
To see if this custom-fit item will work for you please tell us what vehicle you'll use it with.
Make it easier to get into your vehicle with running boards. The added step helps family and friends climb into your vehicle independently, and can also assist you with accessing your roof. Sporty, streamlined boards are custom fit for your vehicle.
Features:
Specs:
Videos are provided as a guide only. Refer to manufacturer installation instructions and specs for complete information.
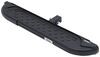
Hello, neighbor, this is Curt with etrailer. And today we're taking a look at the Romik REC-B running boards on our 2024 Toyota 4Runner. Now if you've got any experience with these running boards or if you've got any questions, please leave them in the comments below. We'd love to take your questions and your stories and share them with their other neighbors in order to help them make the best decision for themselves. Now, if you're the owner of a 4Runner, you're probably no stranger to that high ground clearance that you get while getting in and outta the vehicle, and that's where a nice set of running boards can come in really handy. And what the Romik REC-B running board offers is a really sleek, modern design that doesn't really sacrifice that rugged aesthetic that most 4Runner owners are looking for.
It's got a nice tapered front that helps to streamline it. It has this lip in the back and it has no lip in the front. And what that's really gonna help with is channeling any liquid and debris to come off of the running board rather than letting it pool and collect in the middle where it could actually be more hazardous than anything. It still offers a good set of ground clearance. And one of the really great features of Romik is the customization options that you have when installing the running boards.
Romik allows you to kind of position the board front to back, in and out, and more importantly, up and down on the brackets so that you can raise and lower these to be really more for your own lifestyle. And that's important with this because you do want to get that balance of getting in and outta your vehicle safely without sacrificing too much ground clearance here on your 4Runner. And I'm hearing the second row, and as you can see, we've got full coverage of both door openings. This running board offers a 5 1/2 inch wide step, which should be enough for really almost any shoe size getting in and out of the vehicle. So, you know, if you've got kids that you take in your 4Runner, if you have to pick up grandma and grandpa, they don't really wanna make that 22 inch step to get in and out of here.
And this 4Runner is an SR5 model. There are other options in the 4Runner that are even higher than that 22 inches. This is really gonna cut down on that and help everybody be more safe. As a matter of fact, this is actually going to take off about seven inches from that step, which is really pretty impressive. So, you're gonna go from a 22-inch jump to about a 14-inch jump, and then the rest of the way in.
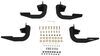
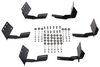
And of course, another really, really popular option with 4Runner owners is using a roof rack. Well, having this running board is gonna allow you kind of a sturdier platform to get up there and maneuver any of the cargo that you have up there in your roof rack or install the bars themselves. With all that being said, why don't we go ahead and take a look at exactly how we got these running boards installed. Before we install our running boards, we have to install our brackets. And before we do that, we have to assemble the brackets for the Romik running boards. Now, a full bracket assembly is going to look like this, and we'll show you exactly how we get there. Now, the brackets are side-specific on the vehicle, so pay very close attention to the diagram in your instructions and making sure you're putting the right set of brackets on the right side. They're also cut out for front, center, and rear to help you know where to mount them on their respective vehicle sides. Now, it's very simple to put these together. What you're essentially going to be doing, and I'll show you on the rear here. We're gonna take it just like that. These bolts here are gonna bolt up into the vehicle. These bolt holes here are going to be for our platform area of the bracket that's actually gonna be holding the running board onto it. Now, on the SR5 model, which is what we have today, which actually kind of sits lower than the other models, it's recommending that we use these holes here. However, with the adjustability of the Romik running boards, we could also drop it a bit if we want to. That's the great thing about these is the customization that you get with the Romik running boards. And to put those together, we used the supplied M10 hardware bolts just like this. So, what we'll be doing is just taking that, putting the bolt through the bracket. And then we're gonna hand tighten it down with the M10 nut, and we'll do the same here. And once we do that, what you'll have the ability to do is essentially adjust the pitch, like we're doing right here. So, it's very slight, but depending on how you want it, you are gonna be able to adjust that before finally tightening them down. But now that we know how to assemble our brackets, let's get under the vehicle and see how to install 'em on there. Now before we slide under while we're out here, let's just take a look at exactly where this bracket placement is going to be and where you're gonna find these mounting points. We've already installed our third bracket, our rearmost bracket here, just to kind of check it out and see how it was gonna go in. So, the third bracket location is going to be there. The center bracket location is right here. The front bracket mount is right here. So, that's where we're gonna find our factory bolts that we need to take out. To do that, we're gonna be using a 12 millimeter socket, and we're gonna go ahead under there and do that right now. Okay, so here we have our front bracket mounting location, and we're just gonna take our 12 millimeter socket and get those loosened up and taken out. (ratchet cranking) And you can set these factory bolts aside. You keep them if you like. But really, most of the hardware that we've seen putting running boards up in here, even if you change 'em out, is generally slightly bigger anyways. (ratchet cranking) So, now that we've got those bolts removed, we're gonna go ahead and line up our Romik bracket here. And really, I'm not gonna tighten these in super tight. I really just want to hand tighten them. You notice that the bolt holes are ovular, and that's so that we can maneuver it how we want to, either further away or closer to the vehicle. So, we're really not gonna tighten any of these down or torque 'em down until we get the running boards mounted as well. And we can kind of see on the vehicle exactly how we like it. So, once I get this bolt put in, we're gonna put in the other one, hand-tightened again, and move on to our center. The center is gonna mount exactly the same as this. Same hardware, same tools. The only difference is the bolts are located a little bit closer together. But other than that, it's the same idea as the front bracket and the rear bracket. And once those are on, we'll be able to grab our running boards and mount those. Now that we've got our brackets installed, it's time to get ready to install our running board itself. So, we've got our running board here, we've got it turned over. So, we're looking at the underneath here. And what you're gonna be finding is three sets of bolts running along these tracks. Now the idea is we're gonna get these lined up with our brackets, and then reapply the washer and bolt once we've got that done. I do think it's a good idea to go ahead and remove the bolts in the washers now. It's just gonna make it easier when you lay it down on the brackets to kind of have them pop into their tracks. So, once we get that done, we'll lay our board down on the brackets and get our bolts lined up. So, we've got our board here, we're gonna get 'em on our brackets. And as you can see, the brackets are slotted. So, I'm just gonna line up that middle bolt here and try to just kind of get this in as close a position as I can. And while I'm doing this, I'm also taking a look at exactly what kind of placement I want these running boards, because before I tighten this down, I wanna make sure that I've got it where I want it, as far as closer or away from the vehicle, or further forward or further back. So, the next thing I'm gonna do is go here and get all the bolts lined up into the slots, and then we'll take a look at exactly where we want to have it placed. So, now that we've got our bolts lined up in our brackets, we're able to still slide it forward and back to get it into our position. We have a little bit of room to maneuver it in and out. However, there are some things on the 4Runner that will impede us from kind of doing whatever we want with it. Mainly, we're talking about this tab back here. Now, that is not really allowing us to get further into the vehicle, although to be honest with you, I think the placement of it kinda right up against it is good. It's still not anywhere outside the tires. And it's still gonna give you plenty of room for your foot once the door is open. However, if you prefer your running board to be a bit closer in, you can remove that. Another way around it would also be to simply lower the brackets. So, the brackets, remember, can be raised and lowered through these bolts here on that second piece of the bracket. We've currently got 'em set at the manufacturer recommendation for the SR5, which is kind of at its highest point. But remember, you've got other options to lower this bracket. So, you could actually lower it, probably only take one notch, to get it below that tab if you really wanted to. However, bear in mind, the lower we get this running board, the less ground clearance you will have, if that's something that's important to you. Now, as far as how forward or how far back we can put it without removing that tab and without lowering it, I have a preference for keeping it further forward. One, I don't wanna move this so far back that it's gonna get really close to that tire. It shouldn't be in any danger of really interfering with it. I just like the peace of mind that it's not really gonna mess with it too much. I actually kinda like it being a bit closer here to the mud flap. It doesn't necessarily have to go right up against it, but I do like the idea of it being closer. The closer you get to this mud flap, the more of the underside of this running board is gonna be protected from debris. Now that my running boards are in the place where I think I'm gonna like 'em best, I'm gonna have to be a bit conscious. 'Cause remember, we're not moving this all the way in up against the bracket, so it doesn't give us that kind of automatic even parallel with the vehicle. When I tighten these down with the washers and the nuts, I'm gonna have to take a bit of a measurement here where it is on the bracket and make sure that the other two brackets match that measurement. That's how I'm gonna ensure that my running boards are running parallel with the vehicle. So, we're gonna grab those nuts and washers and get to getting those set in place. So, I'm gonna go ahead and set the center bolt first, and I'm gonna tighten it, but I only want to tighten it down enough to where I'm really kind of holding it in place. (metal clacking) You don't want to overtighten these, especially with the running boards being aluminum. If you overtighten them, you could damage them. So, I'm just getting 'em down snug enough that they're not gonna move too much on me and I can get my measurements and make sure that all three brackets line up perfectly. So, I'm measuring from the center of the innermost bolt to the edge of my bracket, and I've got a 2 1/2 inch measurement. All I'm gonna do now is make sure that my other two brackets have that same measurement. Then, I know that my running boards are going to be parallel with the vehicle. Now that we've got everything set, we're ready to go ahead and torque all of our bolts into place, starting with the running board to the bracket. We'll then torque down the bolts to the bracket extension. Lastly, we're gonna torque the bolts from the bracket to the vehicle. Now, pay very close attention to your torque specs. Each of these bolts takes a different torque spec, and we don't want you to do anything that would hurt the running boards or your vehicle. All right, so I've got everything tightened up. I'm on my last bolt here. We've done our running board, we've done our extension, and now we're about to finish up bolting it to the vehicle. (torque wrench beeping) And there we have it. Everything's good and solid, and we're ready to try it out on the road. So, there's a look at the Romik REC-B running boards on our 2024 Toyota 4Runner. I'm Curt with etrailer. Thanks for stopping by.

I would have given them a 5 star review. But the instructions for the install needs some clarity. I have a good understanding on hiw to follow an Operation Standard, I even wrote quite a few at my place of work. I have been manufacturing for over 23 years.
I did email their support team and they did provide me with some valuable advise. That advise needs to be added to the install instructions. But the running boards do look good. My wife loves them!
Confirm that they work on the 2026 Sportage X-line (Gas engine.) Love them...adds a nice aesthetic. But, directions are horrible as someone else has stated. Also, I had to flip flop the attachment of the articulated brackets to get the to align properly. That took a bit of experimentation on the first side. Second side was a breeze.
Info for this part was:
At etrailer we provide the best information available about the products we sell. We take the quality of our information seriously so that you can get the right part the first time. Let us know if anything is missing or if you have any questions.


Thank you! Your comment has been submitted successfully. You should be able to view your question/comment here within a few days.
Error submitting comment. Please try again momentarily.