
PRP Custom Seat Covers - Front - Black and Navy Blue


To see if this custom-fit item will work for you please tell us what vehicle you'll use it with.
You put thought into every upgrade on your vehicle. These covers reflect that, with a tailored fit and high-end vinyl that make your front seats look and feel better. More than protection, they bring a sense of completion to the interior.
PRP's seat covers are built to match the exact shape of your rear seats, with precise cutouts for belts, headrests, armrests, and airbags. The materials stretch tight across every surface and hold their shape, with stitching that mirrors the factory layout down to the last seam. Once everything is installed, the covers stay put. They don't slide out of position or need constant fixing, no matter how many times people climb in and out. You also won't lose features you've already paid for, like seat heating and cooling. The design feels intentional from every angle, and that kind of fit makes it easier to take pride in keeping the rest of the interior looking sharp.
These covers protect against the wear and grime that builds up over daily use: sweat after the gym, coffee spills on the way to work, dog hair from your furry co-pilot, and all the other messes you can imagine. And if you get them dirty, just wipe them down with soap and water, no need for special cleaners.
Everything you need is built into the covers. Zippers, stretch panels, and reinforced buckles let you install the seat covers without extra hardware. Just remove the headrests, slide the covers over the seat backs and cushions, tuck the drawstrings, zip the flaps, and put the headrests back in place. The console lid cover wraps in place and secures underneath with a hook-and-loop strap. The install can be done by one person and may require a Torx bit or screwdriver to remove trim or factory hardware, but no other tools are required.
California residents: click here
Videos are provided as a guide only. Refer to manufacturer installation instructions and specs for complete information.
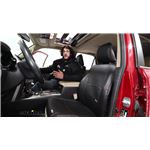
Hi Matt with etrailer. If you have a 2015 Toyota 4Runner and you're just looking for something that's gonna give your seat, just a nicer finish to 'em, something that's gonna last a long time and it's gonna look a little bit more OEM, compared to some other type of seat covers out there, then the PRP Custom Seat Covers are gonna be a great option for you. So let's check 'em out. Now if you do have a little bit of experience with these covers or you do plan to go with them, let us know what your experience is like, what the installation is like. 'Cause we'll discuss that a little bit later in the video and just how they feel overall. But what I'm about to do now is just take off one of these so we can kind of compare what comes with your vehicle versus what this is gonna offer you.
And going a little bit more into getting this to have that more seamless look across the complete interior of your vehicle. You'll notice spots like this, that still retain that OE color and if you wanna cover that up, PRP actually has other sets on our website. There's gonna be one that covers up the center console, so you can get this more seamless look all the way across the front side of the vehicle. And if you even wanna pair that with the back half of your vehicle later on, there's actually be ones for the rear seats too. So you're gonna have the whole interior of the vehicle kit it out like this, which I think will look pretty nice.
And it won't only look nice but it's now gonna feel nice too. So when I come in here and take a seat, I notice immediately this is feeling pretty good. It's not shifting at all, but just the comfort of this, is actually a little more comfortable than what comes standard in my vehicle. And we can see there's really not that big of a difference between the seats right now. And it's also gonna depend on what type of fabric these seats are made of.
If you have leather ones, it's gonna be pretty minimal. And that's something we're looking for because, we wanna want something that has more of that custom OEM finish to it. It's still gonna retain all the same type of stitching we have. We have some additional ones too. And I like these 'cause it has this red finish to it, just makes it a little bit more appealing.
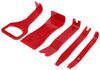
Now if you're not a big fan of the red finish, it comes in different colors too for the stitching. And we're not gonna block anything vital to us. So anything like these buttons we have right here, that's gonna let you adjust your headrest. It does show that brown finish through too, but it's still better than blocking it. We're also not gonna block our belt buckle here on the side and we're not gonna block anything like these buttons to adjust your seats. But now that we've taken a quick look at what the difference between these two are, I'll put that seat cover back on. But with this thicker material, it's gonna be great if you are someone who's kind of going outside getting kind of muddy or wet, this is gonna prevent from it from kind of seeping inside your seats and just making sure everything stays nice and dry, since it will be water resistant. And on the flip side of things, if you're someone who does have a 4Runner, you might be doing a lot of off-roading. And typically, if you're in those kind of dirty situation or just messy situations, it's gonna find a way to get inside your vehicle. So you're gonna want something that's gonna be pretty easy to clean too. You'll find that we have a little bit of dust here, coming by just my finger kind of smeared off some of that. But with some type of rag, you're gonna find a lot more traction with that. And there right there has made a big difference. And this is dry too. So if I came bending here with some type of leather cleaner or even just a a wet rag, it's gonna make a big difference. Now we'll say if you're getting into a lot of extra dirty situations, maybe more so on a daily basis and you don't wanna always clean this off each time you get out of those situations, then I'd also recommend even using the etrailer seat cover with this, 'cause that's gonna be more of a universal design. That's great because, that's just for those real quick messes. You know you're about to get into something real messy, you need to cover this up, protect your seats, and then once you're done with it you can kind of wash it. But I think it works great even paired with this. For when you're not in those dirty situations, you want something that's gonna be reliable, gonna look nice in your vehicle and still work well and not block anything or impede anything on your seats, and I think this does a great job at that. Now, if you wanna see what it's gonna look like installed, what that process is gonna involve, because with a customized seat cover it can be a little bit involved sometimes. Sometimes you'll find that people have to remove their seats completely. We're not gonna be doing that today, but it is definitely more involved versus a more universal style. So if you wanna see what that process looks like, just stay tuned, we'll walk you through that. So the first thing we're gonna do is just start at the top, I find it easy to just to start from the top and then work our way down. What's gonna help us out is if we just adjust our seat some, so it's just at a easier point that get to. You could completely remove this seat, and a lot of times it will make it easier, but if you don't want to deal with the hassle of removing the seat, we're gonna still install this with our seat in place. So I'm just gonna remove the headrest by pressing that button, pulling up on that, and taking it off. I find it typically easiest, easier with the headrest just to do it this way. The way you're gonna install it is if you look at this, we can match up these seams. It should be in the same orientation. This little logo in the back should be facing the back of the headrest. Once we figure that out, we'll just kind of pull it on and we'll say today is a colder day at etrailer, and this leather is not gonna be the most pliable for me. I'm gonna do everything I can to loosen this up some. You might, if you're in a similar situation as us, you might need to get a heat gun and just lightly go over this. You don't want have it over here too long, you might damage to the leather. But just lightly go over it so you can get this to work with you a little bit easier. But if you take your time with this, you'll be able to get it in place. And this is looking pretty good now. Something I'll do if I'm really struggling with this, if you, if the heat technique is not working for you, you can just find a way to put additional weight on this. So I'll typically just come over here, pull on it, use my body weight to get that nice and tight. So we're gonna have these hook and loops on either side. I'll just pull that into itself, get the grab on that side and pull over to the other. There you go. This will be pretty good there. You also gonna have this section here on the side. There we go. Now it's looking really good. Just kind of make sure like, there's ain't any points that are kinda catching on itself, the seams are aligned and there's no air pockets in there. Once we're done with that, we're not gonna put this in place yet, because we're gonna need the head rest removed to put on the second piece. With this piece, this will have a left or a driver's side and a passenger side, and we need to make sure we have the right one. So on our driver's side you're gonna notice this tag that says "side airbag". This is gonna line up with this other tag that says "airbag" on your seats right here. So as long as these tags are on the same side, you should be good. And then we can actually start putting this on. The best way of doing this is just kind of taking your time with this. We're just gonna line up the contours with your seats. There you go. Again, this is gonna be pretty tight, so something's gonna going to help you out a lot, is just going from different angles at this. You might have to adjust your seat a couple times, just so you can get some extra leverage out of this. It's gonna go a long way. I'm just gonna try to shimmy it down, going back and forth. And if you have anything in the back pockets of your seats, I'd recommend taking that out, because you're gonna wanna make sure nothing's gonna be impeding your way. And we're almost at a good point to really talk about the top of this. Now if you've been kind of, making sure this is stayed aligned line with your seats, I'm might have to come in the backside of this real quick. You're eventually gonna get to the point where you can start missing with those holes on the top. Notice how this hole is almost lined up with there. I wanna make sure this stays lined up but, we're also gonna be wrapping this around that tab there. I'm just gonna take my time going around it, making sure those edges are caught, applying a decent amount of force to this. So we have it around one. Do the same thing on the next one, starting on one corner, just working my way around. And there we have it with a little bit of work we got it around. But you notice it's kinda loose right here. So I'm still gonna work with this a little bit more until we have a little bit of a better fit. And what I did now is once I get this in to a pretty good spot, it might not be perfectly tight but it's dang close. I'm just gonna go to the end of this and I'm gonna tuck this section into that crease down here. And you notice I changed the orientation of my seat. I find it's gonna be a little bit easier to do it like this, since it's gonna have less tension against it. Just gonna tuck that through there. And now I'm gonna come behind my seat and I'm just gonna lift up on this flap that comes with the seat cover. We'll lift up on that, so he is out of the way. And underneath here we're gonna have this back flap. It'll be this section here. We need to get that out of our way. So what I'm gonna do is, there's gonna be some straps holding it under and placed underneath. Already got one loosened up, I'm gonna find that secondary one, And a lot of times these are gonna be held in place in different ways. One time sometimes there's just gonna be one elastic strap kind of wrapped around some of the hardware underneath your seats. And this time we're dealing with some hooks. I'll show you what they look like a little bit more in a second. Here you go. This is what the ones I have look like. Again, that's just grabbing onto some existing hardware underneath the seats. And once both of those are loosened up or outta our way, then I'm gonna just fold this section up out of the way. Where I'm gonna fold that up is just right under here, underneath our flap on our cover. And with that in place, I should be able to reach in here and kind of pull this little strap here. That's the front side of our cover that we installed. And if you can't get a good grip on this or you can't get it to come out very much, what you could do is grab some pliers, I got some right over here. You wanna make sure you're grabbing some with a kind of a thicker tip to 'em. You don't want something like a needle nose plier, because that's more likely of tearing something. Try to pull on that a little bit. There we go. And we just do that all the way across. And after a while kind of pulling on this, taking my time, I'm just gonna grab it by the front side, here, and make that connection underneath. Kinda see where these two are connecting. Where we had that front of the cover that came through the seats. And this backside that's grabbing on the hook and loop, one you've done that, you're just gonna try to get that to connect all the way across. And this is a good point to really check how this is feeling. Once we have that synced down, we're just looking to make sure there's no wrinkles in here, everything's feeling flush. A good point to check is maybe here at the bottom and over here on the side of it too. Sometimes I'll find that we do get a lot of wrinkles at this point, but right now mine's feeling pretty seamless. It feels pretty smooth. And then that one that's done, we can move over to the last section. And that's just gonna be this third piece here. You can tell it's a little bit different 'cause, it's gonna have this other flap here. Gonna have these little tabs on it. And we want to make sure this is on the right side, 'cause the are made custom fit to the driver and passenger side. So if I flip that around, you're gonna notice we have the string on the bottom and the side closest to me, you're gonna notice there's a little bit different, there's a little bit more of it, it's easier to spot and see. And we want this side to be a little bit more hidden. And that's why when I flip this around, this is going to be more close to that centric console there in this orientation. So just make sure yours looks like that. So I'll just flip this around again. I'm gonna undo this knot here, and then we can start putting it on. With this untied, we can start installing this. So I'm actually gonna start with this back flap. And what we're gonna do is we're just gonna tuck that to that crevice right there. I wanna make sure our strings don't get caught up in there, so throw that to the front side. There we go, that looks good. Shove this in there. I am gonna go till right about where that seam is right here, where that flat for the seam is. This is a good point to also make sure that these seams here kind of line up with this. Get those to kinda line up some, because once we tighten this down it's gonna be kind of hard to adjust. And let's move over to the string now. What we're gonna do is tuck this string through where the seat meets this kind of plastic frame. And I'm just gonna tuck it in there. Sometimes you might just have to shove your hand down there too, so we can feed through better. It might take a few seconds, and it'll eventually just come out. You just pull on that. There you go. It's a good to start point. I'm not gonna pull on it too much. I'm just gonna toss this underneath here, 'cause later I'm gonna come through the backside and grab that. If you wanna make this a little bit easier, what you could do is just push your seat back some, if your seat's gonna be back all the way then, just leave it there. And then when you go to the backside you can push your seat up. This is a little bit easier to find, but we also do repeat that on the other side too. And this other side is gonna be a little bit different. So if we notice, the exit point of the string is a lot further up, closer to your buckle here. What I'm gonna do is, instead of going in from the front side, I'm gonna go from the backside. I'm gonna go underneath that belt buckle, pass it through like that. That one's looking pretty good. And then, we can actually start pushing this cover into place. Gonna get this kind of fully in place. I'm just gonna tuck this into the paneling on our seat, and I will say try and do this with your hands is doable. It'll be pretty tough though. So what I recommend doing is just grabbing the trim tool. And we have plenty of these on our website and this is gonna go a long way. Of course you could use a flathead screwdriver, but you run the risk of tearing through that leather. So that's why these are a little bit more helpful. And if you can find the ones that are just one solid piece that's gonna give you more surface area, so it's less likely of damaging anything. So I'm just gonna start tucking it into place now, and we're gonna do this all the way across. You're gonna notice you can get that bottom section pretty good and tight, but there's always somebody a little bit of looseness on the backside of it. That's 'cause we still need to tighten them down with these strings. I already got one started over here. The way you just do it, it just push these strings through the holes just like that. Now I'll probably push this one through here. And you can do this a couple different ways. I think what I'm gonna do is push that center one or push both these strings through the center one. There we have it. Like that. Pull it down, this gonna help give it a little bit more even on both sides. If you wanna tighten this pretty well. Take out any of that slack we have. If you have any pliers, you can pull on it with them. There we go. And then now you can just do whatever type of knot you wanna do to secure this down. And if you find that this excess string is kind of annoying, you can cut this, if you don't ever plan on taking this off again. I'm gonna leave it on just in case, if they change their mind and want to adjust something, they can do it. And from here, we're gonna pull this down. We're just gonna secure this flap down with this elastic band and there's gonna be multiple points that you can secure it to underneath. Everyone's seat's probably gonna be a little bit different depending on what package you have. A lot of times there's gonna be that existing hardware that we took this off originally, that you could secure this down to. If you have something else, you can probably use that too, just as long as it's gonna be secure there. And the last thing really you have to do is just put this back in place. Making sure it lines back up with those holes, as it goes down. And that's looking really good. This isn't a bad time to kind of come back through, just make sure everything is feeling flush. If it's feeling maybe a little bit loose, just come back through a couple of points we had earlier. Especially these points, we can kind of tuck it in on the side, grab that trim tool, try to push it a little bit more in there. And that will take away any of that existing slack, if there is any. But again, this was just a look at the installation and some of the features of the PRP Custom Seat Covers, in our 2015 Toyota 4Runner. I'm Matt. Thanks for watching.
Info for this part was:
At etrailer we provide the best information available about the products we sell. We take the quality of our information seriously so that you can get the right part the first time. Let us know if anything is missing or if you have any questions.


Thank you! Your comment has been submitted successfully. You should be able to view your question/comment here within a few days.
Error submitting comment. Please try again momentarily.