
The roof on your slide-out collects leaves and debris when it's extended. When you retract the slide, whatever landed up there comes with it. This slide-out topper rolls out automatically to cover the roof and helps keep that mess out of your RV.
When your slide room's extended, the roof's exposed, and whatever landed up there comes right back into your RV when you retract it. Do you really want water, leaves, pine needles, and bird droppings inside? Probably not. A slide-out topper rolls out automatically when the room extends and covers the roof while it's out. Rain hits the fabric instead of the roof membrane and runs off the sides. Debris lands on it and typically blows away or falls off as the fabric rolls back in. Your slide roof stays cleaner, so you're far less likely to pull that mess inside when it's time to retract.
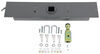
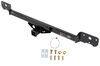
Many RVs come with factory-installed Solera brackets already mounted to the wall. This slide topper pairs with adapter brackets (e76QV - sold separately), which slide over the existing Solera brackets and secure with two set screws each. That lets you use those original mounts instead of removing them and drilling new holes into your RV wall. If the brackets are already in place and sealed, there's no sense making new holes just to solve a problem that doesn't exist.
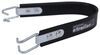
It's not surprising when a slide topper starts to wear over time. The same areas take the strain every time the slide moves in and out, and eventually that constant tension adds up. This topper is built with that in mind, reinforcing the zones that see the most stress so it holds up better through repeated use. In key areas, the fabric is bonded rather than relying only on traditional seams, helping improve durability and resistance to wear where it matters most.
Any time you bolt something to an RV wall, you've created a hole. And holes are where water goes. If those holes aren't sealed correctly, water will eventually get inside. To prevent that, this slide topper includes butyl tape on the mounting brackets. As the bolts are tightened, the tape compresses and spreads into the small gaps between the bracket and the wall, forming a continuous seal instead of relying on surface contact alone.
Both. If your current topper fabric is sagging, torn, or holding a puddle every time it rains, this is a direct replacement. If your slide never had a topper to begin with, your RV's getting an upgrade. Either way, you stop dragging water and debris inside every time the slide comes back in.
Long slide toppers are awkward to move and even easier to damage in transit. Rather than shipping in one oversized carton on a freight truck, this topper ships in protective packaging built to move through standard carriers. That reduces the risk of bent tubes, crushed components, and dealing with shipping damage before you even get it installed. It also helps keep shipping costs more reasonable.
To get the right size topper for your RV, measure from the outside of the flange on the left side to the outside of the flange on the right side. That's the fitment width. The fabric is narrower, typically about 6" less (3" on each side), since it fits inside the assembly.

Videos are provided as a guide only. Refer to manufacturer installation instructions and specs for complete information.
Hey there, neighbor, it's Kevin here with etrailer, and today we're gonna be taking a closer look at etrailer's line of RV slide toppers. So if you own a trailer with slide-outs, you most likely know just how annoying it is to have to on your day of packing up, usually Sunday morning, you're about to leave the campsite, you're getting all your stuff in and then you go to bring your slides in and you got a bunch of leaves, twigs, branches, random things all on top of your slide-out, scratching up the roof membrane and fighting it when you want to draw it back in. Well, that's where a slide topper comes into play. Anything that now is gonna fall on us from a tree, whether that's gonna be those leaves, squirrels, other random debris that might fall out of the tree on you is gonna hit our fabric first and then roll off. And that's gonna do the same for rain as well. So we're gonna be getting a lot of different benefits, which I'm gonna go over here in just a little bit with our awning, aside from just that protection from all that falling debris.
And then also, this is gonna help protect from UV rays. So one of the biggest things that starts to wear out your roof membrane is the Sun. As it starts to wear on there, you might see little holes starting to form, maybe some soft spots on here, and then you throw branches into the mix, you're getting it kind of ripped up, tore up on there. And it's just taking a lot of abuse, where now we can have that be on the fabric instead. Because if we ever needed to replace the roof membrane on here, the entire slide-out has to be removed, which is a huge process just to get that roof membrane off.
Whereas swapping out the fabric on an awning can be done in just a matter of minutes. So go along with that, now that we're reflecting those UV rays or just having them be absorbed by our fabric here instead of going into that roof membrane, it's now also gonna keep that slide-out box just a little bit cooler. It's gonna help reflect that Sun away from it. So then it's also putting less wear and tear on our AC unit 'cause it's not having to kick on as often. So just one little simple thing can really just give you a lot of bang for your buck and really kind of save you a lot of hassle, so that way you're not, like I said, on those Sunday mornings, getting up on the roof, which is probably gonna be covered in dew, or having to lug out a ladder, which is now one more thing you gotta bring with you on the trip just so that you can kind of sweep off the top of the slide-out 'cause it's already gonna be done for you.
Now there's a variety of different lengths when it comes to our slide-out toppers. And what you're gonna wanna do is measure from the outside edge to outside edge of your flange. But there's gonna be a few other factors that are gonna play into that, and I'll get real into that a little bit later in the video and actually show you what we should be measuring for. But I kind of wanted to just talk about the variety of sizes here. So there's gonna be a bunch of different lengths and each one of these is gonna fit a range of lengths.
So it's super important that you measure, figure out what your actual width is for your slide-out, and then also measure anything that's gonna be on the sides of it. So if there's any like awnings, windows, anything that's gonna potentially interfere with this awning when it goes up, we wanna make sure that we're taking that into account, and potentially sizing down your awning if that is the case, or just making sure that we have enough range in there that we can kind of slide it to one side to kind of avoid that issue. 'Cause, like, if you look at ours today, we have a regular patio awning right next to our slide-out. So that kind of limits how much space we really have to get our side topper in place. So with that being said, why don't we show you how to measure. Now, if you're by yourself. What I like to do is just put a little piece of painters tape on my tape measure. That way I can kind of tape it up to the edge of our flange. This portion right here, people will call the flange or they'll call it the T-molding, we're gonna want to get the outside edge of that to the outside edge of the other side. That is gonna be the measurement that we need in order to pick out the correct length. So I take my tape measure down, I'm sitting right at about 144 1/2. Now the other part of this is that we might have some obstructions in the way. The arms themselves that actually hold the roll tube are gonna stick out further than our slide-out. So we need to make sure that there's enough clearance. And if there's not, we might need to size down. In some cases, if you're real tight on that measurement, you might be able to just kind of slide it over a little bit one way or the other to avoid some of those obstacles. Like right now, we have an awning, a 12-volt powered awning that's gonna come out. Well, this is gonna live here and interfere with our arms, and it's only given me about 3 1/4 inches. Realistically, I'd wanna see about five. Since our slide-out is about 1/2 inch bigger than what our awning is actually meant for, and it's gonna be something where I can kind of adjust it down. It shouldn't be a problem. The problem is is if you are a little bit too big or a little bit too small and you start sliding stuff that can kind of throw off where your brackets are gonna need to be. So if you look up at the top of our slide-out on that T-molding up there, you'll see Solera brackets already installed on this trailer. So that is another thing that we'll need to kind of take note of, because if you do already have those brackets, I'd highly recommend picking up the adapter kit to go along with your awnings, so that way you can just bracket right up to that and then you don't have to worry about drilling any holes into the slide-out and kinda wasting your time or putting more holes in your trailer than what you realistically need. Following that up, we also need to have our extrusion rail, but we wanna make sure that we have a about a three inch, maybe 3 1/2 inch spacing between the center of that C-channel that's on our extrusion rail up on the wall and then where the arms on our roll tube are gonna kind of live at. So we wanna have that, and that's just so that you have that nice slope. So all of the rain water, any kind of branches, leaves, anything that's gonna fall down on top of your slide-out will just kind of slope right off and fall onto the ground. So getting that to the correct slope is gonna be a super important factor here. And now in our case, it's already up there. I'm gonna get one of the arms with the adapter and I'm gonna put that up on there. We'll take a measurement real quick, make sure that that is three inches, space-wise. If not, then what we're gonna have to do is potentially remove the existing extrusion rail and then reinstall the new one that's gonna be included with our kit. So here we are in the warehouse. This is exactly you're gonna be getting when you order a Solera slide topper is you're gonna get this super long tube. Now, obviously, this one is meant for 17, 18, or 19 feet, so it's gonna be super long regardless. But instead of having to freight ship this to you, which now is adding on a huge expense and also taking more time because this isn't something where it's just gonna ship easily in a day. With ours instead, it's gonna be in that modular small packaging, so it can easily be shipped not through freight. So that way we're taking all of those shipping costs out and passing those savings on to you. And then also making it a lot easier to manhandle it around because I can tell you, for one, usually when I get some of these down in the shop, I'm having to have a second person come and help me 'cause it's just a lot to kind of maneuver around, especially in our tight shop base. So swapping over getting that smaller package is gonna be a lot more convenient for you and gonna save you a lot of money. So instead of that huge roll tube, this is what you're gonna be receiving, at least for the 144 inch. Now what we're doing when we unbox this here is you're seeing your fabric and your hardware first, so you can grab your fabric out. This would be something I'd probably wanna unfold, kind of let it sit in the Sun a little bit, maybe get some of those wrinkles out beforehand. So if you have a nice long driveway, throw it out there, kinda let the Sun warm it back up. From there, we're gonna have a few other parts. So we have our poly cords. That's how we're gonna run through the beads into our fabric for both the extrusion rail and also for our roll tube. We have our mounting brackets. Now in our case, we have those Solera awning bracket's already pre-installed on our trailer. So these ones, we're not gonna use, we're just gonna put these off to the side because we're gonna be using the adapter bracket so that way we can just tie right into those. And then finally, down at the bottom here, we have our roll tube. And you'll see, it's gonna be nicely labeled right or left side, so that way you can easily know which orientation this is to sit in. In our case, just due to length, we're gonna have a center tube as well. But there's also going to be some goodies that are hidden inside of our tubes. So there's gonna be connectors that will go between each of our tubes to help strengthen that connection between each one of them. And then you'll also find all the extrusion rail that you might need for your install if you don't already have one installed hidden inside those tubes as well. So pop those bags open, dump out the contents that are inside each one of them, and then we can begin building up our roll tube. Now when you're looking at your actual arm portion of the tube, you'll also find those connectors I was talking about, and that's this guy right here in the center. We would then put these together and then we're gonna have some screws we're gonna be inserting there to keep it all nice and tight together. Now starting off building our roll tube, I've put up a bunch of jack stands, so that way I got something I can have it kind of sit up off the ground and support it. From there, I'm gonna start from left and mark work my way down to the right. If you look at your arm on the roll tube, you'll see one that says left one that says right. Left one, obviously, gonna be towards the left. So I'm gonna get that over here. I've got my center tube, which is labeled B. So you'll see, this one says, "A, B," that way you mention it right up. And actually, those stickers should be set to where they should come together, just like so, so that way you know you have in the corrector orientation because this is really only gonna fit a few certain ways on here, so. From there, we have a screw we need to take out and that set screw in there is just holding in our connector for our roll tube. (drill whirring) Pop that out a little bit more. (drill whirring) And then what we're wanting to do is get that connector to a halfway point. So about half the tube, which you can see, middle line, we want this pulled into the tube up to that line, we'll shoot a screw back through there and we'll do that on both sides, so that way it locks this into place. Now, I'll bring in our center tube there. Same thing, just button it right up. Although we are gonna need to grab a screw out of our hardware kit. So I'm gonna grab that right now. Now if you flip it around, there's gonna be two more screws on the other side. We're also gonna have screws towards the outside edges of that connector. So we want to hit each one of those. You'll see, there'll be three sets of them as you roll the tube around. So I'm gonna get those other two on the other side first, so that way I don't have any kind of play between the roll tubes because like you can still kind of bend it a little bit there. And so these get put in place. So I want that nice and solid. Now I've got my right arm here and the other connection point here for us. So same thing, we're just gonna be connecting it up, although this time we've got C and we've got D. So this all lined up properly, making sure that our arms are matching correctly. And then, like I said, I'm gonna work around the inner portion of the tube first and then hit those outside screws. So our next step's gonna be getting our poly cord into our fabric. Now, I've set the fabric out, like I was mentioning before, and we're gonna have on either end a little loop sewn into it, so that way we can slide that poly cord through. Now, you'll notice, there's two differences here between the top and the bottom. The tops gonna be more flat. You'll see kind of more the fabric, little indentations and stuff like that throughout it. And then also you can kind of just tell by the seams, they're a little bit less hidden here on the inside versus the outside, where all you see is just the stitching. So that's gonna tell us this is our outside. Now from there, sliding in the poly cord, you're gonna wanna go with the gray one when you're hooking up to the roll tube, the black one is for when we go through the extrusion rail. So separate these. And then the next step is gonna be actually rolling it up on the tube when we do that. So I want to get this in the correct orientation so I can. So we're gonna look at this from the right arm facing towards the left arm, and we wanna roll this in a clockwise manner, so that way the fabric is going over the roll tube and then going right up to the extrusion rail, so we have that nice slope. So, when this goes on, what I'm gonna want to do is actually have it with the bottom side kind of facing up, so that way I can keep rolling it around. So I'm gonna put my poly cord through, just like I have it laying out right now. And this is sometimes easier if you have a second set of hands. You'll definitely need a second set of hands when you get to the part of rolling it through the roll tube, so that way you can keep everything nice and straight and push it through. But for this, so you can slide through it pretty easily, as long as you don't have any kind of kinks in it just from it being folded. Now we're gonna take one side of our fabric. And the way that I have this setting out is gonna be easier for me to go from right to left. Obviously, if you wanna do it a different way, that's totally fine. Just make sure that you have it rolling in that clockwise position if you we inchesre looking at it from the right arm here. But right at the base of the arm, there's gonna be a slot that's gonna be opened for us to slide in the poly cord in our fabric. So we will get that pushed into at opening. It might be a little hard just at the tip here just 'cause it's got these little like rubber kind of stoppers to help hold it and keep some tension on it too so it doesn't wanna slide around in here. But we'll just keep working this down. Now we're gonna roll this up, keeping it nice and tight to the roller tube here. Now I do wanna stress, it's super important, you'll see on the ends on your end cap, there are some locks that are in place, and that's to hold that tension on the spring that's inside of our roll tube. Don't pull those until we have this locked in place up on the trailer because this arm is just gonna wanna completely unwind itself, and it's under a lot of tension, so you could end up accidentally hurting yourself. And I've grabbed just some painter tape. You could kinda tape the ends of it just to kind of keep it held up like that while you're getting everything else kind of prepped. But once we get up onto the roof, we'll have the poly cord, or not on the roof, but to the side of the trailer, we'll have our poly cord in and then we're gonna be sliding it right through that extrusion rail. So at this point, our roll tube is ready to go. We need to get the one poly cord through it still, but let's go figure out exactly what we're gonna do with our extrusion rail. Now to determine if our current extrusion rail is gonna be good enough or not, there's a couple of measurements you can kind of take to just see what's gonna work for you 'cause we do really want to be able to use those Solera brackets since we have the adapters to make our install a whole lot easier. Well, starting out, we're gonna go from the center of our roll tube, which is this pin that's going into it with our arm down to our connection point. So the center to center of that up to basically this where it's gonna live. So from there to there, it's 3 1/2 inches. So what we need to then determine is, is that mounting bracket going to give us the right amount of gap between that and then the extrusion rail to match up with our two sets of holes that we can use. So from the center of that hole down to the first set of holes is gonna be right around two inches. So that's telling me I've got about 3.5, plus 2 inches, so roughly 5 1/2 inches of space. If I wanted to go a little bit further, maybe go into that second set of holes, that's gonna be roughly an extra inch, maybe an extra eighth of an inch more, so then you're looking at more like six, 6 1/2 inches. So what we can do from there is go hold this up onto the bracket that's out there, that Solera one, and then measure up from the center of this guy down here, the connection point for our rod, up to that extrusion rail to make sure that that is gonna be something that's gonna be doable with the bracket, how it currently stays. So let's walk out there, we'll take a quick measurement, make sure it's gonna be good. If so, I'm gonna throw the poly cord into the backside of our fabric and we can start prepping up our brackets to get those put in place. All right, so we're up at our trailer here. We've got our extrusion rail, we have our mounting bracket. We're gonna be popping off the cover for that Solera one. And I'm just gonna slide this on in the lower position. Oh, there we go. Really tight fit, and that is exactly how we want it to be, so we don't want this moving around on us. Now I know it's 3 1/2 measurement from the extension rod up to the center of our roll tube. So from there, I can measure up 3 1/2 inches. So this is the center of my roll tube. From here up to the center of that, I'm only getting two inches, so that's not gonna give me that three inches that I need. So this would need to actually sit just a bit lower, which is pretty typical whenever we're actually mounting the brackets up because we wouldn't usually put it on the T-molding, we would put it right up in this upper corner, and then we would have the adjustment between the two levels if this was like a Solera one. But in our case, we are gonna have to kind of have this sit just a little bit lower, so that way we can have it get that correct slope to it. So we debated back and forth on how we wanted to get this right, so that way we're getting that three inches of slope. And unfortunately, the only way to do that really is gonna be just removing our extrusion rail and then adjusting it to the right height for it to sit that way. Now we did talk to our neighbor. He does not wanna move it. He is fine with just having the two inches of slope and trying it out. And if it is an issue, we can always take it back down and get it fixed and redo all that. But if it's gonna be good enough, just with how it is right now to where he is getting a decent enough slope, he's just gonna stick with that just to avoid putting some more holes in the trailer, which you'll probably find the same for you too, just because if you have to remove this, it's a ton of screws going down it, you got sealant you gotta remove, and then it's just not gonna look as good as it once did. So now that we've decided we are gonna stick with these brackets, we are gonna go ahead and use the ones that adapt to the Solera brackets. It's time to go back inside, we're gonna put our poly cord through. It's gonna connect up to the C-channel here. And then we can also get our extension rods bolted in place. So next we're gonna be installing our hex rod. This is gonna mount up into the arm. You'll see there's already a pilot hole. We're gonna be drilling that bigger, and we're gonna be drilling through the hex rod before we put our self-tapping screws in. Now there's 12 points on this. So like if you're thinking of this like a socket, there'd be a six point or 12 point. Well, 12 point allows you to turn this different ways, and we don't want this to turn it away where we're gonna get the edge of it or the corner lined up with our hole. We want the nice, flat side there so we have something easy to drill into. So make sure that you are putting it in there correctly. You're fully seating it in, so like I've got it pressed up all the way up to the edge of the inside here. And we're gonna take 7/32 drill bit. We're gonna drill through not only the arm, but also into our hex bar here, so. Now I'll take the 1/4 inch self-tapping screw included in our kit and we're gonna run that through. (drill whirring) Be careful. You want to get it just until it stops. If you keep trying to turn it past that point, it's gonna wanna rip that head right off because you're putting way too much tension on the head of it as you start going through these thicker metals here. So just repeat this process over on the other side and then grab your brackets. It's gonna be time to put this up on the trailer now. So now we're gonna be sliding our fabric into our extrusion rail. And one thing I like to do is take my needle nose pliers. And on the tip of it, I'll kind of bend it out a little bit more, so the openings a little bit wider, gives us a little bit easier of a transition in. So grab your bead, start slotting that through, and I've got three ladders set up. I've got a guy behind me, guy in front of me, so that way we can kind of hand it off and leapfrog each other to get this awning in place. All right, from there, I'm gonna get my bracket lined up, and I'm gonna go with the top hole on here, so that way we have this sit a little bit lower, we get more of a slope. But I'm slipping it on. It's a little hard to see with the fabric anyway, but I'm slipping it onto the extension rod at the same time that I'm trying to slip it into this Solera bracket here. But you get have it perfectly lined up 'cause there's very, very, very tight tolerances on this. Kind of pinching a little bit. I'm gonna grab my rubber mallet. I'll give it a couple love taps. We'll get that to fo come over. All right, I got that nice and even. Now we'll grab our set screw. And then from there, we can kinda shift this back and forth, 'cause like we talked about at the beginning of the video, there's gonna be a little bit of a lean more towards this side just because we have that other awning so close to our slide-out over at the right side here. All right, I got my little set screw. It's gonna be these guys. You'll see four of those in the kit. And these are gonna require a three millimeter Allen key in order to install. Now we'll get those threaded in. Get that nice and snug. And we'll get our second one in, and then we can switch over to our other bracket. All right, now we would wanna move this around and get it centered. We've done that so far. We have it to where the fabric is just really winding up with the box. Not really interfering with our other awning over there. We actually came out pretty good. So once again, we're gonna take that 7/32 drill bit. We're gonna be drilling through our bracket here and then into our hex bar. And we're gonna lock that in place with some more of those self-tapping screws. I got that one in just to kinda lock it in place, so it doesn't move on me while I'm drilling the other one. Now once you get both of those brackets anchored up to your extension rod, it's now time to pop out the little cotter pin that is securing the spring here. And while you're doing that, you want to grab onto the roll tube and roll it towards the trailer. That'll kind of release the tension on it. You can then pull it out. Now this isn't gonna spring out just yet 'cause they still have to get the other side. So I'm gonna walk over there. I'll get that real quick. You'll see this start to wind up real tight. So now for our next part, we're gonna be running the slide out in and out a couple of times. The fabric is still a little loose because it's not secured into the extrusion rail yet. So what we're trying to accomplish here is try to work out any wrinkles that we might have by opening and closing it, and then also kind of pulling on the fabric itself and kind of stretching it outwards in the extrusion rail so we can get that nice and tight. Then we're gonna have some self-tapping screws. We're gonna drill through that extrusion rail right into that bead that we put through the fabric. That's gonna lock it in place. So I'm gonna run this in and out a couple times. We'll see how it looks, see what we need to adjust, and if we need to work any more wrinkles out. And then we'll start getting those screws put in. So, at this point, once you're happy with it, if you're not happy with it, you keep running in and out and what you can kind of do is massage it out, so kind of roll back the tension on the tube and you can kind of force it down. The wrinkling that I'm seeing right here is more so just this needs to sit in the Sun for a little bit and it'll kind of flatten itself back out. But I'm talking about when you see some wrinkles, there's like real big folds in it you'll see sometimes. That's where you really want to kind of try and fix that and work it out before you fully seat this in place. Now once you're ready, we're gonna go about 1/4 inch in from the seam here. So there'll be two seams running down this. I'm gonna go, like I said, 1/4 inch in. And since this is a rounded surface and we're using that really, really, really small self-tapping screw that's included in your kit, I'm gonna look kind of pulse the trigger. And I'm aiming to stay inside the center of our C-channel here. And I just want to go through the metal, go into that bead, and then stop. (drill whirring) There we go. Now that locks it in place so this can't move side to side anymore. And we're gonna do the same thing over on the other side of our awning. Well, that's gonna do it for our look at etrailer's line of RV slide toppers. My name's Kevin. And if you still have some questions on trying to pick out the right slide topper size for your RV slide-outs, please feel free to reach out to us via our Ask the Experts link, a comment on this video, or a phone call to our customer service department, and we'd be happy to help you out on your journey.

Info for this part was:
At etrailer we provide the best information available about the products we sell. We take the quality of our information seriously so that you can get the right part the first time. Let us know if anything is missing or if you have any questions.


Thank you! Your comment has been submitted successfully. You should be able to view your question/comment here within a few days.
Error submitting comment. Please try again momentarily.