
To see if this custom-fit item will work for you please tell us what vehicle you'll use it with.
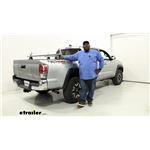
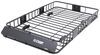
Easy to load and unload, the low-profile CrossBed truck bed rack keeps all your gear within reach. This rack lets you carry a rooftop tent, kayaks, a cargo basket, or other gear on your outdoor adventure. And it leaves the bed free for more cargo.
Features:
Specs:

Videos are provided as a guide only. Refer to manufacturer installation instructions and specs for complete information.
Hi, I'm Matt with etrailer, and today when we talk about the Malone Bed Rack on the back of our 2022 Ram 1500. This will be a great option for anyone who plans on going and doing a lot of activities for a long time. So maybe you need some extra storage and you're running outta space in your bed, you're gonna be able to store things on top of your crossbars too. This is gonna be great if you need to put any additional items like skis, snowboards, or anything else like that. So let's take a closer look at these. Now this system is gonna be comprised of three parts, so let's take a closer look at each one.
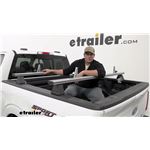
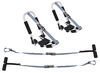
So we're gonna have our 72 inch Malone bars up top and they're gonna have this rounded edge on the front side to help them be more aerodynamic. And we're gonna have this T-channel as well, so you can put any of your T-channel accessories. And then beneath it we're gonna have our towers and those towers is just gonna sit on top of your bed rails. They're pretty straightforward for the most part. And then we have our clamps that hold down the towers.
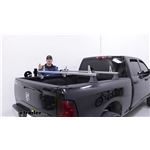
Now I'm not a big fan of these clamps just for them having multiple parts to them. So we have these two clamps that connect together with a bolt that runs through. And when you have all these moving parts, it's really easy to make mistakes. So make sure when you are putting these on later on, to do it right. And these clamps are gonna connect to our towers.
And I'm not a big fan of these clamps in particular, just 'cause they have a lot of moving parts. So you're gonna have two clamps that connect to each other via this bolt on top. Since you have all these moving parts, it's really easy to make mistakes and if everything isn't making contact, it won't give you a secure fit. Something else I do like about this system is that we have these load stockers on top. And they're really easy to maneuver.
What you gotta do is turn this knob on the back, it'll slide up and down this T-channel. And it'll also be great for holding things in place since we do have this open space, so you can even use it as an anchor point. Something else I do like too is we also have this channel on the backside. So if you need to mount any other accessories like a light back here, you have that option to. Now we can get some measurements on how this sits back here. So going from your bed to the bottom of the crossbar, that's gonna be a little bit under 26 inches. You're gonna have that much room to play around with underneath. Now what I do like about how this does sit back here is if you don't have anything loaded at that time, you're gonna have a lot of your back window open so it won't obstruct you while you're driving a lot of the times. Now if you do have something back here, just keep in mind that's gonna block a lot of your back window. Now we're not gonna have a lot of overhang on each side. It's gonna be about three inches, so it's not gonna stick out too much past your truck. Now if you wanna put any clamp on accessories at the very end, there won't be a lot of options for you. You might be able to put some ski carriers over here if they have thinner straps, but it's not gonna be a whole lot of options. This is also gonna have a dynamic weight capacity of up to 500 pounds. So you can really load up with this. It's gonna be great, especially if you do have that rooftop tent you wanna put up here, it's gonna be able to handle that too. Now overall, this is gonna be a great option for you if you are looking for that system that's gonna be great for recreational uses, whether you have that rooftop tent like I just talked about, or if you wanna put a kayak on here since it does have those load stoppers that you can use as anchor points. Now what I would recommend though, if you do have a kayak, just sliding this back some so it doesn't get too close to your cab. Now if you're looking for something that's gonna provide more space underneath the crossbars and they're going sit above your cab, I would recommend the Yakima OverHaul System because don't have all that space up top to sit past your cab, so it is great for longer kayaks or canoes, and even long ladders too. But if you like this one because it sits pretty close to your rails and your bed and you don't have to worry about it blocking too much of your back window, it's a solid option. As far as the installation went, it was pretty straightforward. The only thing you gotta watch out for is the clamps. You've just gotta be a little bit more mindful when you're putting them on here. But if you need a hand with it, just stay tuned and we'll help you out with it. Just start off the installation, we're just gonna lay everything out. So I'm gonna have my crossbars and the towers that go along with them, and the clamps next to those. We're gonna have our hardware and you're gonna have your end caps and we're gonna have some load stoppers. You're gonna have two included Allen keys, and what I recommend doing is grabbing a tape measure to make things a lot easier. Now we're gonna start off with a tower and just make sure you have this block already on. All it is is just this bolt that runs through and connects to it on the other side. We wanna make sure this is still pretty loose, so I'm gonna go on the backside of it and loosen it up some. It can be a little bit difficult since it does have that blue Loctite on it. Now we're gonna grab that tower and move over to the end of our crossbar. We wanna make sure this is gonna be in the right orientation, so I'm gonna flip ours over to make sure it's on the bottom. And what we want is a rounded edge facing towards us and the opening part of the tower facing in towards the crossbar. I wanna line up this metal block with that channel and push it on. You might have to maneuver the block underneath a little bit so it fits through. And once it's on, you can just roughly adjust where it needs to sit. And something that might help you a little bit too is if you notice this is too loose now, what I recommend doing is just tightening it slightly with that smaller Allen key, just enough where it's not gonna be sliding all around when you try to put it on the bed of your truck. We're just gonna roughly place our crossbar now on top of our bed and then we can make our adjustments afterwards. Now that we have it up here, we just want to double check a few things. First, we wanna make sure that our towers are sitting flush against the bed of our truck. If it's not, just grab a tower, pull it towards you. Next thing is we wanna make sure that the rounded part of our crossbars are facing towards the cab. And then the next thing is we wanna make sure our overhang is gonna be the same on both sides. Now we do have a little bit of excess overhang on my side, so how I'm gonna fix that is by lifting up on the crossbar, pushing in and pulling this tower closer to me until it's flush. And then I'm gonna double check that overhang. And then I'll fix it from there if need be. Now the next stage is gonna be putting on our clamps, but before I do this, you've probably already noticed that we do have this front crossbar on. And when I put on my rear crossbar, I wanna make sure it's not too close or not too far away. And that's gonna be be for making sure it accommodates whatever accessories you have for the crossbar spread. So how I can check that is just by measuring from the front of a rear one to the front of our front crossbar, and making sure that my accessories can fit on that. Now when we're putting on our clamps, we wanna make sure there's nothing underneath blocking that clamp from sitting down. And when that looks good, you can grab your clamps. And how they're gonna go together is just like this. We wanna make sure the teeth ends are gonna be connecting together and these holes are lined up. Once it looks like that, we're gonna clamp it around where we want it to sit, making sure that bottom clamp is making contact with the tower and what it is. We're gonna grab our bolt and washers and bolt it on. Now I'm gonna grab our larger Allen key and bolt this down the rest of the way. After, when you've completed this side, you can repeat the same process on the other side. We're gonna grab our smaller Allen key now and go underneath our tower, and there'll be a bolt underneath the rear. And you're tighten this the rest of the way so there's not any rattling from this crossbar. I wanna move over to our end caps and you'll have this small bolt that comes with your kit. You are gonna put it through this tiny channel and line it up with that hole. Sometimes you can tap it or if you have something small, you can push something through there. And when it's finally in there, we're gonna line it up with the end of our crossbar. And our hole is actually at the bottom, so we're gonna come underneath and tighten it down the rest of the way that way. And when you have the nut in your end cap, you're just gonna line the end cap with the end of your crossbar and you'll notice there's a hole underneath. And we're gonna put that bolt through. And I forgot to mention earlier, but we're gonna need a Phillips screwdriver. It helps if you put it on the very end of it and put it in this way. And finally, you have the option of putting on your load stops. Now this isn't required, it's just something you can put on there if you're worried about any of your loads sliding around. All you have to do to take them on and off is just loosen this knob at the very end and slide them off through that T-channel. And when everything's on there, just give it a good shake test, make sure everything looks secured. And if it does, then you can put whatever accessories you have and put it on it. If you like everything you saw today, that was just a look at the installation of the Malone Bed Rack on the back of the 2022 Ram 1500.
Info for this part was:
At etrailer.com we provide the best information available about the products we sell. We take the quality of our information seriously so that you can get the right part the first time. Let us know if anything is missing or if you have any questions.


Thank you! Your comment has been submitted successfully. You should be able to view your question/comment here within a few days.
Error submitting comment. Please try again momentarily.