
To see if this custom-fit item will work for you please tell us what vehicle you'll use it with.
If your Chevrolet Blazer's rear window keeps closing while you're unloading cargo, it's time to change your strut. Replace it with this custom fit gas strut and make your window operate like new again. Quick, tool-free installation.
Features:
Specs:
Note: Always replace your struts in pairs, where applicable. Most rear windows have a strut on each side. Failure to replace both struts can result in a warped or damaged hinge.
Gas Strut with Exceptional Stability
Most gas struts consist of a tube filled with pressurized nitrogen gas, a piston, and rod. The Atlas Lift strut, however, has a dynamic damping groove inside the tube that regulates gas movement across the piston. This ensures your window stays open when you want it open and shuts slowly without bouncing or slamming. Lastly, in contrast to struts that only have gas in the chamber, a few drops of oil have been mixed in to help seal the piston and lubricate the rod. This allows your window to move more smoothly as the rod travels in and out of the tube.
Videos are provided as a guide only. Refer to manufacturer installation instructions and specs for complete information.
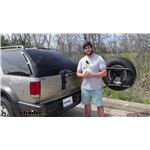
Hi, Matt with etrailer. And today we're talking about our Atlas Custom Fit Gas Struts on our 2002 Chevrolet Blazer. Now this is gonna be able to fit a lot of different vehicles too. What I recommend doing though, is just plugging in your vehicle's information into our fit guide to find which one's gonna be the best fit for you and fit you correctly. But the main appeal to this is this is gonna be something that's gonna make your life just a little bit easier because when you are using these, a lot of times if you don't wanna push it up all the way, or if yours are kind of wearing out on you, they're gonna not hold themselves up. And if they're not hold holding themselves up and you need to reach into the back of your car, that's gonna be kind of hard to do because that's constantly gonna be applying pressure to the top of you.
You also wanna make sure that you're getting the correct ones because today we're talking about the back window. Now there are gonna be different versions that will work for your hood, or if you have a hatch, those will be other options. And they're all gonna work pretty much the same. The way they're gonna work is you're gonna have, inside of here, there's gonna be these wipers that keep the inside of this greased, so it's gonna last you a long time. And it's gonna help propel these up and hold 'em into place.
And it's also gonna prevent this from slamming shut too. (window slams) And something you wanna think about too is, when you are replacing one of these, is you probably wanna replace both of 'em. And that's gonna be for a few reasons. The first reason is if one's going bad, they're both are probably going bad, especially if they are the OEM parts. And the second part is if you have one of two different brands or one of two different awarenesses of how long that you've had 'em, it's probably gonna operate differently.
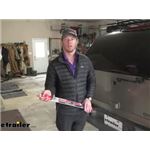
So if I go to try to shut this or open this up, they're probably gonna work a little bit differently and not give you a good smooth, gradual lift. To give you an idea of what we have at the moment before we actually put the new ones on. You can see that this is really falling in on itself a lot more and while it does have some pressure to it, it's not really holding itself up. So that's gonna be one of the main reasons for replacing this today too. Actually installing these is gonna be pretty quick and easy.
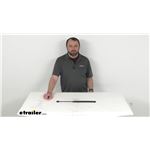
I installed one of them off camera just so it would hold itself up, so it's a little bit easier to show you guys. There's not a whole lot to 'em. Now if you want a more in depth look at how these really do function and what makes them so smooth they'll operate. You can actually check our demo where we do a full description on how this works. But as for the installation, it's actually pretty straightforward. All you need is just a flathead screwdriver and it goes on there pretty easy. And the nice thing is if you installed one of these on one type of vehicle, it's probably gonna install very similar to another vehicle too. But if you're curious to see what that process looks like, just stay tuned and we'll walk you through the process. So what you want to start with is actually with the old one. And what you wanna do is just check the part to make sure it doesn't have any additional parts to it that your kit doesn't have. So what I like to do is just hold 'em up side by side, make sure we have that retaining clip, this bracket up at the top and make sure we have that on the other side too. Everything looks the same so we can actually start putting this on. When everything looks good, I'm just gonna take my flathead screwdriver. You probably want a smaller one for this too. And apply pressure underneath that retaining clip. And you're just trying to pry this up. Since our new kit already has some of these, we won't need this either, so I can fully remove this, move it somewhere else. Sometimes it's gonna want to grab on, not be removed, just kind of work with it some, it'll come off. After you remove this one, you just come down to the bottom and remove the second one. And when you are removing those clips, just make sure you have a hand on this, just in case it falls out, 'cause sometimes it will. And I'm just gonna pull on this, might have to wiggle it some. it'll remove from that ball mount. Just do the same thing on the other side. And you're good there. You want to try to keep it in the same position right here. Now if both of yours are gone bad, it won't hold itself up. Even with the new one on the other side, it still isn't wanting to hold itself up. But from this point, I'm gonna push it the rest of the way up, make sure it's in the same orientation as it was before. And we actually don't need to do anything with this clip this time. We just need to push it onto that ball mount. So, just gonna apply pressure (part clicks) so it clicks into place. Then we come to the bottom, you notice this isn't lined up. I'm just gonna rotate this so everything does line up for me, and then push it in. (part clicks) Just like that. After when you have it installed, just give it a good test, make sure everything's operating correctly. It's wanting to shut pretty smoothly (window bangs) and it's gonna open up by itself too. And once that looks good, that'll complete our look at the installation and some of the features of the Atlas Custom Fit Gas Struts for your rear window on our 2002 Chevrolet Blazer. Thanks for watching.
Average Customer Rating: 4.7 out of 5 stars (15 Customer Reviews)
If your vehicle's rear window keeps closing while you're unloading cargo, it's time to change your strut. Replace it with this custom fit gas strut and make your window operate like new again. Quick, tool-free installation.Perfect fit. Incredibly easy to install. Now the hatch window stays up and doesn't hit me in the head!
Also, worth noting that the parts I ordered were delivered in two days with no additional fees. Will keep etrailer.com and Madison M (parts rep) in my contact list.

Exact match and work as good as new. Only downside was trying to figure out how to get them on as there were no instructions (I'm not the most mechanically inclined person).
I was very pleased with my order from etrailer, although not at first…the box my shipment was in was torn open in transit and the contents taken…I immediately called etrailer and spoke with Nichole…she took care of everything, and within a few days I had my order in hand…Thanks Nichole, and etrailer!
Excellent strut
Install was easy and window lift is exc ellent.
The right part on time, works great.
Easy to install, took about 5 minutes to remove old struts and install new on both sides.
Highly recommend.
Took a while to get it seems fine
Info for this part was:
At etrailer.com we provide the best information available about the products we sell. We take the quality of our information seriously so that you can get the right part the first time. Let us know if anything is missing or if you have any questions.


Thank you! Your comment has been submitted successfully. You should be able to view your question/comment here within a few days.
Error submitting comment. Please try again momentarily.