


The Sunseeker awning with STOW iT provides quick, reliable shade for short stops and days spent outside. With roll-out coverage and a quick-remove mounting system, it gives you shade that's easy to install, remove, and live with through the day.
The Sunseeker provides dependable side-mounted shade without adding bulk to your setup. It creates a comfortable space for breaks, events, or afternoons outside while keeping the overall footprint simple and contained. When you don't need the awning installed full-time, the STOW iT mounting system lets you remove it easily, making it a good fit for seasonal use or shared vehicles.
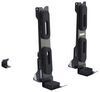
Once the awning is rolled out, the setup stays simple and familiar. The built-in support poles attach at the front and edges of the canopy to hold its shape, and guy lines and stakes are used to secure the awning when conditions call for it. In calm weather, this gives you quick, reliable shade without a lot of extra steps. When wind or rain moves in, staking it down adds stability and keeps the setup predictable.
This awning is designed to be fast and intuitive to mount and remove. The STOW iT mounting brackets attach to your roof rack using Zwifloc channel nuts, which drop directly into the rack channels so you can position or relocate the awning without moving other accessories. Once the brackets are in place, the awning slides into them and secures quickly, and deployment is straightforward when you stop. When you want to take the awning off between trips, the STOW iT system lets you remove it in minutes for storage.
This awning uses a mold-resistant ripstop canopy that's designed to handle sun exposure and wet conditions without needing special care. The CPAI-84 fire-rated fabric blocks UV with UPF 50+ protection and holds up well to repeated use over time. When you're ready to move on, the awning packs back into its weatherproof PVC storage bag to stay protected during travel and storage.
For added protection against low sun, wind, or roadside exposure, the Sunseeker awning side wall (RR32112 - sold separately) lets you create a more sheltered space along the awning's edge. It integrates with the main awning and gives you an option for adapting your setup to changing conditions or longer stays.

California residents: click here
Videos are provided as a guide only. Refer to manufacturer installation instructions and specs for complete information.
Hey, everyone, I'm Evangeline right here at etrailer. Today we're taking a look at the Rhino-Rack Sunseeker awnings. Now these awnings are available in different sizes as well as there's the extra free standing awning feature, which we're not looking at today, but we will talk about. We're gonna focus in on how this awning works, how this awning sets up, and we're gonna take a peek at the new Rhino-Rack STOW-iT bracket. If you're still trying to decide between different awnings, the easy answer is that the Rhino-Rack Sunseeker is gonna be one of your lightest but also largest awnings when it comes to that ratio. So if you want something quick and easy, this is gonna be the one to look at.
But you also have to consider your vehicle, where you're going, what your priorities are. So before you go any further, double check your roof rack system on your vehicle. You need to have a roof rack with channels in order to fully appreciate the Sunseeker awning. Now, something that a lot of people ask is, "Okay, do I get the longer awning or the regular size awning" Today we have the 2m, which is a regular size. This will fit most scenarios, most situations, but if you have a larger SUV, a larger platform, or your roof rack is actually a ladder rack on a big old truck, well, you can then take full advantage of the 2.5 awning or even consider getting the free standing addition.
The main thing about an awning is that it gives shade, great for camping, or even if you have like a little bit of a rain shower you can set up underneath the awning. This is gonna be a very lightweight fabric while also being heavy duty able to handle your harsh sun and the elements. With that in mind, this also has a UPF rating of 50. What is UPF Well, you know how there's SPF per sunscreen, same thing, but UPF is gonna be the fabric. Now, this won't be a full coverage because as you can see, open sides all around, so sun will come in from the sides, but so will the breeze.
So for those that like shade as well as an open breeze, this is a style of awning that they prefer. But if you do want walls or more shade, there are extension pieces available. You can get the extension piece, you can get the side wall all available right here at etrailer. All those awnings are gonna have the same fabric that you see here, which is actually designed to be compliant with certain safety standards, it's gonna be mold resistant as well as that UV rating. With that in mind, whenever you do use this, yes, it can hold up to a quick shower, but always angle your awning, so that the rain goes down away from you and make sure it's dry before you pack it all up.
This is what your awning will look like all packed up on your vehicle when you're ready for your long road trips. A lot of people have been walking by the studio and saying, "This looks really sleek on the car." And that's true, but the main thing for me is look at all that space on the roof rack for all kinds of other gear. I could put a tent, some kayaks, maybe a roof box. All the things I might need for my adventure, plus I have shade. So with that in mind, if you are planning on fully decking out your system, you can see why Rhino-Rack really pushes the pioneer platform system for all that extra space for all those extra things. The fabric of the bag that goes around the awning is made of this PVC material. So very similar to tarpaulin, banner-like material, which means that if you do wanna leave this on your roof, that's fine, it will hold up to the rain, to the sun, to the elements. Now, it's not completely waterproof because I notice that underneath these zippers can still have water splash up into them, but from all my time of using awnings, it's never been too much water where it's becomes a problem. At the beginning of this video, I mentioned these STOW-iT brackets, and in all reality, that's probably one of my favorite new additions to the Rhino-Rack awning series. So once you remove the bolts from those brackets, you can then just lift your awning up and out of the way. So if you don't wanna leave your awning on all the time, or maybe you wanna switch between cars or change up your setup, this makes it super simple to do. The brackets stay on the vehicle, the awning comes off. And when you're ready to set this all up again, this fits right into place. Now the STOW-iT brackets are seen throughout Rhino-Rack series of accessories. So sometimes what some people do is they use your STOW-iT bracket with something else. Maybe it's a different awning, maybe it's a different carrier. The brackets is gonna be the same, the accessory switch up. Now it's time to set up the awning. From my experience at the campsite, there always tends to be that one person who's kind of put in charge of setting everything up. So while this is gonna be a lot easier to do with two people, it is doable all by yourself, and I'm gonna guide you through that specific process. We're gonna start with unzipping the awning. And when you unzip, don't worry about anything falling out from inside as some people do because everything is still gonna be secured by your straps. When you undo those, that's when the awning will drop. But don't go too far because underneath are going to be these legs. Go ahead and hook them and bring them out. Those legs are gonna be helpful in supporting the awning fabric as you unroll it. And then when you start going through your halfway points, you can then continue on. There's gonna be the layer. And then keep going. And then there's gonna be the second leg extension. And just keep going. Again, if I'm on my own, this is where I'll start bringing the legs out just so that they have some kind of support while I get the other arm set up. Now, do not do this on a windy day because you don't want the awning to catch the wind and blow away. You always wanna make sure it's supported at all times. So with the legs in place, we can now grab the arms and fit them into the holes of the awning. Alright, once you've secured the arms on both sides, you can now secure the legs. The legs are gonna have the same thing where they're gonna have two leg extensions depending on the height you wanna be at. Just remember that as you adjust the height, you're also gonna have to adjust the length of the arms to match. Now, to secure the arms, you have these straps along this side, so go ahead and use the hook loop straps to secure both sides. And before you bring it up to full height, I always like to set up the guideline first, making sure it's hooked into place before it goes too high up where I can't reach it. Again, always making sure that everything is tightened down and extended as far as it needs to go. Please always use your guidelines. Now, we're obviously not outside right now, so we don't have wind coming through, but it is very important whether there is wind or not, to have your guidelines tied down. There are stakes included. And that way if a gust of wind does come around, your awning isn't blown into your vehicle. And that's gonna be it for setting up your awning. Now packing up is just gonna be the exact same process, but in reverse. Again, keeping in mind notes like while this is mold resistant, make sure your awning is dry before packing up and to make sure that you have your sticks and your guidelines properly packed up in a spot, so that you don't get tangled up. From my experience, once you keep those things in mind, then your Rhino-Rack awning will last you for a while for all of those adventures and all of those trips. If you're wondering now, "Well, how do I get it onto my own roof" Well, stick around and I'll show you the install process. To get your awning installed, it's very simple. It's a matter of getting the base onto your roof first. Depending on your roof rack system, that hardware choice might be a little different. So let's break down our three different here. First option, we have our square plates. And these are gonna go into most of your channel mounted accessories. Your next option is gonna be these larger rectangular plates, and these are gonna be for your HD bars or heavy duty bars. You'll know them by their taller channel. And finally, we have your Zwifloc. And this is gonna be for your Rhino-Rack Pioneer platform or recon bars. And the way they all work is that they will be secured with your two bolts up top, holding the block in place inside of your channel mount accessory. If you don't have channels on your rear track, well, that's gonna be a different discussion. The instructions are very clear for your Rhino-Rack products for how to install, but a lot of people actually ask about is what if I don't have a Rhino-Rack roof rack Which is why I have a different brand here today, simply to show that this will still work with your universal channels. So opening up the channel area, we're gonna have to get access to the inside. And I actually have to pull these strips out of the way simply because of how the bolts and plates are centered. So you slide the plate in through your channel. If you are not sure if you have a right channel, you can always double check our product description. Once those plates are in place, you can just put your base on top of it and then use your two bolts to tighten down onto the plates. And then the included tool will help with that process too. Once you've tighten down your base, so that it doesn't wobble anymore, then that's exactly how you install it onto your roof. Your next step is going to be to remove the piece that goes onto your awning. So using the tool, we're gonna loosen that bolt up top, so that we can slide this piece up and out. Your next step is gonna be installing these ends onto your awning. So, you're gonna have these two T-track bolts. And these will slide in through the sides of the awning, one on each side, and then you're going to secure the hardware. So, note the orientation of your hardware. You want it on the side that doesn't have a zipper since your zipper is facing down. And then you can choose whether you want the top hole or the bottom hole depending on the height you may need on your vehicle. In my case, I need a taller awning, so I'm gonna go ahead and secure this to the top hole. You're then gonna have this nut that you're going to use to loosely thread onto both brackets. You'll keep those loosely on there because you still need to find out how far apart you need to actually tighten them down. So go back to your roof rack and we're gonna measure center to center from one bracket to the other. I have it at 26 and a half inches, so this is gonna be where you secure the brackets on your awning. So my crossware spread is definitely on the shorter side. Depending on what you measure for your vehicle will also determine where you put the brackets. So what I like to do is I like to orient it by the center, so 26 and a half at 13 and a quarter. I know where the center is because of the bracket. And then we just bring this over to 26 and a half. That way you have the same amount of length on each side of the bracket, same amount of support, all evenly distributed. Once you're happy with your spacing, you can then go ahead and tighten down. Now I use a 13 millimeter socket and a wrench for this part. For this next step, usually you'll need a second person, but the combination of this shorter vehicle plus this lighter awning makes it actually doable on your own if you have your measurements perfect. So with that, we can then just line up the bracket on the awning with the bracket on the roof rack. Double checking that it's all in place. There we go. Once it's seated on both sides, you can then tighten down the awning using your bolts. Bolts comes down from the top, and then you use your tool from your kit to tighten that down on both sides. That's really all there is to the installation. The main difference is for you is just gonna be what type of roof rack or platform you are installing this to, your own dimensions. But once you have that down, as you saw, the process is very straightforward for getting this installed onto your own roof.
Ratings & Reviews

Easy to install even though the directions were not as clear as they could have been. Fit on my existing rail on my van which was the most important detail.
Info for this part was:
At etrailer we provide the best information available about the products we sell. We take the quality of our information seriously so that you can get the right part the first time.


Thank you! Your comment has been submitted successfully. You should be able to view your question/comment here within a few days.
Error submitting comment. Please try again momentarily.