
To see if this custom-fit item will work for you please tell us what vehicle you'll use it with.
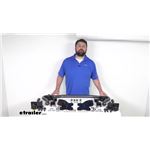
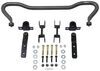
Minimize sway and driver fatigue by improving the stability and driveability of your truck. Solid, 1-3/4" chromoly bar mounts to the rear axle and to the frame to balance weight transfer and reduce body roll. Includes mounting hardware.
Features:
Specs:

California residents: click here
Videos are provided as a guide only. Refer to manufacturer installation instructions and specs for complete information.
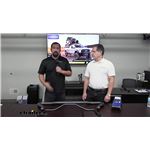
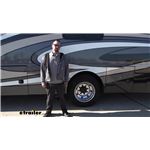
Hello, neighbors, it's Brad here at etrailer, and today we're taking a look and installing the Hellwig Rear Anti-Sway Bar on a Ford F-53 Motorhome Chassis. Now when choosing any upgrades for your suspension, you really wanna determine what do you need to do with it. If you are truly feeling sway, or anytime a gust of wind comes along and you're really kind of having to fight to bring it back to center, or if you're just making turns and it still seems like it's squashed to one side when making another quick turn, that rear anti-sway bar is gonna make a huge difference. Because it's using the weight of the chassis and structurally mounting to the axle, as it flexes to one side, it's gonna fight against it on the other, bringing it back to that center. And really flat is good when it comes to handling, that just means that it's gonna be better overall for parking lot driving or small maneuvering, but also out on the highway. This is what your sway bar is gonna look like when it's installed, and you see that it sits on the rear of the differential.
And right above the front of the differential you'll see there's another anti-sway bar, and that's our factory one. So we're not replacing that, we're just supplementing it, which is really gonna just double up and fight against that sway while driving, which translates to better overall driving experience for you in the driver seat. So with our sway bar officially installed, we're out taking it for our first test drive. And every time I've done 'em, it's just the first turn you can really tell a difference and that's the case here. So on my before drive, just to kind of get our footage, I found that the handling of this was almost laughably bad.
This already had SumoSprings, but the sway was just terrible. It felt like it wanted to tip over. And, honestly, just that turn alone makes me feel like it's really doing a good job of keeping it nice and flat and that's where you get that cleaner handling. There's a little bit, I'm not gonna say it's heavier feeling in the steering, it's about the same, but it's just planted. It feels like the whole chassis is just, the center of gravity is just a little bit better.
It doesn't feel like the whole thing wants to lean over as I turn. What I think a lot of people want sway bars for is when they're out on the road and you get that gust of wind or a semi passing you, or whatever it may be, that's where you're really gonna find that the whole RV's just gonna be more planted. It just is a more solid feel. It's gonna cut down on the white knuckling. So especially if you've ever driven in high winds in an open highway, or in weather, you're really fighting on the wheel, just having to kind of keep this thing from going side to side and it's a very unsettling feeling.
Where this, once you have those sway bars in, it really just kind of absorbs everything, allowing you to focus on the road, making it a lot more comfortable to just kind of have a nice, smooth operation throughout the driving experience. Now, as far as the installation goes, now a lot of this has to be done when the suspension is down just like you would be driving down the road to get it all in place. And with our brackets that attach to the U-bolts, getting those bolts off or the nuts on the U-bolts, the factory ones, was very tricky. You will probably need some really heavy-duty tools to accomplish that. Your 1/2-inch impact's probably not gonna take those off. You're gonna need a torque wrench that's strong. We fought with ours for a decent amount. And something else that we ran into was those SumoSprings play ball with it fine once it's installed, but those will also have to be removed. There's also bolts for the frame bracket that, unfortunately, the leaf springs kind of get in the way of being able to take those out or put new ones back in, so you're gonna need to find a way to raise your RV up for that to drop down. So it's a little bit of a balance of having this on the ground, working on it, but also being able to lift it up. In concept, it's really not that hard to do. There's not a ton of hardware to it. But when it comes down to it, realize that an RV like this, has big, heavy hardware that you're gonna have to remove and also put on. So that comes down to having a large torque wrench and the leverage to be able to do that underneath your RV. Now we went ahead and installed this and I'm gonna show you how to do all that step by step, but I'm not gonna hold back on the struggles that I face with this. And I don't wanna deter you from not trying this on your own, but just know that you are probably gonna need some tools that you may or may not have. Now, if you do things with farm equipment or diesel equipment, you might be all right. But if not, if this is beyond your scope of installation, I don't blame you one bit, you can use our dealer/vendor network to figure out a vendor that we recommend to get this installed. So whether you choose to do this install on your own, props to you, I give you kudos. But if you do our vendor network to get someone to install this, I don't blame you one bit. Either way, I think at the end of the day, once it's installed, it makes a huge difference. So I don't wanna scare you off from not getting a rear anti-sway bar, it makes a huge difference. The install does get a little bit tricky, so let's take a look at that. Now, for our installation, you're gonna wanna do this on the ground. You don't wanna have the suspension unsprung, so it needs to be just like it would be driving down the road. So we have a lift here, which obviously makes it easy. But you all at home are gonna be doing this on the ground, so I wish you the best of luck here. First step is going to be taking off our U-bolts, and we're gonna focus on one side at a time, we don't wanna take off both sides, obviously that kind of keeps everything together. So on our F-53 here today, the four bolts that are holding our U-bolts on are gonna be a 1 5/16, so let's go ahead, we'll get those removed. (impact wrench reverberating) Now a lot of times the underside of your RV is gonna have quite a bit of rust and corrosion build up on hardware like this, so, you know, I would plan this out maybe the night before. Go ahead and get some penetrating oil sprayed down on this, that's gonna help loosen those up long term and just make your life a little bit easier during the install. Now to get your installation started, one thing that we noticed on this one in particular, they had SumoSprings already installed, and those do use the U-bolts to kind of perch in and hold in place and it's bolted up to the frame. Now to get those U-bolts to draw out, you kind of have to go straight up vertical. So if you have SumoSprings, I would highly recommend getting those removed, that way you can get those U-bolts taken out. To get your SumoSprings out, you are gonna have to raise up that suspension to get it, you know, unsprung. So you're gonna be moving the RV quite a bit. Now, I've kind of already gone ahead and done one side to just kind of get myself prepped for this, and something that we realized is this is a 2019 RV, and these U-bolts gave us a big fight. Now we broke a breaker bar trying to get these off. We tried to use our large impact and it still didn't budge. So we ended up using a torque multiplier to get these off. And so that's a very distinct possibility during your install to get these knocked loose is not easy. Something else to take in consideration is when we go to torque these down later, you're gonna need a very large torque wrench to really get that leverage. I mean, you're gonna be doing this underneath your RV, it needs to be on the ground when you do that portion. And you're also gonna wanna focus on one side at a time, obviously, you don't wanna loosen up both sides of the suspension. But it is important before you start doing anything, try to get these knocked loose. Because if you can't get those loose, then you're not gonna be able to install your sway bar. So this is something if you don't have the tools that are super heavy duty, you might wanna consider going to a shop or using one of our vendors through etrailer to figure out who you can get to get this installed. I'm all about you trying this at home, but the reality is, this one gave us a pretty good fight getting these off. Now this sway bar is working in conjunction with the factory one, so we're not removing that, that's gonna stay in place. And the main reason we're getting our U-bolts taken out and putting new ones in is so we can get our plate in place where our sway bar will bolt up to. So we'll go ahead, we'll get these. I've already kind of knocked those loose, so we'll get 'em taken out. This is gonna be a 1 5/16 socket, a 33-millimeter also works. (impact wrench reverberating) So here I'm using the torque multiplier. I got two of them off, even after loosening 'em with our impact. So this really just cranks that torque down really well to really knock this loose. Now, again, this is one of those things, we're on a lift here to give us the leverage to be able to do this, but the suspension still has to be compressed. So this is one of those tasks that if I'm doing this at home, I'm not exactly sure how to go about this, but you can see this is working. It's a slow process, but it does loosen it up. (impact wrench reverberating) Now I've tried the torque multiplier, I've tried our breaker bar, I've tried our large impact, and I can't get this last one off. Now we are replacing the U-bolts and we have new bolts. So, when in doubt, you can always cut it out. You have to be careful here. Obviously, the brakes, we have our caliper right here. So I've zip-tied up the bracket just to kind of hold this up. I could run the nuts up too to just kind of give us that gap where we got it and I'm just gonna cut that off. Now, something I'll point out, you are gonna want an angle grinder, because as we installed our new ones, these are rather long. And there's really no great way to get a large socket to draw up far enough when you torque these down, so having an angle grinder handy throughout this installation is probably gonna come into play. (metal grinding) With that cut off, now we can officially get our bottom plate removed. And that's gonna be going back up, so don't go too far with that. I'll get my supporting zip ties out of the way. And then, our U-bolts, we just slide these up and out of the way. And this is where if you have those Sumos, this is where it gets in the way because you can't slide this up. Now, if you're doing Sumos in conjunction with this, they are a great option. Just make sure you're doing it after you do the sway bar. So now grab your new U-bolts and slide those. They should sit in the perches up top and kind of rest where those factory ones went. You can see these indentations, so make sure it's properly aligned. (metal clinking) (metal clinking continues) (metal clinking continues) Now, also when you drop these down, there's gonna be some brake lines around the axle. Just make sure, obviously, it's not pinching any of those, that are gonna cause any damage long term. So with these in place, we'll go ahead, we're gonna get our bracket put back in and we're gonna grab our new one at the same time, we'll slide this up. It's also recommended that you have your new hardware, as well as your washers, ready just to kind of hand start these, that way it'll hold those brackets up for us. So, obviously, make sure that your factory plate's in the same orientation that matches the axle to keep it flat. And your bracket, you're gonna want these tabs going towards the middle, towards the rear differential, so make sure you have it in that orientation. And sometimes it helps to do one of these at a time, but I think I can slide all this up. And then, with the new hardware, put a flat washer here. And, as I mentioned, I'm just gonna get at least one of these started here to hold that up, and that way we can get the rest of the hardware in place. Now these thread on all the way, and I would suggest going as much as you can with your hands, if you need to, you can also put a wrench on here just to kind of snug these up, because we're gonna be torquing them down. And there is a pattern to kind of follow, just as you would lug nuts, you wanna make sure that it's evenly tightening, you're not doing one too much. And we will ramp up those torque settings as we go to make sure that it's evenly doing it. So now is a good time also to make sure that you have your U-bolts nice and level, you know, they're gonna be parallel, not kind of off to the side from the axle. So go ahead, get these all snugged down. Now, the issue we ran into is, obviously, there's quite a bit of thread here and I think that's to account for different chassis. Obviously, you gotta make sure that there's enough thread to tighten this down, but this might be a little bit overkill. And that puts us in a situation where, yes, you can get to these with a wrench, but you can't really use a wrench for torquing these down properly, you do need a socket. And the downside is is right now this will go on, that as we torque this down, there's quite a bit of pressure as you're torquing them and you don't want this to slip off. So what we're gonna do here, just to kind of prevent that from bottoming out before we can't, you know, get a full grab on the nut is I'm gonna take my angle grinder and just cut off maybe about an inch or so. We'll still have plenty of threads up here that we'll be able to, you know, get our socket on there. And the main concern is, yeah, just that clearance. So go through and cut all these. Again, be very careful because your brakes are right here. We need to torque these down. We're gonna be using a 1 1/4-inch socket to accomplish this. And there's four different torque settings that we're gonna work our way up, starting pretty low, and that's just gonna make sure, again, it's gonna tighten up progressively and make sure it's even throughout. Now when doing these, you're gonna wanna do a cross pattern. So you're gonna go from say this corner, cross, straight over, and then back to this side, and then repeat as necessary. So you don't need to necessarily get this torqued down first, you need to just kind of slowly work so they're nice and even. But I'm gonna go ahead and get my first ones started here, and then I'm gonna ramp this up to the different torque settings found in the instruction manual. Now, for the first couple steps, you can probably get away using a 1/2-inch torque wrench and that's gonna get you pretty close to where you need to be. Now when it comes time for maybe the higher ones, you might need to step it up to a one-inch torque wrench just for that leverage. You can technically get away with this. And depending on the U-bolt size that you're using, that's gonna also differentiate for that final torque setting. So these are all torqued down. I'm gonna go ahead, move up to my next torque setting, and then continue on until they're all properly torqued down. (torque wrench beeps) With those torqued down, we're gonna move along to our bracket where our end links are gonna attach. And this is gonna use factory-mounting points where we have our crossmember that runs across. The crossmember has four bolts, we're only gonna be using three of 'em. And you'll see this slant that should face towards the front, so this will slide up on the frame rail. And on the factory bolts, they look like this, they're gonna be a 15/16, and they have these little arms here that'll just kind of lock that in place as you tighten or loosen. So get those removed, we're gonna be using new hardware with that 15/16. Now, something I'll point out, these are gonna be tricky to get to because your leaf spring is in the way, so sometimes this definitely becomes necessary to raise this up to get that spring out of the way, otherwise you're not gonna be able to take the old ones out or feed the new ones in. So the gap between our frame rail and our leaf spring, as I mentioned, this is the old bolt, and you can see it's really tight here. And you also have to slide this over the bracket with the new hardware, so it does become pretty necessary to be able to move this out of the way, so I'll be lowering this down. And we have our jacks raising up the rear of the vehicle to unspring the suspension. And since this is bolted up, we're good to do that. But we'll do that to get those bolts out, we'll then raise this up in place, and then put our new hardware in. Now we've gone ahead and raised up the rear of our RV from the hitch, and that's gonna give us a direct shot. You can actually go from the wheel well to get those loosened up. Now, I'm using a 7/8 socket, and we are gonna leave this top, forward-most hole, that one's gonna stay in place to keep our crossmember in place. But the other three we're gonna remove. And you can see with this raised up, that's gonna give us a straight shot to those bolts, whereas normally that leaf spring's right in the way. So we got those out. We'll go ahead, we'll feed our new hardware in. And these have a flange nut on the backside, so we're gonna use those. And then, we'll get these snugged down. Now these also have a torque setting that's found in the instruction manual. So once you get these in place, go ahead and get these torqued down. (wrench whirring) (torque wrench beeps) At this point, if you did have Sumos or you're installing Sumos, now's probably a good time, since we have everything unsprung, so we're gonna get ours put back in place. Take your end link and we will attach this to our frame bracket. And we're gonna use the new hardware, we have our flat washer, this is gonna slide through, and then we'll finish it up with another flat washer, and then our nylon lock nut. So just make sure that the hardware's going the same way. Now we do have this tube here. Seems like once we kind of put this in place, that should allow for a little bit of gap here and won't cause any issue for that. And we're just gonna hand tighten this on. We wanna leave this loose, because this is gonna allow us to really get our sway bar perfectly in place before tightening it down. We're gonna attach our sway bar to our end links, and you can see it does dip down in the center, so make sure that kind of matches up with that factory sway bar. And this is gonna allow us to really kind of get this in place with eventually our bushings. So I'll just raise this up, and it's gonna be the same hardware configuration as we had at the top of the end links. Now, this is heavy, you might wanna grab an extra set of hands here if you need to. And we're just gonna loosely attach this as well for now. Do that on both sides. Grab your D-brackets and your bushings, and we're gonna get some grease on these. It comes with grease. I recommend getting some nitro gloves, this stuff can kind of get nasty. And the tube should be plenty to be able to coat the inside, I also do the outside here. These polyurethane bushings are fantastic for holding up. But they can tend to squeak, so that's where this grease comes into play. And the hammer-tone finish on this is really nice. It creates little pockets that that grease can kind of stay in. Rather than having a flat-to-flat surface, like normal ones where that just kind of moves that out as it, you know, kind of pushes that grease out, this will kind of keep it in place. So, long term, it's gonna stay nice and quiet. So I'm just gonna kind of pinch off half of it here. Put a good amount on the inside, and then coat the outside. And then, just take your fingers and make sure that whole inside's coated. And this has a split in it, so we'll get this in place. So you just kind of peel this over. And once you're happy with it, you can take your bracket and just slide that in. We'll go ahead and do the same on the other side. Now, at this point, we'll take our brackets and line them up with our bottom bracket that we put underneath our U-bolts. And we're gonna be using the hardware that comes with the kit. And we're gonna be passing this down with a flat washer up top, and then finishing up with a flat washer and a nut on the bottom side. And if you need to, you can just put a nut in place just to kind of hold this up to get the other hardware in, that might be the easiest way. And then, just come back and put the washer. It's kind of wanting to walk around on me here. And supporting the sway bar while doing this can get a little bit tricky. Now, the instruction manual has these going one way versus the other in the picture. I think it's gonna be a little bit easier to do it this way. It should all hold the same. So, again, I'm just gonna go ahead and get the nut started here to get the others going. Now, as far as orientation of the hardware, I found that if you do put a flat washer, it's gonna bind that up on our U-plate here, which I'm not super happy with. So I went ahead and I put the bolt here. Now, the bolt head going facing up, a flat washer and a nut should allow this to tighten down. We're gonna take a 9/16 socket to snug this up first. (drill whirring) And we'll just kind of go from side to side, making sure it's evenly tightened down. (drill whirring) It's also a good time to make sure it's nice and evened up. You, obviously, want it straight to where it's not gonna be pulling one way or the other. So make sure you have this properly set up exactly where you want it before tightening. Now, when tightening these down, I did realize that we wanted this to center up and I'm kind of having a hard time just figuring out side to side versus kind of before the bend and exactly where it's supposed to go. So I think the best option is gonna be tightening down our end links and where they mount up to the bracket, that's gonna allow everything to kind of cinch up. And then, that's gonna put it, hopefully, in a nice, centered position to where we can tighten those down. So these are gonna be 15/16. I'm gonna go ahead snug them and torque 'em down. (drill reverberating) (torque wrench beeps) (drill reverberating) Now once you get those torqued down, you've officially installed your rear sway bar. Now you're gonna wanna take it out, give it a test drive, notice the difference that it's gonna have immediately. But also, once you drive it around, you do have some suspension kind of moving around, you wanna come back and double check your torque settings just to make sure nothing's worked loose a little bit. And that was a look and installation of the Hellwig Rear Anti-Sway Bar on a Ford F-53 Motorhome Chassis.
Average Customer Rating: 4.9 out of 5 stars (29 Customer Reviews)
Minimize sway and driver fatigue by improving the stability and driveability of your truck. Solid, 1-3/4" chromoly bar mounts to the rear axle and to the frame to balance weight transfer and reduce body roll. Includes mounting hardware.Sway bars are considerably larger than factory. They were easy to install and helped to control side to side sway. These bars were installed along with a rear sway bar. I would recommend these sway bars
Installed this sway bar along with a front sway bar. This bar is quite larger than the factory one and helped control side to side sway. I would recommend this sway bar cause it make driving our RV so much more enjoyable.
Really takes that rock-n-roll motion to a minimum, especially when driving out a driveway. Much beefier than the stock E450 sway bar - very pleased with this product.
Really takes that rock-n-roll motion to a minimum, especially when driving out a driveway. Much beefier than the stock E450 sway bar - very pleased with this product.
Great experience. The orginal sway bar was disconntinued however Tiffani stayed on top of my order at all times with a direct replacement for my truck.
Thank you,
Excellent website and easy ordering! The parts were delivered in just a couple of days; really fast process! Thanks for everything and if I need anything else, Etrailer will be the first place I look:)
Thank You etrailer for your prompt shipping and Expert advice and videos!!
Good product no torque values on bolts in direction!
Massive improvement over the stock sway bars!
Massive improvement over the stock sway bars!
Easy installation and noticably better handling. Hope it will help when I have the drop in camper in the bed. (Already had rear Hellwig bar)
As usual, etrailer was so helpful and knew exactly what part we needed for our rig. They were sent out the day they were ordered and we had them installed and are 100% pleased with the product. Our motorhome definitely feels more stable and tight with these stabilizers on them.
We ordered the hellwig front and rear stabilizers and had them installed and are 100% pleased with the stability of the rig. I did not even feel a semi passing me after we picked it up from the shop to take it back to the storage unit unlike before.
Great product that works to perfection on my 2020 Ford Expedition. I wanted less sway when on a less than great highway. And that’s what we have achieved.
Excellent , easy to install
Perfect fit and felt a huge difference on the first drive. Install was straight forward with no issues. Highly recommend for all F150 owners!
Very good boxing
Very knowledgeable people
Info for this part was:
At etrailer.com we provide the best information available about the products we sell. We take the quality of our information seriously so that you can get the right part the first time. Let us know if anything is missing or if you have any questions.


Thank you! Your comment has been submitted successfully. You should be able to view your question/comment here within a few days.
Error submitting comment. Please try again momentarily.