
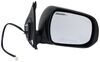
K-Source Replacement Side Mirror - Electric w/ Turn Signal - Textured Black - Driver Side
Item # KS70150T
Retail:$290.44
Our Price: $139.99
You Save: $150.45
Confirmed to Fit
2015 Toyota Tacoma
Access Cab
Double Cab
Will this fit?
To see if this custom-fit item will work for you please tell us what vehicle you'll use it with.
This item qualifies for Free Shipping


Need help with installation?
Locate installers near me- All Info
- Q & A (0)
- Videos (1)
- Photos
2015 Toyota Tacoma - K-Source Replacement Side Mirror - Electric w/ Turn Signal - Textured Black - Driver Side
- Replacement Standard Mirror
- Electric
- Black
- Paint to Match
- Fits Driver Side
- Turn Signal
- K Source
- Non-Heated
A direct replacement for your Toyota Tacoma's side-view mirror, this power mirror features electric adjustment, turn signal, and breakaway design. Simple bolt-on mounting and plug-in wiring.
Features:
- Side-view mirror is a direct replacement for the driver's-side factory mirror on your vehicle
- Modeled after manufacturer's original look and fit
- Power remote capability
- Adjust mirror face position with the factory power controls inside your vehicle
- Amber light on side of mirror flashes when turn signal is activated
- OE-grade, flat glass with first-surface plating reflects clear images
- Front of glass is plated with reflective chrome
- Flat lens reflects true representation of object size
- Breakaway design - mirror folds when struck to deter breakage
- Durable plastic housing with textured black finish
- Cover can be painted to match your vehicle
- Easy, no-drill installation
- Same footprint and mounting points as factory mirror
- Mirror plugs into existing electrical wiring
Specs:
- Original equipment (OE) number: 8794004211
- Quantity: 1 driver's-side mirror
- 90-Day warranty
Note: The power remote capability and turn signal of this mirror will work only if your vehicle already has those functions.
70150T KSource OEM Replacement Sideview Mirror - Power - Textured Black - Left Hand Side
Video of K-Source Replacement Side Mirror - Electric w/ Turn Signal - Textured Black - Driver Side


Videos are provided as a guide only. Refer to manufacturer installation instructions and specs for complete information.

Video Transcript for K-Source Replacement Side Mirror Installation - 2015 Toyota Tacoma
Hi, everyone. Aiden here with etrailer. Today, we're gonna be taking a look at and showing you how to replace the passenger side mirror on your 2015 Toyota Tacoma. It's gonna be a direct replacement from K-Source that matches the OEM style and provides all the same power functions for adjustment and turn signals. Let's check it out. Here's a look at that mirror.
It's gonna be a direct bolt-on replacement and have this black plastic cover that comes with it so it gives it a nice finished look. It's not color matched, but I honestly don't think it looks bad. You could very easily paint this material. It's got a nice smooth finish to it, so, painting I don't think would be too hard. You just have to find the right color.
You can see it does retain the ability to break away like that. So, if you did hit something, it wouldn't just immediately snap the mirror. Or if you just needed to fold this into safe space, you could do that, too. And here's where you can see our turn signals will be. It's a little hard to see out in the sun right now, but we've got the blinker on and it illuminates just like the old one did.
Now, because we've got a plug and play installation, I can adjust the mirrors from inside the vehicle using the indoor controls just like I could before. And with all that in mind, really the only thing you have to worry about is how to install it. It's a really straightforward process. Let's walk you through it right now. Starting off the installation, we're gonna make sure we've got the correct mirror for the correct side.
And there are a few rubber pieces like this that just come pre-attached on here as packaging materials. You can take those off now or later. It's really up to you. And we're gonna actually be beginning the install on the inside of the door where we need to get this door panel removed. The first thing is the smallest panel up top, just this triangle shape, go in with the plastic trim tool, starting from the top and just prying this up and popping this out. This one comes out very easily with these three tabs here. And we'll set this to the side for now. Right below that is a small push button fastener. A small flathead screwdriver like this will probably work better just because that is quite small. So, push that center part in and use the flat head to just pry up on the outside here and remove that from the panel. Using that same screwdriver and trim panel tool, you can go to where your door controls and window controls are and just start again from the front and work your way back, using that screwdriver to get yourself a little more leverage with that trim panel tool since it is a pretty thin gap, and disconnect these two plugs. There's a small tab on the back of those plugs that you can depress to remove them. It's gonna be a little hard to see in the sunlight here, but in by our door handle and our lock, there's going to be a small plastic door. Use your flathead screwdriver to open that door up and that's going to reveal a Phillips-head screw inside that we can remove. Now, we're gonna do the same process in this handle down here. So, just popping that door open and going in there with a Phillips-head screwdriver and removing that screw. With all the fasteners removed, you can start to pop off the door panel. It's best to go down in the closest corner here kind of where the speaker is. You can get your fingers in there pretty well, but you can use a trim panel tool, too to just start prying up, and you'll hear some pops of some push tabs coming off. Just work your way around slowly and carefully. Try not to crack the plastic by applying too much pressure, but once you get it started, it should go pretty easily the rest of the way. And then, we can set this to the side for reinstallation later. So, right up by that initial panel, there's going to be a small white connector here. Again, just press that tab, pull the connector out, and if we follow it up, that's gonna lead us to where our mirror once was. And from there, we can see three nuts, all 10 millimeter in size. So, just take a wrench and socket, or if you've got something like this where it's a small 10 millimeter on the end of a screwdriver, that'll work, too, maybe make it a little easier to reach and keep my hands out of the way of the camera here. And once we remove all three, it'll pop out from the other side so make sure you have a hand on it as you undo the last nut or have an extra set of hands to catch it. When you have that last nut removed, this should just release from the vehicle, and we can set this to the side because it's broken and it's not gonna get reused. The new mirror will be a direct replacement. Feed the wire in through the largest hole first. Make sure all the nuts are off because they do come pre-installed, so have 'em removed. Carefully, feed it through the holes. And then, on the other side, we can attach the new nuts. That first one is probably the most important to get installed now just because then, the mirror will support itself and not fall out. So, once you've got that one in, you can just repeat that process for the other two nuts. These are all still gonna be 10 millimeter. It's probably not a bad idea to come back through with a wrench or a socket and ratchet just to make sure all of those nuts are snug 'cause you can get a lot better leverage with this. You don't want the mirror rattling as we go down the road. There's no provided torque specs, but I just make sure that it's solid and secure. No need to over-tighten it and just crank down on it really hard. Our new connector will plug right into the old one. We'll hear a small click to let us know it's secured. And I'm just gonna try to tuck this excess up into this cavity here so it's not getting caught up in anything. And before we get the door panels put back on, I'm gonna test everything just to make sure it's working properly 'cause this is a power mirror. So, make some adjustments on the mirror and also test the blinkers. The door panel and all its fasteners are gonna attach the same way we took 'em off just in the reverse order. One trick when reattaching it, do the top first because it kind of hooks into that panel. So, once you get it a little bit above where it's gonna sit, just push in and you'll feel it seat down into position. And then, we can go around pushing it on the sides and hearing some clicks of those push fasteners. Make sure you connect the smaller connector to the smaller plug and the larger one to the larger. Hook the back end in first and push down on the front. Reinsert this push connector and press that center button in to lock it. The Phillips-head screws for the door panels are different. The larger silver one will go to the bottom. The smaller one will go to the top. In the small triangle panel up top, it'll just push back into position once you've got it lined up properly. Now, your kit does come with a new plastic cover for the backside of the mirror. If you've got your old one, you might be thinking, can I just pop the old one on No, just because the tabs don't line up. The pattern in the middle is going to be a little bit different. So, if you want to, you can keep it as a reference to paint and color match it. Otherwise, you're gonna need to take that new one from your kit and pop it on the mirror. There's no real science to this. Just kind of pop it on one side and push it in. You'll hear some clicks throughout. Just make sure it's all seated evenly throughout. And that's really all there is to it. The whole process is honestly pretty straightforward. And it's nice because we get to retain the power control of the mirrors, the turn signals on the back, and it'll still fold in if we need it to. So, if you've got a broken mirror for the passenger side on your 2015 Toyota Tacoma, then you can check out this K-Source replacement. It's a very simple process, and if you need the driver's side, just be sure to check out the one for the driver's side. But that'll do it for our look at and replacement of this passenger mirror. Thanks for watching.
0
0
See what our Experts say about this K Source Replacement Mirrors
Info for this part was:

Video Edited:
Dustin K

Written by:
Mary K

Edited by:
Amanda M
At etrailer.com we provide the best information available about the products we sell. We take the quality of our information seriously so that you can get the right part the first time. Let us know if anything is missing or if you have any questions.
Product Experts Available Now!
Call 1-800-940-8924
Thank you! Your comment has been submitted successfully. You should be able to view your question/comment here within a few days.
Error submitting comment. Please try again momentarily.