
Summer Starts Here - Save up to 70%

Videos are provided as a guide only. Refer to manufacturer installation instructions and specs for complete information.
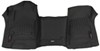
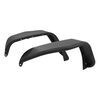
Today on our 2012 Jeep Wrangler Unlimited we're gonna be installing Aries Front Inner Fender Liners. Part number AA1500350. And this is what our replacement inner fender liners are gonna look like when they're installed. They're gonna give it a more aggressive look. It's gonna more enclose the area leading into your engine compartment. This'll help keep out more dirt, dust, debris and water to help ensure that your engine bay is cleaner and the components inside will be longer lasting.
And in addition to being larger and keeping out more debris it's custom molded to fit your Jeep to go around all of your components. It features an aluminum construction so it's gonna be harder and more resilient than your factory plastic liners. Since it's made of aluminum it's gonna be resistant against rust and corrosion and it features a black powder coat finish to further protect against the elements and to give it that meaner, darker look.It comes with all the hardware you need to get it installed. There is some drilling required as well as some rivet nut instillation. Let's show you how to do that now.We'll begin our installation of our front inner fender liners here on our passengers side.
You'll need to remove your factory fender flare. Our fender flare was already removed by the customer as they are getting an upgrade to Aries Fender Flares. Once your fender flare is off we'll then need to remove the inner fender liner. You use a 10 millimeter socket to remove the bolts located here on the inside. There's also one small allen head bolt that we'll need to remove with a 2.5 millimeter island key.
And if you have a marker light here in your inner fender liner you'll wanna unplug that. You'll simply push in on the release tab located here and pull the connector out. We can now set this aside. We do have the option to reroute this wire and drill and place it in your new one if you so desire.We can now set our new inner fender liner in place. We wanna line up all the holes and if necessary we'll use a 25/64 inch drill bit to drill out a hole where each one of these are, if there's not already a hole there and then we'll insert the rivets using the tool that comes in the kit.
Next we'll install our Z brackets that come with the kit. Two on each side. There already will be factory weld nuts located on your vehicle, so we'll take a M six bolt that comes in the kit. We're going to place a lock washer followed by a flat washer under those bolts and then we'll thread this right up in to that factory weld nut. We're gonna do that with two brackets using those two factory weld nuts that are located here underneath.Now we'll snug em up using a 10 millimeter socket. We don't wanna get them all the way tight just yet. We just wanna get em close to where we can still move it. Now we'll need to adjust the distance between those two brackets to about seven and 7/16s from center to center. Make sure they're about the right distance apart and then snug em down.We'll now take our fender liner. We're gonna line it up using the same hardware we did before with the bolts, lock washers and flat washers and thread that hardware into those Z brackets. And we're gonna just leave these hand tight for now. And again for each hole that we have here we're gonna prepare a bolt with a lock washer and flat washer and we can reinstall our fender liner. We're putting on Aries Fender Liners which will use the extra bolts as our inner fender liner does here. So we just need to line those up and thread our hardware in. And again for now we're just gonna leave everything hand tight.If you are upgrading to the Aries Fender Flares, there is a bolt also located here on this bracket that we need to go up through the bottom to catch. The front most hole that lined up with our body was already too large to use the crush rivets that come in the kit, so we're gonna just be using the nut and bolt from the factory hardware to get it reattached. We're gonna reach behind it. Using a wrench to hold the nut can make it a little easier if your hand doesn't quite fit back there to hold it. Now we can go back with a 10 millimeter socket and tighten everything down.We'll now repeat the exact same procedures on the opposite side and complete our front installation. And that completes our installation of Aries Front Inner Fender Liners on our 2012 Jeep Wrangler Unlimited.
Info for this part was:
At etrailer.com we provide the best information available about the products we sell. We take the quality of our information seriously so that you can get the right part the first time. Let us know if anything is missing or if you have any questions.


Thank you! Your comment has been submitted successfully. You should be able to view your question/comment here within a few days.
Error submitting comment. Please try again momentarily.