
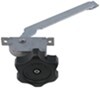
Curt Venturer NEXT Trailer Brake Controller - 1-3 Axles - Time Delayed
(12 reviews)
Price: $89.95
Curt Venturer NEXT Trailer Brake Controller - 1-3 Axles - Time Delayed
Item # C74VV
Retail:$118.95
Our Price: $89.95
You Save: 24%


- All Info
- Reviews (12)
- Q & A (0)
- Photos
CURT Trailer Brake Controller - C74VV
- Electric
- Electric over Hydraulic
- Time Delayed Controller
- Up to 3 Axles
- CURT
- LCD Display
- Dash Mount
- Under-Dash Box
- Automatic Leveling
- Up to 360 Degrees
A simple LED display and a pinch-trigger manual override make this time-delayed brake controller easy to read and easy to use. Installation is quick and simple with no mounting restrictions. Activates brakes with a preset intensity.
Features:
- Brake controller activates trailer brakes with preset intensity
- Adjustable power output control lets you select the amount of braking force
- Rocker switches located on left front of module for easy access
- 10 Gain settings and 9 load settings allow you to adapt to various driving conditions
- Select a higher setting for harder braking and lower for more gradual braking
- Pinch-trigger manual override is within easy reach for controlling trailer sway or stopping in emergencies
- Simple LED display shows the amount of power output
- Self-diagnostics monitor trailer connection and check for shorts
- LCD display shows power adjustments in 1.0 increments
- Brightness is adjustable for optimal visibility
- Auto-sleep mode prevents battery drain after 5 minutes of idle time
- Quick and easy installation with no mounting restrictions
- No need to mount level - install anywhere at any angle
- Included mounting bracket and hardware designed to hold brake controller flush against the dash
- Plug-in, vehicle-specific brake control adapter (sold separately) available for select vehicles to reduce installation time
Specs:
- Application: trailers with up to 3 axles (6 brake assemblies)
- Compatible with low-volt, PWM, ABS, cruise control, and electric-over-hydraulic trailer brakes
- Dimensions: 4" long x 3-1/8" wide x 1" thick
- Limited lifetime warranty
Gain Adjustment
Gain control lets you set the maximum amount of power that will be applied to your trailer's brakes, adjusting in increments of 1. How much braking output you need is determined by the weight of your trailer; a heavier trailer will need more power to bring it to a stop. You want to go as high as you can without the trailer brakes locking up. Typically, the gain is only readjusted when you experience changing road conditions or if the weight of your trailer changes. To get more power to your brakes, press the left-hand upper rocker switch. To decrease the gain, press the lower switch. When you make your adjustment, the gain setting will show on the LED screen for 5 seconds as a series of bars and then go into sleep mode to reduce drain on the battery.
Load Control
Once you have the gain set, you can fine-tune your braking by adjusting the load control on a scale of 1 to 9. This controls the aggressiveness of your trailer's braking, meaning how quickly the brakes reach the maximum braking level. Load control can get the braking power to your trailer faster and with more intensity so that it doesn't push your tow vehicle forward. If your vehicle takes too long to come to a stop, increase the setting by pressing the right-hand upper rocker switch. If it stops too abruptly, decrease the setting by pressing the lower switch. You can alter the setting to suit your driving preferences or to improve handling based on changing road conditions or varied trailer loads.
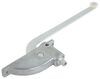
Pinch-Trigger Manual Override
The Venturer comes with a easy-to-reach, pinch-trigger manual override, great for stopping sway or controlling your trailer's momentum in emergencies. To engage the manual override, just push in the trigger. This will activate the trailer's brakes and brake lights without you having to apply the brakes on your tow vehicle, perfect for limiting trailer movement while you're cruising.
LED Display
The LED display on the Venturer is large and easy to read at a glance. It will show you what setting the brake controller is on as well as give you information for troubleshooting. You can adjust the screen brightness or trigger night mode so it won't glare obnoxiously on your dash. Press the control button to cycle through the different modes, shown as a bar - keeping it simple.
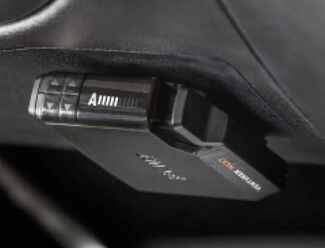
Quick Installation
Because inertia plays no role in the functioning of this controller, you do not have to mount the unit at any particular angle. Your mounting options are limitless, so long as you can still easily access the controller and the manual override. The included bracket is designed to mount the brake controller flush to the dash so it takes up almost no space at all.
If your vehicle already has a plug-in brake controller wiring harness, just connect the unit to it. Otherwise, you will need to purchase a vehicle-specific wiring harness (sold separately) to plug into. If a harness is unavailable for your vehicle, hardwiring will be necessary.
Note: If a custom brake control wiring adapter is not available for your vehicle, one of the following will be required:
20-Amp circuit breaker (9506P - sold separately) for 2- to 4-brake applications
30-Amp circuit breaker (38630 - sold separately) for 6- to 8-brake applications
See also etrailer.com's exclusive 7- and 4-way brake control installation kit (ETBC7 - sold separately) if you don't already have a 7-way plug at the back of your vehicle.
Time-Delayed Braking
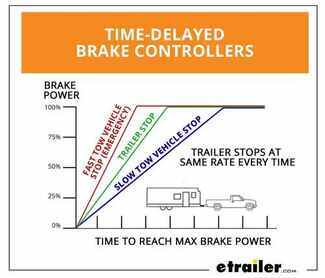
The Curt Venturer NEXT comes equipped with time-delayed braking. Every time you apply the brakes in your vehicle, a signal is sent - via the brake switch - to the Venturer. The controller then sends power out to your trailer brakes to activate them with an intensity set by you, at a rate determined by you. Both the amount of braking power (gain) and rate of application (load) can be adjusted to suit your preference, the road conditions, the type of trailer, and the weight of your load. To determine which levels are best for your application, test your towing setup and choose what feels right.
51116 Curt Venturer NEXT Time Based Trailer Brake Control - 1 to 3 Axles
Replaces Curt 51110
Installation Details


Customer Satisfaction Score:
96% were satisfied with this product
4% of customers were not satisfied
- Defective
- etrailer mistake
- Product did not meet expectations
Customer Reviews
Curt Venturer NEXT Trailer Brake Controller - 1-3 Axles - Time Delayed - C74VV
Average Customer Rating: 4.9 out of 5 stars (12 Customer Reviews)
A simple LED display and a pinch-trigger manual override make this time-delayed brake controller easy to read and easy to use. Installation is quick and simple with no mounting restrictions. Activates brakes with a preset intensity.by: John 04/13/2024
Installed but not used with a trailer yet, easy instruction and appreciate the extra hardware for the installation.
Compact and not intrusive. Decided to use the adhesive tape included and taped under the dashboard L of the steering wheel.
by: Jason 02/23/2024
Slimmer than most of the others. Easy install with the additional pigtail.
by: Paul 02/26/2024
Delivered early. Was just what I wanted.
by: Gene 08/14/2023
Almost plug-n-go.The hardest part was where to put the controller !
by: Mike 02/14/2024
by: Robert 02/12/2024
by: Joshua 04/02/2024
by: Mikel 04/05/2024
by: Bill 04/13/2024
by: Robert 03/22/2024
by: Stuart 03/27/2024
by: John 01/23/2024
12
12
See what our Experts say about this CURT Trailer Brake Controller
- Power Always On Blue Wire on Curt Brake Controller on a 2005 Chevy SilveradoBrake controllers do send back a minimum amount of voltage to check for a connected trailer but it should not be enough to activate the brakes. There are some tests you can perform to determine if the problem is with the controller. First disconnect the trailer from the truck. In the truck cab you will need to sever the blue wire several inches from the back of the controller. Then use your tester to test the end of the blue wire coming out of the controller. It should only have power...
view full answer... - Wiring Diagram/Colors for Installing Curt Venturer Brake ControllerThe Curt Venturer part # C74VV uses the standard brake controller wiring colors of white for ground, red for stoplight switch, blue for brake output to trailer connector, and black to 12 volt power. I also attached a link to the install instructions for this controller for you to check out as well.
view full answer... - Mounting Curt Venturer NEXT Trailer Brake ControllerCurt has started using new brackets for their brake controllers, and that is also true for the Curt Venturer NEXT Trailer Brake Controller # C74VV. To mount this, all you have to do is put the included adhesive tape onto the included bracket and stick it wherever you like under your dash. If you'd like, you can also use the included screws with the adhesive to mount the bracket under your dash. With the bracket mounted, you'll just slide the Venturer NEXT controller into the bracket and...
view full answer...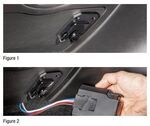
- No Trailer Connected Message Shown After Brake Controller InstallationThe no trailer connected error on most brake controllers simple means the controller does not sense resistance on the brake output circuit. This is usually caused by a short or improper wiring. I recommend checking the vehicle side connector to make sure everything is working correctly with the override. If you don't get signal sent to brake output pin then you know the issue is on the vehicle. If you do then move to the trailer. You can probe the blue wire directly behind the controller...
view full answer... - Making Under Hood Connections to Power Brake Controller and 7-Way on a 2008 Chevy SilveradoNot all Chevy trucks have the tow package wires completely installed from the factory. This means there could be some connections you will have to make under the hood to power the brake controller and the 12 volt circuit on the 7-Way trailer connector. I have included a link to a how-to article that explains the under hood connections that need to be made. I am not sure which video you watched so I have linked another on a 2008 Silverado and a different brake controller that should also help.
view full answer... - Does Curt Trailer Brake Controller Wiring Harness Require Separate Ground Wire on 2006 Toyota TundraSome of the other brake controllers require a more substantial ground connection than what the factory plug on the 2006 Toyota Tundra has so that is why they have that extra ground wire. The engineers at Curt have determined that their controllers do not require an additional separate ground wire for the controllers to work properly so they did not include one. So all you have to do is mount the controller according to the instructions and plug it all in. After the initial set up you should...
view full answer... - Trailer Brakes Dont Engage Completely and Brake Controller Not Showing Full PowerIt sounds like there might still be some wiring issues in addition to the one that you found, but I think your best bet to start with this issue is by pulling the pin on the breakaway system on the trailer; this will allow us to figure out if these issues are being caused by the brakes/wiring or if the problem lies somewhere else. If you pull the pin and the brakes don't lock up completely, the issue is going to be on the brakes and/or brake wiring; if the brakes lock up completely, we...
view full answer... - Troubleshooting A Curt Venturer Brake Controller That Is No Longer WorkingPer the instructions for the Curt Venturer Brake Controller, part # C74VV, a blinking red light means there is a brake overload or a short. The probable solutions listed for this is to confirm the brake maximum load of 6. If that is not the issue, then you will need to locate the short and fix it. If you find no short in the system, the controller may be bad. You will need to test the wires at the back of the brake controller for proper input and output. The red wire should only have power...
view full answer... - Troubleshooting Brake Controller Install 2003 Chevy Silverado 1500HD that Wont Work w Brake PedalSince your truck is a 2003 Chevy Silverado 1500HD you should check the third brake light fuse of the truck. Your generation of GM truck is notorious for this fuse easily blowing and when it does brake controllers will stop working with the brake pedal. An easy way to check this is to see if the third brake light on your truck cab still lights up with the brake pedal.
view full answer... - Red Dot on the Curt Venturer Trailer Brake Controller Part # C74VVWhen is the red dot displayed? When you have the trailer connected or when you have the trailer disconnect? If it is when the trailer is disconnect than this is normal and not a sign of anything wrong. However, if the red dot appears when the trailer is connected and the vehicle is on then this is an indication that there is a short on the brake output wire (usually blue) that runs from the brake controller all the way back to the magnets in each braking assembly. You would need to trace...
view full answer... - Will Trailer Brakes Lock Up When Output On Brake Controller Is Set To MaximumWhen you adjust your output to maximum on the Curt Venturer, part # C74VV the brakes will be applied aggressively but will not lock them up as you questioned. It is a time-delayed brake controller and will apply the brakes to aid in braking as you need. If you move the manual adjustment to maximum you will apply the brakes even more aggressively.
view full answer... - Trailer Brakes Locking Up Even After Adjusting the Settings Per InstructionsFirst, you will want to figure out where the problem is occurring. Test the voltage from the brake controller at the vehicle end trailer connector. What you have your brake controller set at is what the voltage should read at the connector. If you are getting more voltage at the connector than what the brake controller set at, you will want to move your troubleshooting to the brake controller. If the voltage is reading correctly at the vehicle end trailer connector, then the problem is...
view full answer... - Installing Curt Venturer Trailer Brake Controller # C74VV in 1994 GMC 3500 C/K Series PickupIf you cannot access the wire going to the hot side of your brake light switch you may be able to access the brake pedal switch signal at an electrical box located near the emergency brake pedal. If you can find in this box a terminal(s) labelled NAT this might provide an alternative means to obtain the signal. You can use your circuit tester on this pin to confirm that it carries a signal ONLY when the brake pedal is pressed (and not when other vehicle functions are activated). I have...
view full answer...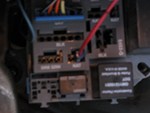
- Finalizing Wiring in Engine Compartment to Install Brake Controller on 2002 Chevy SilveradoIn some instances, the final brake controller wiring connections for the 1999-2006 GM full size trucks weren't completed at the factory. I've linked you to our FAQ article that shows how to complete the wiring. Next to the fuse block under the hood, you'll find a red wire with a ring terminal on the end of it. This wire provides power for the brake controller, and installs on the power stud on the side of the fuse box. Use the stud closest to the firewall. The power stud is activated by...
view full answer...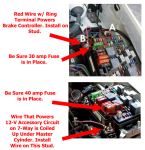
- No Power On Blue Wire From Curt Venturer Brake Controller That Is Flashing RedWhen the Curt Venturer Trailer Brake Controller # C74VV flashes red it means there is a short on the brake output circuit which sounds exactly like what is happening. The red wire should show power only when brakes are applied. The black wire should show somewhere close to 12V and the white wire is the ground so it should not have power. The blue wire not showing power is the brake output circuit and it should show power when the brake pedal is depressed or the manual override on the brake...
view full answer... - Troubleshooting Trailer Brakes Locking Up After Wiring 2010 Nissan Frontier with Brake ControllerThe issue you are having on your 2010 Nissan Frontier is a common problem that has shown up when installing a brake controller # C74VV on certain Nissan vehicles. This issue is for some reason the Nissan wiring was reversed during manufacturing. The solution can be found ins the attached article. Basically, you will have to switch the black and blue wires location on the brake harness plug. There are couple of ways to swap the wires. The article will explain how to perform both solutions.
view full answer... - Curt Venturer Trailer Brake Controller That Shows Green Light When Brakes Applied No TrailerWhat happens when a trailer is connected? It is possible what you are seeing is normal. The single green light of the Curt Venture part # C74VV indicates that there is no trailer connected but that the controller is ready to be used otherwise. Trying hooking up a trailer to see if it activates the trailer brakes.
view full answer... - Troubleshoot Trailer Brakes and Brake ControllerWhat needs to be done first is discover if the problem is on the tow vehicle or the trailer brake side. The easiest way to do this is connect your travel trailer to friends vehicle with their brake controller to discover if travel trailer reacts the same. If it does, you need to address your campers brakes. If everything brakes as it should then you have issues with your brake controller. Swap the brake controllers between vehicles also to discover if your 2007 Hyundai Santa Fe will function...
view full answer... - Normal Indication Lights For Curt Venturer Brake ControllerI called Curt to make sure that this is normal when the trailer is not connected. They confirmed that your brake controller is working exactly like it should. There should be a red light when you get in, and then it should change to a green light.
view full answer... - Will Display Light of Curt Venturer Drain Vehicle BatteryThe LED light of the Curt Venturer Trailer Brake Controller # C74VV draws such a miniscule amount of amperage that it would take a very long time to deplete a car battery to the point it wouldn't start the vehicle. Basically the battery would have gone dead due to inactivity before the display light would drain it.
view full answer... - Brake Controller for Trailer with Electric Over Hydraulic Actuator on Motorcycle TrailerFor a brake controller that will work great installed on a motorcycle and is electric over hydraulic compatible you'd want the part # C74VV. It's a time delayed controller which works the best on motorcycles.
view full answer... - Troubleshooting Curt Venturer Electric Brake Controller Doesnt Show Anything with Brake PedalIt sounds like you have a short in the 7-way connector. I would start by cleaning it, if you haven't already, and possibly replacing it. Start by testing for power on the red wire going into the controller. It should only show power when the brake pedal is pressed. If it isn't then it's connected to the wrong wire. If the red wire checks out try testing for power on the blue wire coming from the controller. Since the controller's display isn't showing anything I doubt you'll read...
view full answer... - Wiring Curt Brake Controller to Factory Harness on 2012 Toyota TundraThe four wires coming from your Curt Venturer Trailer Brake Controller # C74VV are for the following functions: White - ground Black - 12V power Blue - output to trailer brakes Red - input from brake switch Then, based on my research, the factory brake controller harness for your Toyota Tundra features the following wire functions: Brown - ground Black with red - 12V power Red - output to trailer brakes Green with white - input from brake light switch, The green wire is actually not...
view full answer... - Troubleshooting Constant 12V Power on Blue Brake Output Wire with Curt Venturer Brake ControllerIf you are reading a constant 12 volts on the blue brake output wire with the Curt Venturer Brake Controller # C74VV installed, this is indeed an indication that either the controller itself is bad or there's a short somewhere along the brake output wire on your truck (between the controller and 7-Way connector). The first thing I recommend doing is severing the blue wire just a few inches behind the Curt Venturer and testing for power again on this wire. This will isolate the controller...
view full answer...
Do you have a question about this Trailer Brake Controller?
Info for this part was:

Edited by:
Lindsey S

Expert Research:
Jameson C

Video Edited:
Chris R

Updated by:
Wilson B

Installed by:
Michael B

Installed by:
Aidan B

Video by:
Charles A

Written by:
Amanda K
At etrailer.com we provide the best information available about the products we sell. We take the quality of our information seriously so that you can get the right part the first time. Let us know if anything is missing or if you have any questions.
Product Experts Available Now!
Call 1-800-940-8924
Thank you! Your comment has been submitted successfully. You should be able to view your question/comment here within a few days.
Error submitting comment. Please try again momentarily.