
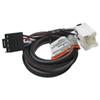
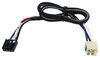
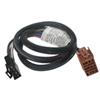
Replacement Brake Control Plug-In Harness for Tekonsha and Draw-Tite Brake Controller 12" Long
(693 reviews)
Price: $13.32
In Stock
Replacement Brake Control Plug-In Harness for Tekonsha and Draw-Tite Brake Controller 12" Long
Item # 20127
Retail:$17.50
Our Price: $13.32
You Save: 24%
Will this fit?
To see if this custom-fit item will work for you please tell us what vehicle you'll use it with.
In Stock
Thank you! Your comment has been submitted successfully. You should be able to view your question/comment here within a few days.
Error submitting comment. Please try again momentarily.


- All Info
- Reviews (693)
- Q & A (0)
- Videos (6)
- Photos
2023 GMC Acadia - Replacement Brake Control Plug-In Harness for Tekonsha and Draw-Tite Brake Controller 12" Long
- Trailer Brake Controller
- Wiring Adapter
- Plugs into Brake Controller
- Draw-Tite
- Universal
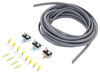
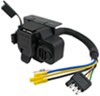
Tow Ready Replacement Plugin Harness for the Tekonsha P3, Voyager, Prodigy, and Primus Brake Controllers. Also works with Draw-Tite Intella-stop Xtreme, Intella-stop Ultra, Intella-stop Digital, and Activator III (5520) brake controllers.
- Wire lead length: 12"
- Wire functions:
- Blue: trailer brakes
- White: vehicle battery negative terminal
- Black: vehicle battery positive terminal
- Red: cold side of stoplight switch
8506920 Replacement Brake Control Plug-In Harness for Tekonsha and Draw-Tite Brake Controller 12" Long
Replaces 20127
California residents: click here


Video of Replacement Brake Control Plug-In Harness for Tekonsha and Draw-Tite Brake Controller 12" Long


Videos are provided as a guide only. Refer to manufacturer installation instructions and specs for complete information.


Video Transcript for Trailer Brake Controller Installation - 1991 Ford F-150
Today on our 1991 Ford F150, we will be installing the Tekonsha PowerTrac electric brake controller, part number 39523 in conjunction with the ETBC7 Brake Controller wiring as well as the replacement brake control plug in harness for Tekonsha and Draw-Tite type brake controllers, part number 20127. We will begin our installation here at the rear bumper. We will need to install the bracket to the rear bumper that will hold our 7 pole connector. We will take the bracket and the hardware, put the bracket in place here in the redrilled holes. Slide the bolt through, put the washers on the other side and lock it down with the nut. With both bolts in, we can go ahead and tighten it down securing it to the rear bumper. We are now ready to put the 7 pole into the bracket. We will take our 7 pole connector and the hardware here, put the connector into place making sure that the wires pass through the bracket and with our connector in place, we will pass the bolts through the connector, through the bracket, put the nut on the other side and tighten them down.
With all four bolts in and tight, our 7 pole is secured to the vehicle and we are ready to wire it up. To wire it up, you will notice that the 7 pole has a 4 pole on the other side. This vehicle already has a 4 pole so we will simply plug it in to our new connector and lock it down with a zip tie. This will ensure that it never comes apart where we can then wrap it in electrical tape further securing it and keeping the elements out. With that connection made, we will go ahead and secure it back to our hitch here using a couple of zip ties. We will now move on to our ground and reverse light lead. The white wire here with the ringed eyelet our ground and the purple wire with the yellow butt connector on it is our reverse light lead.
We will not be hooking this up so we are going to go ahead and attach the purple wire to our white wire just to keep it out of the way. With that done, we will find a good grounding location and using a self starting screw, we will attach it here to the frame of the truck giving us a good ground. We will again make sure that all our wires are neatly tucked away and secured with some zip ties. We are now ready to work on our brake control wiring. We will take our duplex wire, remove the sheathing and attach the white wire to the blue wire here on our 7 pole. We will take the black wire and attach it to the black wire of our 7 pole.
With that done, we will go ahead and wrap it in electrical tape just to keep it out of the elements. We can then secure it to the hitch and begin running our wire up to the front of the truck. As we run it up to the front of the truck, we are going to try to stay away from anything hot such as the exhaust or any moving components such as the vehicles suspension or steering as we route the wire. Before we move back to the top side of the truck, we are going to take the included corrugated loom and wrap it around our 7 pole wiring just to give it a good look.Now that we are done underneath the truck here, we move up to the top side. Here in the engine compartment of the truck, we will route our duplex wire up where we can now cut the majority of the sheathing left off of the wiring.
Our white wire, we will route through the firewall of the truck and into the cab. The black wire will continue up the firewall and around to our battery. Here at our battery, we will need about an extra 8 feet of our duplex wire. This will be our power and ground for the brake controller. We will start here at the battery and work in the same way that we ran the black wire back to the firewall where we can then pass it through the same hole that we ran the white wire through. With that done, we will move into the cab where we will mount our brake controller.We will find a suitable location and using the self starting screws, we will attach the brake controller mounting bracket to the dash of the truck. With that done, we can now attach our brake controller to the bracket using the included screws coming with the brake controller. Now that we have our brake controller mounted, we will move over back to our wiring. We will take our replacement brake control plug in harness and the wires that we ran into the truck from the firewall. We will connect the white wire from the duplex wire to the white wire on the harness. We will connect the black wire on the duplex wire to the black wire on the harness. We will take the white wire that was by itself coming through the firewall and connect it to the blue wire of our wire harness. The red wire will need to make a connection at our brake light switch. We are going to go ahead and extend our red wire just to make sure we can route it without getting in the way of any steering components or other electric accessories.We will now locate our brake signal. Heres our brake switch where we will back probe our connector. We will want to connect to the wire that energizes when you press on the brake. Now that weve located it, we will now take the wire tap included with hour ETBC7 and connect the red wire to the solid green wire on our brake light switch. You may need to peel the sheathing from the brake light switch wiring in order to get enough wire to tap it. We will now go ahead and plug the harness we just assembled into the brake control harness and secure it up underneath the dash. With that done, we will just make sure that our wiring is all secured underneath the dash where we can reinstall the cover that we removed previously.With everything done there, we will move back out to the engine compartment. We will take our 20 amp fused breaker and attach it to the firewall here. We will have three wires, two black wires as well as one white wire. The black wire that is within the duplex wiring sheathing will cut off, strip it back, and attach our small ringed eyelet included with the ETBC7 kit. We can then take the ringed eyelet and put it over the silver side of the breaker. We will take the excess that we cut from the black wire and attach another one of the small ringed eyelets and we will put it on the copper side of our breaker. This wire will run to our positive terminal on our battery. We will take the 40 amp breaker included with the ETBC7 and attach it to the side of the truck here. We will now take the black wire thats by itself and attach a small ringed eyelet to it. With that done, we will take the small ringed eyelet and attach it to the silver side of our breaker. We will then take another piece of black wire, attach our small ringed eyelet and attach it to the copper side of the breaker. With both breakers in and all of our nuts tight, we will attach the large ringed eyelets to the other side of both black wires where we can now make our connections to the positive side of our battery. We will take the white wire and connect it to the negative side of our battery and with that done, our brake controller is in and we are ready to pull a trailer with brake.That completes our installation of the Tekonsha PowerTrac electric brake controller, part number 39523 in conjunction with the ETBC7 Trailer Brake Wiring Harness as well as the replacement brake control plug in harness for Tekonsha and Draw-Tite brake controllers, part number 20127 on our 1991 Ford F150. .
Customer Satisfaction Score:
97% were satisfied with this product
3% of customers were not satisfied
- Wrong item was ordered
- Product did not meet expectations
- etrailer mistake
Customer Reviews
Replacement Brake Control Plug-In Harness for Tekonsha and Draw-Tite Brake Controller 12" Long - 20127
Average Customer Rating: 4.8 out of 5 stars (693 Customer Reviews)
by: Michael 02/18/2023
Exactly what I was looking for and needed ! It was delivered very quick . Actually I just ordered a complete wiring harness from you tonight . Your service and follow up is great
by: David11/05/2019
2007 Ford Ranger
Purchased a Teckonsha Voyager brake controller and the ETBC7 install kit.
The instruction an video were very clear and easy to follow. Installed on a 2007 Ford Ranger Sport. Tech support was also very helpful on the one question I did have.


David

11/8/2020
I have been completely satisfied with this item. It has operated as advertised an has had no problems.
by: Wayne12/20/2019
The drawtite hitch and trailer wiring harness fit great. Instructions were clear and concise. Installation was a breeze. I am ready to tow my little trailer now. As soon as I get the brake controller installed, I will be ready for my big trailer.


by: Chris C10/09/2016
If your truck comes with the tow haul package.... this item is literally plug and play. I had it wired up and all mounted inside of thirty minutes. It's literally 4 wires and the stock system wires are labeled along with the brake contoller. I haven't tested it yet but so far I am thoroughly impressed!


by: Griff Morgan06/19/2022
Class iii Draw Tite trailer hitch:
This part was quick and easy to order and I received it sooner than expected. My mechanic said the installation was easily accomplished and looks great on my car. I would not hesitate to order from etrailer again!

Griff M.
6/21/2023
The product has worked well. I have had no problems with it.
by: Rudy04/20/2023
Purchased this as part of all parts required to convert 1996 Jayco over to electric brakes. Very happy with results. Surprised to see after winter in storage that the battery supply still shows full charge.
by: Easy install01/21/2021
Perfectly wired directly to existing wiring that I had for the previous brake controller I replaced with the, Draw Tite I Command. This will make it a lot easier should I choose to upgrade the unit in the future.
Fantastic customer service from Joshua as well.


by: Bryce05/03/2022
Ram 2500
I installed the Curt gooseneck on my 1993 GMC 2 Wheel Dr. 2500 truck. All the components have tight tolerances. It took me eight hours. With a socket and the wrench. Laying on my back. I did have to cut the wheel well lip about 3/8 of an inch off because I could not get that front angle bar to slide in without hitting it, no way around it unless you lift the bed up and I wasn’t going to do that!!. You have to cut it.instructions do not state that. I’m very happy with the Hitch, it is definitely stout! I did have to make a notch on the outside brackets to go over my airbag bolt. I also had to remove the support bracket on the inside of the frame for the airbag and the crossmember for the spare tire to get the front angled bar in.


by: Douglas08/03/2023
As always, etrailer delivers. Part was on time and a perfect match for the brake controller. What you don't get from Amazon is the technical support on how to install or use the equipment purchased from etrailer. That's why I keep coming back!
by: Don 03/07/2021
My truck was stolen and wrecked. I was able to retrieve the Tekonsha Brake controller from under the Dash board before it was hauled to the salvage yard, but not the wire harness. I was ale to order a replacement harness from eTrailer and reinstall the controller in my new truck. I had no problems at all. Thank you eTrailer for the great support.
Don
3/9/2022
Still works perfectly after one year. Actually, I been using this Controller for well over a year. I just reinstalled it in my new truck a year ago.
by: Charles 09/25/2022
Chevrolet
Wiring harness I used to connect into the trailer brake control circuit. Requires pulling some inside trim in the drivers footwell area to access my 2022 Chevy Colorado's wires. Follow the intructions or better yet go onto YouTube for video on what goes where.
by: Tim 06/21/2020
These guys are great they had the installation kit it came with everything you need and even had a video for my specific vehicle to install the brake controller and wire in a 7 pin trailer plug
If you don’t have factory brake controller the etbc7 is an amazing kit they have comes with everything I mean everything

Tim
6/26/2021
Everything has been excellent e trail has the right products and they fit just like they say
by: Chad07/13/2021
Works as intended, but the plug on the back of the controller is a loose connection. Sometimes I would go to brake and find that I had no trailer brakes because the controller lost power. After a wiggle it would start to work again. I was able to shave the Molex plug a bit and now I don't have any problems with it.

Sierra K.
7/19/2021
Thank you for your review. I have not heard of that problem. I would have used some electrical tape.
by: Bill08/13/2020
The service you receive from etrailer is top notch. This brake controller has worked very well. I actually swap it between two of our vehicles. Just unplug it from one and plug it into the other.

Bill D.
8/15/2021
Very well. The service etrailer provides is the highest Ive ever experienced. They are just super to work with. Ive used them time & time again. I recommend them to everyone looking for anything they carry.
by: Shad11/01/2022
Works great. FYI YOU HAVE TO RUN A BRAKE WIRE FROM THE CONTROLLER TO YOUR LIGHT PLUG . For it to work properly.
by: Steve03/10/2024
1976 Chevrolet Blazer
Great selection and servive
by: Mile03/19/2024
Quality plug and what i needed for my F-53 chassis.
by: Bernard05/16/2023
The controller is on 24/ 7.I wish it turned on with the truck but this is more of a criticism of the truck not the controller I added a toggle switch so I can turn it off when I will not be using the trailer for a long spell.
by: Beck05/28/2022
One year later I'm extremely pleased with this purchase. I often chuckle when I see stock hitches and the whole thing is visible while mine is neatly tucked under with everything hidden except for the 2" receiver. 10/10 have recommended etrailer on many occasions to friends and family for their service and know-how. Since installing my hitch I towed a pop up camper 1500+kms and do frequent trips to the dump or my local dirt and gravel yard for supplies. Love it!
by: Steven05/03/2022
2008 Honda Pilot
Universal Installation Kit for Trailer Brake Controller - 7-Way RV and 4-Way Flat, Item # ETBC7
I installed this 7-pin plug kit on my 2008 Jeep JKU to add power and trailer brake control.
I also purchased :
Draw-Tite I-Command Trailer Brake Controller Item # 5535
and
Curt No-Drill Bracket Item # C57202
along with a little extra wire, just in case.
The kit quality was great. It shipped with everything I needed, sans the controller and bracket above. I used a cordless drill, a quarter inch drive socket set, screwdrivers, wire cutter/crimper, pliers, black electrical tape, half inch loom (plastic flexible conduit) and quite a few extra zip-ties I had laying around. I needed the Curt bracket to mount the 7-pin plug farther away from the muffler that runs parallel to the bumper in Wranglers.
I first ran the grey jacketed wire from the rear bumper all the way to the engine compartment. This was the hard part for me since I'm old and a little more round than I'd like. I didn't need to raise the jeep since it already has a 2 1/2 inch lift. I zip-tied the jacketed wire to the frame and brake lines until I found a spot in the frame I could run it through. I ran it out of the frame at the rear of the left front wheel well and up into the engine compartment. There is a (very handy) rubber plug in the firewall just to the left (outboard) side of the brake vacuum booster. I made a small slit in the rubber plug. I removed the outer jacket from the wire at that spot and fed the white (future brake controller wire) into the cabin of the jeep. I ran the black wire, in a wire loom/conduit across the top of the firewall to the battery. I had enough extra wire to run the brake controller power and ground wire from the battery, across the top of the firewall in the same conduit, and into the cabin through the same rubber plug/grommet. I drilled small pilot holes to mount the two circuit breakers. I then connected the wires at the 7-pin plug at the rear bumper. I again made a pilot hole and then mounted the ground wire with the self-tapping screw provided in the kit.
Here I'd like to mention, I would have been happier with heat-shrink connectors. I could have gone to town and bought some, or I could have soldered the connections. Instead, I just used the provided connectors and a LOT of black tape. If I have any corrosion issues later I will replace the connectors provided in the kit.
I wired and mounted the brake controller. This would have been super easy if I could fit under the dash. I dislike using the little blue inline wire connectors (self stripping connectors) but it was a godsend when working one-handed under the dash. I mounted the controller bracket and covered most of the exposed wiring with black tape for aesthetics.
If I was 20 or 30 years younger, I would have had this whole kit installed in about 1 1/2 hours. I am very happy with the quality of the materials. Many others have already noted the bracket is not quite perfect where it is designed for the four wire plug to slip in. The four wire plug had moved slightly on my 20 minute drive to work and would likely have fallen out if I went much further. I may put a wrap of electrical tape around the plug to tighten up the fit. Otherwise I will see if a zip-tie or a drop of superglue will hold the four wire plug in place. I was a wee bit skeptical about the sturdiness of the no-drill bracket as it's held in place by what looks like a hose clamp. I am happy to report, the clamp is heavy duty and well made. The no-drill bracket with the 7-pin and 4-pin receptacles are very sturdy and secure. The instructional videos on etrailer's website made the job easy to understand.
If I had this job to do over again, I would definitely use the same products from etrailer.
by: Ken D.02/22/2022
Both the 2017 & 2018 Winnebago Forza class A motorhomes DO have in place (under dash) connections for trailer brake controllers, unlike as depicted on your website as needing an additional part (wiring and 4 prong plug), although it is somewhat difficult to find. Attached to the connection socket is an unwired plug (with blue "lips" in somewhat blurry photo). One could either cut and splice the 12" plug-in harness (#20127) into the vehicle connections, or as I did, use solderless socket connections. To determine what wires go where, use an ohmmeter. You will find two b+ wires (use either one) a ground connection, a brake signal wire(use DC voltmeter and press on brake pedal (engine on in diesel pusher) to get reading, and a to trailer wire (bottom left corner when two b+ and ground wire are on right side of socket).
by: kent05/19/2021
If you are starting from scratch to install a brake controller and a 7-Way connector, you would want the Brake Controller 7-and 4-Way Installation Kit (ETBC7). This kit contains all the necessary parts to connect to the 4-Way connector mentioned above, and to wire all the way to the front of the vehicle and connect to the brake controller. I already had a Tekonsha Primus brake controller from another vehicle, so all I needed for that was the Brake Control Plug-in Harness (#20127).
by: Marc-Andre07/13/2022
Not even 2 years after install all rusty. Electric brake pin broke due to rust.
Impossible To remove 4 bolt holding connector due To rust. I do not recommend
by: Donnie12/11/2017
GMC Sierra 3500
I have used this on almost a daily basis , love it .


by: Jeff 08/19/2022
Working as expected.

Jeff
8/21/2023
Still working just fine.
25
693
Show More Reviews
See what our Experts say about this Draw-Tite Accessories and Parts
- Does the Tow Package Wiring on a 2008 Chevy Colorado Match a Brake Controller Color for ColorOn the 2008 Chevy Colorado with a factory tow package, the wiring for a brake controller is located under the dash, to the left of the brake pedal. The wire bundle should have a white tag on it that also lists the functions of each wire. You will need to match the wires to the brake controller by function, not by color. On the brake controller, white is ground, black is 12 volt power, blue goes out to the trailer connector, and red is in from the stop light circuit on the brake switch. It...
view full answer... - Tow Package Wiring Colors and Functions for a 2007 GMC Sierra 1500 New Body Stylethe wire bundle you are looking for looks like the one in the FAQ article I have linked for you. It is located under the left side of the instrument panel to the left of the steering column. The wiring colors should be as follows: Red/black wire = 12 volt power White = ground Light blue/white = input from brake switch Dark blue = output to trailer brakes Orange = not used There also may be some connections that you will need to make under the hood to make everything fully functional....
view full answer... - What Brake Controller Will Work With My 2022 Chevrolet SuburbanWhen it comes to your 2022 Chevrolet Suburban the Tekonsha Brake Controllers do not have the plug and play adapters for your vehicle. You will have to splice those 4 wires into your Prodigy P3 controller using the Replacement Brake Control Plug-In Harness # 20127, and this will activate your controller. I linked an installation video below on a different vehicle but it is the same concept.
view full answer... - Voyager Brake Controller Does Not Show Voltage with Manual Override AppliedThe way a brake controller works is sort of like you described. In many proportion controllers, you actually have to be moving to get voltage when applying the brake but will see voltage when applying the manual override. The controller actually senses how much the vehicle is decelerating using an internal sensor. It does not monitor how hard you press the pedal but it does sense when you are pressing the brake. Of course usually how hard you press the brake does effect the rate of deceleration. If...
view full answer... - Replacement Brake Control Plug-In Harness For Tekonsha And Draw-Tite Brake ControllersIf you're referring to the plug-in harness, we have the Replacement Brake Control Plug-In Harness for Tekonsha and Draw-Tite Brake Controller # 20127. This will work with the Tekonsha P3, Voyager, Prodigy, and Primus Brake Controllers. Also works with Draw-Tite Intella-stop Xtreme, Intella-stop Ultra, Intella-stop Digital, and Activator III (5520) brake controllers. If this isn't what you're looking for, let me know and I'd be glad to assist you.
view full answer... - Replacement Tekonsha Primus IQ Brake Controller Mount and HarnessFor a replacement harness with blunt cut wires you would want the part # 20127.
view full answer... - Brake Controller Wiring Harness For 2024 BMW X5 Without Factory Tow PackageWe do have a brake controller wiring harness that works with your 2024 BMW X5 without the factory tow package, and I verified with the manufacturer for you the correct part number is the following: - Tekonsha Brake Control Harness # 20127
view full answer... - Brake Controller Harness For Tekonsha Primus Brake Controller For 2013 Chevy SilveradoThere isn't a plug-and-play wiring harness for any brake controller for a 2013 Chevy Silverado, even with the tow package. So while we do have a harness for your Primus brake controller, it is a splice-in harness: - Replacement Brake Control Harness # 20127
view full answer... - Finalizing Final Under Hood Wiring Connections for Brake Controller on 2009 GMC SierraIt sounds as if the final power connection needs to be made under the hood. If you take a look at the Brake Controller Installation FAQ article I have linked you to, and scroll to the bottom of the page, you can see the procedure for finalizing the connections under the hood. The wire that provides power to the brake controller is located to the right of the power distribution box, between the box and the fender. Cut the electrical tape and free the red wire with the ring terminal on...
view full answer...
- Replacement Hardwire Brake Controller Adapter For Prodigy P3You'll need to hardwire the Prodigy P3, which means the correct adapter is the Replacement Brake Control Harness # 20127. If you do not have a factory brake controller on your Ram you will not need to have it flashed; if you are replacing the factory brake controller there is a good chance you will (this is not a one size fits all answer which is why I can't give you a definitive yes).
view full answer... - Brake Controller Wiring Functions to Install on a 1990 Dodge D250 PickupThe red wire that disappears under the dash of your 1990 dodge D250 pickup is input from the brake switch and will go to the red wire on the brake controller. Blue is output to the trailer brakes and connects to the blue wire on the brake controller. White is ground as you know and connects to the controller white wire and the fused red wire is for power which connects to the black brake controller wire. If you had switched the other red wire and the blue wire nothing would have happened...
view full answer... - Harness Needed To Install Tekonsha Brake Controller on a 2002 Toyota TundraIn order to install a Tekonsha brake controller on a 2002 Toyota Tundra you'll need the Brake Control Plug-In Harness for Tekonsha and Draw-Tite Brake Controllers part # 20127. This harness plugs directly into the brake controller and then the other end splices into the circuits on the vehicle. Please note, there is no brake controller port on a 2002 Toyota Tundra so splicing is the only option.
view full answer... - Parts Needed to Install Tekonsha POD Brake Controller on a 2010 GMC Sierra 1500On 2007 (new body style) through 2013 GM trucks did not have a brake controller port. Instead GM provided a tow package wire bundle under the dash, to the left of the steering column, held together with a white tag. All you will have to do is connect the brake controller wires to the tow package wires as follows: Tow Package red to brake controller black for 12 volt power Tow Package dark blue to brake controller blue for output to trailer brakes Tow Package light blue or orange to controller...
view full answer... - Wiring Needed to Install Prodigy P3 Brake Controller on a 2012 Chevy AvalancheI'd be happy to help! The Tekonsha Prodigy P3 # 90195 comes with a pigtail that connects to some blunt cut wiring on your 2012 Chevy Avalanche by splicing them together. Some vehicles have an OEM connector under the dash but others, like your Avalanche, have wiring you splice together for those connections. If you misplaced the pigtail then we have a replacement as part # 20127. When you go to splice these connections together you'll need to connect the following from the pigtail to the...
view full answer... - Parts Needed to Install a Voyager Trailer Brake Controller on a 2011 GMC SierraOn a 2011 GMC Sierra, there is no port under the dash to plug in a wiring harness but there are tow package wires. You will find the wires under the dash and below the steering column held together with a white tag. The tag will list the functions of the wires. You will need to attach these wires to the 4 wires on the brake controller but they will not match color for color. The brake controller white wire is the ground, black is 12 volt power, blue is out to the trailer brakes, and red...
view full answer... - Brake Controller Recommendation and Install for a 2006 Hummer H3Yes, to install a brake controller all you would need is the Tekonsha PowerTrac Brake Controller part # 39523, which is a great economically priced controller and the correct wiring harness part # 20127. Either harness will work fine. Your 2006 Hummer H3 should have four or five blunt cut wires under the left side of the instrument panel to the left of the steering column. You should see a bundle that contains a red wire with a black stripe, a white wire, light blue wire with a white stripe,...
view full answer... - Can't Find the Instructions to Install the Tekonsha Prodigy P3 90195I was able to look up your order history and found that you ordered the Tekonsha Prodigy P3 # 90195. It also looks like you ordered the Replacement Brake Control Plug-In Harness # 20127. I am linking the instructions to this answer, although you can find them on the product page as well. The correct wiring is as follows: Black - 12V Power Supply Blue - Brake Signal to 7-Way Wiring Harness Red - Cold Side of Stop Light Switch White - Ground (negative side of battery) If you have any other...
view full answer... - Replacement Wiring Harness for Tekonsha P3 Trailer Brake ControllerThe correct replacement wiring harness for the Tekonsha Prodigy P3 Trailer Brake Controller # 90195 is the Replacement Brake Control Plug-In Harness for Tekonsha and Draw-Tite Brake Controller # 20127. The harness will plug into the P3 and you'll then hardwire it to the brake controller wiring.
view full answer... - Where Is the Brake Controller Port on a 2005 Lexus GX 470The brake controller port (if present) on your 2005 Lexus GX 470 should be located underneath the driver side dash taped to another harness near the emergency brake pedal. Please note that these are not always easy to find so you will just want to be patient. If you are using a Tekonsha brake controller like the Tekonsha Prodigy P3 part # 90195 then the Tekonsha Plug-In Wiring Adapter for Electric Brake Controllers part # 3040-P is indeed correct. There is also a chance that your Lexus...
view full answer... - Does Prodigy P3 Brake Controller for 2009 Hummer H3 Use a Wiring HarnessIf you purchased your Prodigy P3 Trailer Brake Controller # 90195 new, it will have a wiring harness that comes with it that you will have to hardwire into your 2009 Hummer H3. Otherwise, if you are simply looking for a replacement harness for the controller it is the Replacement Brake Control Plug-In Harness for Tekonsha and Draw-Tite Brake Controller # 20127. I have added a link to a video review of that harness as well as the Prodigy P3 Trailer Brake Controller # 90195.
view full answer... - Brake Controller Installation on 2011 Chevy TahoeYou can't find it because you don't need it. Beginning in 2008, GM changed the set up of the tow package wiring under the dash. Instead of having a connector that required a wiring adapter, they went with bare ended wires that would hardwire to the controller. If you're using a Tekonsha controller that came with a quick disconnect pigtail like part # 20127, you'd begin by locating the tow package wiring located above the emergency brake pedal. Look for a bundle of wires that has a white...
view full answer...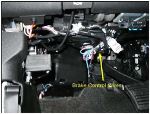
- Which Brake Control Plug-in Harness Fits the Prodigy P2Yes, the Brake Control Plug-In Harness, part # 20127, that fits the Tekonsha Prodigy will also fit the Prodigy P2, part # 90885.
view full answer... - Economical Easy to Install Brake Controller for 2011 Chevy SilveradoThe easiest to install and setup brake controller we offer that's at a great price is the Tekonsha PowerTrac part # 39523 which requires harness part # 20127. Connect the four wires on the brake controller adapter (20127) to the tow package wires. Follow the table below to connect the tow package wires and adapter wires using butt connectors. I also attached an install video as well.
view full answer...
- What Are the Brake Controller Wire Colors for on a 1998 Dodge Ram 2500The factory electric trailer brake controller wires on a 1998 Dodge Ram 2500 are as follows: Power - Red/Orange Ground - Black/Orange Stop Light - White/Tan Brake Output - Light Blue For a brake controller, I recommend using the Tekonsha Voyager Trailer Brake Controller part # 39510. It sounds like the previous owner of your truck may have cut off the old brake controller port so you are also going to want to use the Replacement Brake Control Plug-In Harness for Tekonsha and Draw-Tite...
view full answer...
Do you have a question about this Accessories and Part?
Info for this part was:

Expert Research:
Mike L

Expert Research:
Patrick B

Expert Research:
Michael H

Expert Research:
Jeff D

Expert Research:
Jameson C

Expert Research:
John H

Video Edited:
Zack K

Video Edited:
Joshua S

Video Edited:
Mike H

Video Edited:
Dustin K

Video Edited:
Chris R

Test Fit:
Nicholas E

Test Fit:
Shane H

Test Fit:
David F

Test Fit:
Clayton O

Video by:
Andrew L

Video by:
Zach D

Video by:
Jonathan Y

Video by:
Jacob H

Updated by:
Wilson B

Updated by:
Alexander C
At etrailer.com we provide the best information available about the products we sell. We take the quality of our information seriously so that you can get the right part the first time. Let us know if anything is missing or if you have any questions.
Michael
2/19/2024
After 1 yr and many trips this product has more than exceeded my expectations. Would definitely recommend it to anyone