
Best Dodge Avenger Bike Racks
change vehicle# 1
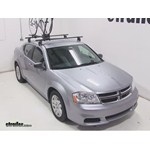
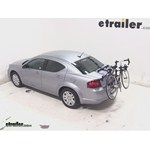
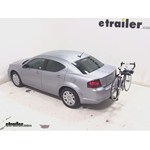
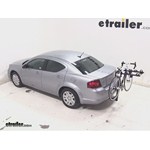
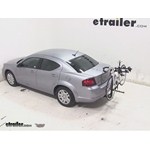
Thule Passage Trunk Bike Rack for 2 Bikes - Hanging Style

- view all Trunk Bike Racks
- Frame Mount - Anti-Sway
- 2 Bikes
- Non-Retractable
- Locks Not Included
- 6 Straps
- Adjustable Arms
- Hanging Rack
- Thule
More Information >


by: Jennifer06/14/2020
Excellent and prompt customer service! When I first ordered my product it wasn’t in stock— staff were quick to let me know and offered me comparable products. I ended up waiting for my original order and shipping quick and they stayed in touch with ideas! Thule: The instructions could be a little more detailed. I ended up watching YouTube videos to help me instal. Overall it was easy, and this was the first rack I’ve ever installed and I did it by myself! I was surprised to learn the bike rack is in no way secured inside your vehicle, so.. I store it in my garage when it’s on.


View More
View Less
by: Michael J06/17/2020
Positive: The product is well thought out and works for a wide range of automotive vehicles. It comes with interesting dampers that i think work. Instructions seem to be translated from another language, but are quite good, accompanying pictures make installation straightforward. A test drive over speed bumps shows that the rack will support the bike for all travel needs. It can be disassembled , collapsed and stored in the trunk. Downside: The rack is made for the classic triangular shaped frame: horizontal cross bar, "male" bike. For bikes without the horizontal bar, mounting is a little less satisfactory. Such a bike can only be mounted on the outside mounts. Cannot use the damper on one side. Picture shows the mounting. as to a design solution, maybe brackets could be replaced with smaller profile, some adjustability? however, as it is, vibration control is good and adjustability with smaller profile would have vibration concerns.


View More
View Less
# 2
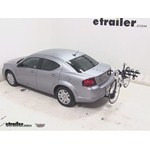
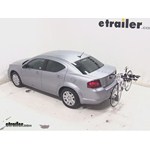
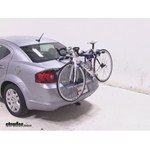
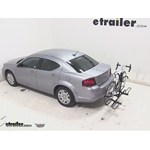
Thule Hitching Post Pro Bike Rack for 4 Bikes - 1-1/4" and 2" Hitches

- view all Hitch Bike Racks
- Hanging Rack
- Folding Rack
- Tilt-Away Rack
- Frame Mount
- Locks Not Included
- 4 Bikes
- Class 1
- Class 2
- Class 3
- Fits 1-1/4 and 2 Inch Hitch
- Fits 1-1/4 Inch Hitch
- Fits 2 Inch Hitch
- Thule
More Information >

by: Matt08/30/2022
The good: I like the way the bikes are held in and the ability to add the upright adapters to the bike frame holders. The straps are quality too. For a jeep with a spare tire, this is the perfect length to clear it. This rack is 5 stars from the bike holders to the base of it. The bad: the 2"receiver adapter and bolt are insufficient. I wish they made this in a solid 2" hitch. The entire setup is held into the receiver by a very short bolt. It only goes about half way into the receiver tube. So your hitch is only "secured" on one side. A hitch pin or bolt should go through the receiver tube completely imo so it can be secured on the other end with a retaining clip or nut. Because this only goes in the one side, the entire weight of the rack plus bikes are held tight to one side of the receiver by the undersized bolt and washer. A few bumps down the road and that bolt loosens. Now instead of distibuting the weight of the rack and bikes on the receiver and post, it's completely up to the bolt to keep you from losing the rack. The bolt threads get damaged too. I took this down a dirt road and nearly lost everything. I had to buy my own bolt with hd fender washers and lock washers to correct this. Thule should've provided this from the start. The current short bolt design where only one side of the receiver secures the rack is unacceptable. This rack is 1 star at best for the connection to the receiver.


View More
View Less
by: Cole06/02/2023
Hitch pin broke before I got it. Looks like a poor design for the locking pin, they might want to consider a different design. I got a 3/8 shear pin from Home Depot to replace and it works great. Bike rack is great!


View More
View Less
# 3
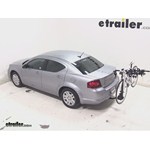
Thule Passage 3 Bike Carrier - Trunk Mount

- view all Trunk Bike Racks
- Frame Mount - Anti-Sway
- 3 Bikes
- Non-Retractable
- Locks Not Included
- Fits Most Factory Spoilers
- 6 Straps
- Adjustable Arms
- Hanging Rack
- Thule
More Information >
by: Kelly11/20/2017 Ford Edge
Ford EdgeFits perfectly on our Lexus CT200h. Only on the old LS400, the side straps have to be fastened to the wheel arch edge, since the upper trunklid gap is to narrow for inserting the strap hooks. Mounting of two bikes is (with some routine) quickly done, and they stay safe even for longer and faster routes. For transporting three (mountain) bikes, though, the design doesn't seem big and robust enough. Nevertheless, the price-benefit-fun ratios are way better than reasonable.

View More
View Less
by: Emily 08/08/2022
We are very pleased with the quality and ease of use for our like-new purchase. From the online shopping experience with etrailer.com through multiple outings already, this bike carrier more than meets our needs. Thank you!
View More
View Less
# 4
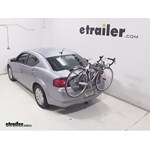
SeaSucker Komodo Bike Rack for 1 Bike - Fork Mount - Vacuum Cup Mounted - Aqua Blue

- view all Trunk Bike Racks
- Fork Mount
- 1 Bike
- Locks Not Included
- Suction Cups
- Suction Cup Rack
- SeaSucker
More Information >
by: Daniel M.07/13/20172001 BMW Z3
The Komodo was the perfect solution for carrying my road bike on the trunk lid on my old BMW Z3 Roadster. I also purchased the front wheel Hogg and or works beautifully. Seasucker's Komodo Is a very high quality product that looks like a piece of art. I'm likely to get more compliments on the Komodo rack than my bike or car!


View More
View Less
# 5
Thule EasyFold XT Bike Rack for 2 Electric Bikes - 1-1/4" and 2" Hitches - Frame Mount

- view all Hitch Bike Racks
- Platform Rack
- Folding Rack
- Tilt-Away Rack
- Frame Mount
- Bike and Hitch Lock
- 2 Bikes
- Class 1
- Class 2
- Class 3
- Fits 1-1/4 Inch Hitch
- Fits 2 Inch Hitch
- Fits 1-1/4 and 2 Inch Hitch
- Electric Bikes
Heavy Bikes - Thule
More Information >
by: Pam A04/20/2023
The BEST bike carrier by far!! We are both in our 7th decade and even I alone (5’2” 120 lbs) can manage to attach this in my hitch without any issues. It’s so easy to load both our hybrid and e-bike and they are super secure. We love that it folds up small and wheels away when not in use. This bike carrier is worth every penny!!
View More
View Less
by: Lori03/11/2024
This rack is perfect! eTrailer had it shipped and at my home in almost no time. I drove with it on the car today, and it was solid and secure. It's super easy to get on and off the hitch. I'm 5'1 and I was able to load the bike on with the ramp without a struggle. Thanks for the thorough video and comparison information. It made this purchase easy.


View More
View Less
# 6
Curt 2 Bike Platform Rack - 1-1/4" and 2" Hitches - Frame Mount - Tilting

- view all Hitch Bike Racks
- Platform Rack
- Folding Rack
- Tilt-Away Rack
- Frame Mount
- Bike Lock
- 2 Bikes
- Class 1
- Class 2
- Class 3
- Fits 1-1/4 and 2 Inch Hitch
- Fits 1-1/4 Inch Hitch
- Fits 2 Inch Hitch
- CURT
More Information >
by: Paul10/29/2023
I installed this rack onto a Curt trailer hitch which is mounted onto a 2017 Honda Fit. I have been using it intermittently for several months, probably about 5 times with one bike and twice with two bikes. I give some pros and cons below and then elaborate. Pros: easy to assemble, easy to mount and dismount bikes, easy to lock and unlock, how to put the rack into different positions is intuitive Cons: inconvenient to put the rack into different positions, inconvenient to mount the rack onto the hitch, rack protrudes about 15 inches from bumper when in flipped up position (seems very vulnerable to someone backing into it in a parking lot, very inelegant looking I say the repositioning is intuitive because there is really only one way you could possibly place the pins for each position. But removing and replacing two pins is much less convenient than turning a knob or a lever, like some racks do. Also many racks fold and flip in such a way as to look very unobtrusive when in non-use mode. This one looks like kind of a monstrosity. That does not really bother me but it might bother some owners. The part that does bother me is how far it protrudes from the car. I back into parking spaces whenever possible to avoid someone bumping into the rack and damaging it (which happened to a friend). My number one suggestion for Curt is related to mounting the rack onto the hitch. Make it easier to tell when the holes are lined up so that the bolt/pin will fit and thread. As it is now, if you insert the rack as far as it can go it is way too far in. Ideally, it would be exactly lined up. Failing that, maybe some kind of click or other feedback to know at least that you are in the neighborhood. It would also be great to have an attaching device that is easier to fasten and unfasten than is the bolt/pin. Tip for mounting the rack onto the hitch: I assumed that it would be awkward to hold, what is it 46 pounds?, while trying to line up the rack probe with the receiver. If you have a garage with exposed collar ties, my solution could work well for you. I looped a cargo strap over a collar tie. Then I hooked both hooks of a bungie onto that loop. The idea is that you hook one of the bike frame holders of the rack onto the bungie, suspending the rack a few inches off the garage floor. This takes most of the weight of the rack so that you can just pull up or down and forward until you line up with the receiver. Tip for mounting bikes. Don't put the little screw into the post that prevents you from completely removing the bike frame holders. Remove both holders. Position the first bike, slide the holder into place, position the second bike, slide the holder into place. I found this makes it much easier, because you avoid parts of the bike hitting the holder as you are trying to get the wheels into place. The trick is that if you are mounting only one bike, don't forget to put the second holder back on - or maybe just stick it inside the car right away.


View More
View Less
by: Matthew 02/03/2024
I had a 1 1/4" hitch installed on my 2016 toyota camry (the only size offered on the camry). I was very pleased with the ride. I expected to hear alot of noise like experienced when towing a trailer, but I heard almost nothing accept when going over speed bumps. I had to extend the tire supports to their widest position because having mountain bikes with a step through angled bar, they were more secure the closer i could get the upper and lower support arms to the seat post. The bikes were mounted in opposite directions and only stuck out maybe 6 inches or so. One locking barrel on the lower support arm was malfunctioning and gave me trouble but i called etrailer and they sent a replacement as soon as they were in stock. It comes with a anti rattle hitch pin but I highly recommend purchasing an anti rattle hitch pin with a lock on the end instead of just a clip for more security when unattended. After a few times mounting the bikes and figuring out the best way they should be positioned (pedals positions, direction of bike, and that my wife's smaller bike fit better going on first with my larger bike on the outside) I can mount the rack and bikes and be ready to go in just 5 minutes. (70 pounds on a torque wrench recommended for the hitch pin) I am overall pleased with my purchase i would recommend this product.
View More
View Less
# 7
Thule Gateway Pro 2 Bike Rack - Trunk Mount - Adjustable Arms

- view all Trunk Bike Racks
- Frame Mount - Anti-Sway
- 2 Bikes
- Non-Retractable
- Lock Rack
- Fits Most Factory Spoilers
- 6 Straps
- Adjustable Arms
- Hanging Rack
- Thule
More Information >
by: Timothy10/09/2022
Exactly as advertised, transported 2 Trek bikes on on the back of my 2016 Toyota Avalon without issue - travelling from Boston MA to Green Bay WI. Outstanding price buying this item as open-box. etrailer's website is the best I could find on the web with name brand racks, automated compatibility vehicle check, and they they shipped overnight.
View More
View Less
by: Dave05/14/20232018 BMW 3 Series
The delivery was quicker than I expected, but apparently the item was not checked before shipping. There was a key strap missing. I called customer service and they said they would send me a replacement part. If that goes well, I would move my rating to four stars from two.
View More
View Less
Bike Rack Videos
Yakima QuickBack 2 Bike Rack Review - 2014 Dodge Avenger

Today on our 2014 Dodge Avenger, well be test fitting the Yakima QuickBack Trunk Mounted Two Bike Rack, part number Y02621. Now, according to the included instructions or Yakimas website, well begin our test fit by placing the bottom part of the bike rack on the upper tier of the rear bumper. Then the top part of the bike rack will rest in the top part of the trunk. Now since this is specialized fit for your vehicle, youll need to double check the included instructions or Yakimas website to determine the measurement between the two pads. This one sure that the customized fit will be great for your vehicle. With the bike rack in position, we can take the top clips and hook them to the top part of the trunk. Then the side of the clips to the side part of the trunk, and the bottom clips to the bottom part of the trunk.
Yakima FrontLoader Roof Bike Rack Review - 2014 Dodge Avenger
Today on our 2014 Dodge Avenger, were going to be test fitting the Yakima FrontLoader, a wheel mount roof bike rack with part number Y02103. With our Yakima Q-tower roof rack system already installed on the Avenger, were going to begin our test fit by placing our bike rack directly onto our crossbars. Here at the front, well want the double leg side of our clamp in the front of our bar, and the single leg portion of our clamp behind the bar. Well then tighten the black T-handle located here on the front to secure our clamp around our bar. With the front secured, well move to the rear. Here well loosen the black T-handle, remove the T-bolt from the slot, bring our clamp around our bar, reinsert our T-bolt and tighten it down with the black T-handle. With our rack secured to our vehicle, its now time to load our bike.
Yakima ForkLift Roof Mounted Bike Rack Review - 2014 Dodge Avenger

Today, on our 2014 Dodge Avenger, we're going to be test fitting the Yakima Forklift, a Fork Mount Roof Bike Rack with part # Y02098. With our Yakima Q Towers Roof Rack System already installed on the Avenger, we're going to begin our test fit by placing our bike rack directly on to our cross bars. Here at front, we're going to remove the skewer, and slide back the black plastic cover. This will give us access to the T handle that will loosen enough to remove the T bolt from the lower half of the clamp. We'll then bring our clamp around our bar, reinsert the T bolt and tighten it down with the T handle. Once we have it secure, we'll slide our black plastic cover forward, then we can reinsert our front skewer. We'll now move to the rear where we're going to loosen the T handle, remove the T bolt from the slot and the clamp, bring our clamp around our bar, reinsert the T bolt into the appropriate slot, and tighten it using the T handle. With our rack secured to our vehicle, it's now time to load our bike. We'll undo the rear wheel strap, then make sure our front skewer is open and loose.
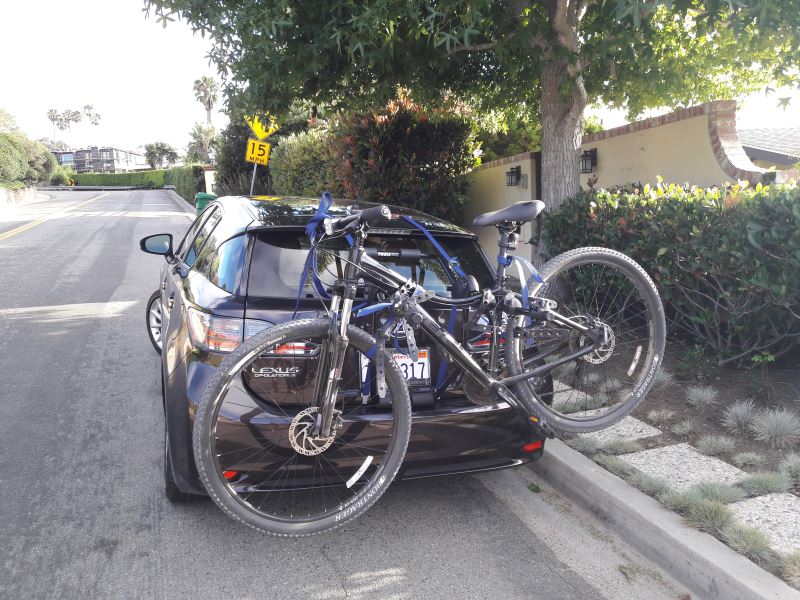
Thule Vertex 4 Hitch Bike Rack Review - 2014 Dodge Avenger
Today on our 2014 Dodge Avenger, we're going to be test fitting the thule vertex. A titling four-bike rack for inch and a quarter and 2 inch hitches, part number TH9029. To begin our test fit, well slide the shank of the bike rack into the receiver tube of our hitch. Well line up our pin holes, thread in our anti-rattle bolts, and tighten it down with a wrench. We can then secure it with the provided clip. In this position, well have about 8 and a quarter inches worth of ground clearance. The closest point of the rack to the back of our vehicle is about 2 and a half inches away, and over all weve add about 9 inches to the length of the Avenger. As you can see with our mast in the upright position, we do have access to our trunk.
Prorack 4 Hitch Bike Rack Review - 2014 Dodge Avenger
Today in our 2014 Dodge Avenger, we'll be test fitting the Prorack Tilting 4 Bike Rack for 1 1/4 inch and 2 inch hitches, part # PR8062404. To begin our test fit, we'll slide the shank of the bike rack into the receiver tube of our hitch, line up our pinholes, thread in our anti rattle bolt and tighten it down with a wrench. We'll then secure it with the provided clip. In this position, you have 7 3/4 inches worth of ground clearance. The closest point of the rack to our vehicle is about 3 3/4 of an inch away. Overall, we've added about 27 1/2 inches to the length of the Avenger. With our mast in the upright position, we do have access into the trunk. However, by pulling the big pin and clip at the base of the mast, we can tilt the rack away from our vehicle giving us even more access.
Thule Passage Trunk Mounted Bike Rack Review - 2014 Dodge Avenger
Today on our 2014 Dodge Avenger, we'll be test fitting the Thule Passage Trunk Mounted 2-Bike Rack, part number TH910XT. Now according to the included instructions or the Thule Fit Guide, we'll need to set the fit dial on the bike rack to number 7. Once we have the fit dial set, we can place the bike rack up onto the trunk. The bottom bar of the bike rack needs to be placed on the upper tier of the rear bumper and the top part of the bike rack should be placed on the top part of the trunk. We can now take the top clips and hook them to the top part of the trunk, the side clips to the side part of the trunk adjacent to the top part of the taillight and then the bottom straps to the bottom part of the trunk. Now you will need to pop open the trunk to get the side and the bottom clips in place. Now I'm going to tighten down each strap a little bit at a time so that way the bike rack can stay centered onto the trunk. Once all the straps have been tightened down and secured, I'll go ahead and secure the excess strap.
Thule Hitching Post Pro Hitch Bike Rack Review - 2014 Dodge Avenger

Today on our 2014 Dodge Avenger, we're going to be test fitting the Thule Hitching Post Pro, a folding, tilting, 4-bike rack. For inch-and-a-quarter and two-inch hitches, it's part number 934XTR. To begin our test fit, we'll slide the shank of the bike rack into the receiver tube of our hitch. We'll line up our pin holes, thread in our anti-rattle bolt, and tighten it down with the wrench. In this position, we'll have about 8-1/4 inches worth of ground clearance. The closest point of the rack to the back of our vehicle is about five inches away, and overall, we've added about 12 inches to the length of the car. Pulling the gold pin at the base of the mast will allow us to tilt it away from our Avenger.
Saris Axis 3 Bike Rack Review - 2014 Dodge Avenger

Today, on our 2014 Dodge Avenger, we're going to be test-fitting the Saris Axis, a tilting three-bike rack for inch-and-a-quarter and two inch hitches, part number SA843D. To begin our test-fit, we'll slide the shank of the bike rack into the receiver tube of our hitch, line up our pin holes, thread in our anti-rattle bolt, and tighten it down with a wrench. We can then secure this using the provided lock. In this position, we'll have about eight and three quarters of an inch worth of ground clearance. The closest point of the rack to the back of or vehicle is about two and a quarter inches away, and overall we're adding about 11 inches in length to the Avenger. As you can see with the mast in its upright position, we do have access into the trunk. However, if we need more room, we'll simply pull the yellow T handle at the base of the rack, tilt the mast away from out vehicle, and as you can see, it gives us all the room we need. We our mast back in its upright position, it's time to extend their dual cradle arms. We'll lift the two yellow levers located on our arms, slide them towards the center mast, rotate them into position, slide them back out, and hold them in place by reengaging out levers. When we set our arms, we'll be sure to set them level or slightly inclined. It's now time to load our bike, so undo our cradle straps, and grab our bike.
Thule Archway Trunk Mount Bike Rack Review - 2014 Dodge Avenger
Today on our 2014 Dodge Avenger, we'll be test fitting the Thule Archway trunk-mounted, 2-bike rack, part number TH9009XT. According to the included instructions or the Thule fit guide, we'll need to place the fit dial on number 7. With the fit dial set, we'll place the bottom arm on the upper tier of the rear bumper and the top arm on the top part of the trunk. We'll then take the top clips and hook them on the top part of the trunk, the side clips to the side part of the trunk, and the bottom clips to the bottom part of the trunk. Now, you will need to pop open the trunk to be able to position the side clips in place. Now, I'm going to tighten down each strap a little bit at a time just to make sure that the bike rack stays centered onto the trunk. Once all the straps are all tightened down, we can then secure the excess strap with the included hook and loop fasteners. Once this is done, we're ready to load up our bike. We'll need to flip out the gray levers on the upper left and right hand corner of the bike rack. This will allow us to bring the cradle arms out.
Thule Apex 4 Hitch Bike Rack Review - 2014 Dodge Avenger

Speaker 1: Today on our 2014 Dodge Avenger, were going to be test fitting the Thule Apex, a tilting 4 bike rack for 1-1/4 and 2 inch hitches, part number TH9025. To begin our test fit, well slide the shank of the bike rack into the receiver tube of our hitch. Well pull out on the attached pin located on the right side. Line up our pin holes, and allow the attached pin to go into our pin hole. We can now turn the black knob. This is going to engage our anti-rattle device and further secure our rack to our vehicle.With our rack secure, well take a few measurements.
Swagman Upright Roof Mounted Bike Rack Review - 2014 Dodge Avenger

Today on our 2014 Dodge Avenger, we'll be test fitting the Swagman Upright, a roof bike rack with part number S64720. With our Yakima Q Towers roof rack system already installed on the Avenger, we're going to begin our test fit by placing our bike rack directly onto our crossbars. Here at the front, we'll bring a metal U bolt around the underside of our crossbar, fit it through the head of the carrier, and secure it with 2 wing nuts. We'll repeat that same process on the other side of the front, and then, we can tighten down all 4 wing nuts to secure out front to our bar. We'll now move to the rear. Here at the rear, we're going to place a U bolt down through the rack. We'll be sure that it comes out on both sides of our crossbar. We can slip on the metal plate and then hold this in place with the 2 wing nuts. We'll tighten these down to secure our rack. With both of them secure, it's time to load our bike.
Swagman Titan Hitch Bike Rack Review - 2014 Dodge Avenger
Today on our 2014 Dodge Avenger, we're going to be test fitting the Swagman Titan, a tilting 4-bike rack for 1-1/4-inch and 2-inch hitches, part number S63410. To begin our test fit, we'll slide the shank of the bike rack into the receiver tube of our hitch, line up our pin holes, thread in our anti-rattle bolt, and then, we can tighten it down with our wrench. To secure it, we'll use the provided pin. In this position, you'll have about 11-1/4 inches worth of ground clearance. The closest point of the rack to our vehicle is about 6 inches away, and overall, we've added about 16 inches to the length of the Avenger. With our mast in its upright position, you do have access to the trunk. However, if you need more space, we can simply pull up on the black lever located at the base of the rack. The mast will swing away from our vehicle, giving us great access. With our mast back in its upright position, we'll pull the black lever located at the top of the mast. This will allow us to swing out our dual cradle arms.
Swagman Fork Down Roof Bike Rack Review - 2014 Dodge Avenger

Today on our 2014 Dodge Avenger, we're going to be test fitting the Swagman Fork Down, a fork mount roof bike rack with part number S64710. With our Rhino Rack 2500 Series roof rack system already installed on the Avenger, we'll begin our test fit by placing the bike rack directly onto our load bars. Here at the front, we'll bring 2 of the U bolts around the underside of our bar, fit it through the head of our carrier, and hold them in place with 2 wing nuts on each one. We'll tighten them down to secure the front of our rack to our crossbars. With the front secure, we'll move to the rear. Here at the rear, we're going to bring a U bolt through the rack, being sure that it comes out on both sides of our bar. We'll bring the metal bracket around the underside of our bar and fit the U bolt through it and secure this in place using 2 wing nuts. We'll tighten these down to secure the rear of our rack to our crossbars. We're now ready to load our bike. We'll begin by undoing the rear wheel strap and making sure that our skewer is loose and open.
SportRack Super EZ Hitch Bike Rack Review - 2014 Dodge Avenger

Speaker 1: Today on our 2014 Dodge Avenger, were going to be test fitting the SportRack Super EZ, a platform style 2 bike rack for 1-1/4 and 2 inch hitches, part number SR2901LR. To begin our test fit, well slide the shank of the bike rack into the receiver tube of our hitch. Well then line up our pin holes, thread in our anti-rattle bolt and tighten it down with a wrench, then secure it with the provided lock. In this position, we have about 11-1/2 inches worth of ground clearance. The closest point of the rack to the back of our vehicle is about 7 inches away. Overall, weve added about 21 inches in length to the Avenger. Pulling the two black pins on the outside on the rear of the rack will allow us to tilt down our wheel cradles.
Saris Bones Trunk Mount 3 Bike Rack Review - 2014 Dodge Avenger
Today on our 2014 Dodge Avenger, we're going to be test fitting the Saris Bones, an adjustable arm, trunk mount 3-bike rack with part number SA801. We'll begin our test fit by placing the bike rack directly onto the lid of the trunk. We'll take the hooks labeled top and connect them to the leading edge of our trunk lid. The hooks labeled side, we'll bring to the side and move them up into position. We can now take the lower hooks and connect them to the lower edge of our trunk. We'll move around the rack, tightening each strap a little bit at a time until we have it secured to our vehicle. We'll now secure our excess strap. With our rack secure to our vehicle, it's time to extend our dual cradle arms. We'll do this by turning the small black thumb dials, moving the arms toward the middle of the rack, rotating them into position, moving them back out into the slots, and tightening the thumb dial back down.
Saris Axis Tilting 2 Bike Rack Review - 2014 Dodge Avenger
Today on our 2014 Dodge Avenger, we're going to be test-fitting the Saris Axis, a tilting 2-bike rack for 1.24-inch and 2-inch hitches, part number SA832. To begin our test fit, we'll slide the shank of the bike rack into the receiver tube of our hitch, line up our pin holes, thread in our anti-rattle bolt and tighten it down with the wrench. We can then secure this using the provided clip. With the rack in this position, we have about 8 3/4 of an inch worth of ground clearance here. The closest point of the rack to the back of our vehicle is about 2 3/4 of an inch away. Overall, we've added about 11 inches to the Avenger. With our mast in its upright position, we do have access into the trunk.
RockyMounts TieRod Stretch Roof Bike Rack Review - 2014 Dodge Avenger
Speaker: Today on our 2014 Dodge Avenger, were going to be test fitting the RockyMounts TieRod Stretch, a fork mount roof bike rack with part number RKY1011. With our Rhino Rack 2500 Series Roof Rack already installed on the Avenger, well being our test fit by placing the bike rack directly onto our load bars. When we do this, we want to bring our black rubber coated straps around the underside of our front crossbar. Well then remove the black plastic cover, bring those straps around, fit them into the head of the carrier and we can secure it by tightening down the Allen Bolt. With this secure, well replace the black plastic cover. Then, we can move to our rear clamp. Here, well remove one of the Allen bolts completely from the clamp, bring it around our crossbar, reinsert our Allen bolt and tighten both of our Allen bolts down to secure it to our rack. With our rack secure, its time to load our bike. Were going to undue the rear wheel strap and make sure that our front skewer is loose and open.
Pro Series Q-Slot Hitch Bike Rack Review - 2014 Dodge Avenger
Today, on our 2014 Dodge Avenger, we're going to be test-fitting the Pro Series Q-Slot, a platform-style tilting two-bike rack for 1 1/4" and 2" edges, part number PS63134. To begin our test fit, we'll slide the shank of the bike rack into the receiver tube of our hitch, line up our pin holes, thread in our anti-rattle bolt, and tighten it with a wrench. We can then secure it with the provided clip. In this position, we'll have about 10 3/4" worth of ground clearance. The closest point of the rack to the back of our Avenger is about 7" away, and overall, we've added about 22" in length to the car. Pulling the two silver pins on the outside of the rack will allow us to tilt down the wheel cradles. We'll reinsert the pins to secure them in place. Pulling the center silver pin will allow us to tilt our center mast away from our vehicle. As you can see, it gives us great access into the trunk. With our mast back in its upright position, let's take a couple more measurements.
Kuat TRIO Roof Bike Rack Review - 2014 Dodge Avenger

Today on our 2014 Dodge Avenger, we'll be test fitting the Kuat Trio, a fork-mounted roof bike-rack, with part number RU01. With our Rhino Rack 2500 series roof rack already installed on our Avenger, we'll begin our test fit by placing the bike rack directly onto our cross bars. Here at the head of our rack, we'll bring the two black, rubber-coated U bolts around the underside of our cross bar, fit them through the head of our carrier, and hold them in place using two cylinder nuts on each one. We can then take our provided allen key and tighten these down. With our front secure, we'll move to the rear. Here we're going to completely remove one of the wing nuts, bring our clamp around our bar, replace our wing nut, and tighten both of them down. With our rack secured to our vehicle, it's now time to load our bike. We'll begin by undoing our rear wheel strap and making sure that our front skewer is loose and open. We'll grab our bike, place our bike onto our rack.
Kuat Beta Hitch Bike Rack Review - 2014 Dodge Avenger
Today, on our 2014 Dodge Avenger, we're going to be test fitting the Kuat Beta, a full-length 2-bike rack for 1-1/4 inch hitches, part number B202-114. To begin our test fit, we'll slide the shank of the bike rack into the receiver tube of our hitch. We'll line up our pinholes, slide through the pin, and secure it with the provided lock. We'll then turn the black T handle on the rear of the rack. This will engage our anti-rattle device and further secure our rack to our vehicle. With our rack secure, we'll take a couple measurements. As you can see, we'll have about 9 inches of ground clearance with the rack.
Hollywood Racks Traveler Hitch Bike Rack Review - 2014 Dodge Avenger
Today on our 2014 Dodge Avenger, we're going to test fitting the Hollywood Racks Traveler. A tilting forward bike rack for inch and a quarter and two inch hitches. Part #HR8500. To begin our test fit, we'll place the shank of the bike rack into the receiver tube of the hitch. Line up our pinholes, throw down our anti-rattle bolt and tighten it with a wrench. We can then secure it with the provided clip. In this position, you'll have about eight and a half inches worth of ground clearance. The closest point of the rack to the back of our car is about two and a half inches.
Hollywood Racks Road Runner Hitch Bike Rack Review - 2014 Dodge Avenger
Today on our 2014 Dodge Avenger, we're going to be test fitting the Hollywood Racks Roadrunner a tilting-free bike rack for inch and a quarter hitches, part number HR310. To begin our test fit, we'll slide the shank of the bike rack into the receiver tube of our hitch, line up our pin holes, slide through our pin, and secure it with the provided lock. We'll then turn the black lever on the rear of the rack. This will engage our anti-rattle device and further secure our rack to our vehicle. In this position, we'll have about 9 inches worth of ground clearance. The closest point of the rack to the back of our vehicle is about an inch away. Overall we've added about 5 and a half inches to the length of the Avenger. Pulling the larger black pin at the base of the mast will allow us to tilt it away from our vehicle.
Hollywood Racks Expedition Trunk Bike Rack Review - 2014 Dodge Avenger

Today, on our 2014 Dodge Avenger, we'll be test-fitting the Hollywood Racks Expedition Trunk Line 0:00:05 2-Bike Rack, part number HRF6-2. We'll being our test fit by placing the bottom part of the bike rack on the upper tier of the rear bumper. We'll then flip out the top two black levers so that we can adjust to fit the top part of the bike rack to fit the trunk. We'll need to place the top bar about the center of our trunk. We will then clamp down the black levers which will secure the top bar in this position. We'll then take the top hooks and clip it to the top part of the trunk.
Hollywood Racks Baja 2 Trunk Bike Rack Review - 2014 Dodge Avenger

Today on our 2014 Dodge Avenger, we'll be test fitting the Hollywood Racks Baja, a trunk-mounted 2-bike rack, part number HRB2. We'll begin our test fit by placing the bottom bar of the bike rack on the upper tier of the rear bumper. We'll flip out the two black levers on the left and right hand side of the carrier to adjust to fit the arms to fit this size of a trunk. The top part of the bike rack will need to rest on the top part of our trunk. We'll then go ahead and close down the black plastic levers to secure cradle arms in place. We'll now take the top clips and put it to the top part of the trunk, the side clips to the side part of the trunk, and the bottom clips to the bottom part of the trunk. Now you will need to open up the trunk to get the side and bottom clips into position. Once all the clips are in position, I'm going to tighten down each strap a little bit at a time so I don't off-center the bike rack.
Thule Vertex 4 Hitch Bike Rack Review - 2013 Dodge Avenger

Today on our 2013 Dodge Avenger, we'll be test fitting the Thule Vertex 4 hitch-mounted bike carrier, part number TH9029. To install the bike rack to this vehicle, first we need to remove the 2" adaptor and then slide our bike rack into the hitch, and line up the hitch pin hole. We'll thread in our anti-rattle bolt, and tighten it down using the wrench. We'll go ahead and go over a few measurements. With this bike rack, we have a ground clearance of 9-1/2", and the closest point of the bike rack to the closest point of the bumper is about 1". With the bike rack in the folded position, we've added about 9" to the overall length of our vehicle.
Dodge Avenger Bike Rack Questions
- The trunk mount bike rack that I would recommend for your 2013 Dodge Avenger SXT with the rear spoiler is the Hollywood Racks Expedition 2 Bike Rack, # HRF6-2. This bike rack was designed with a longer lower support arm to clear factory spoilers. I have attached a demonstration video of this bike rack on a 2014 Dodge Avenger for you to check out. This car does not have the spoiler, you can use the fit of the bike rack to see that it will clear the spoiler.
If you will be carrying...
view full answer... - The bike rack I recommend for your 2013 Avenger is the Thule OutWay, part # TH45JV.
This bike rack has the patented fit dial to make sure you get a great fit on your vehicle. This bike rack features anti-sway cradles to help keep the bikes from banging into each other and also features a locking cable to secure the bikes on the rack along with locking covers over the release levers that secures the bike rack to the car. This bike rack uses only two retractable cables to hold...
view full answer...


What our customers are saying:
"I order a Curt trailer hitch and a Rola bike rack on Wednesday. They arrived the next day. Can't do better than that - good prices, fast service. Only thing better would be an automatic install!!! Thank you."