
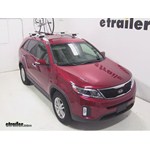
Best 2014 Kia Sorento Bike Racks
change vehicle# 1
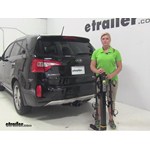
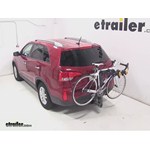
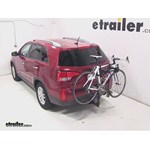
Thule Hitching Post Pro Bike Rack for 4 Bikes - 1-1/4" and 2" Hitches

- view all Hitch Bike Racks
- Hanging Rack
- Folding Rack
- Tilt-Away Rack
- Frame Mount
- Locks Not Included
- 4 Bikes
- Class 1
- Class 2
- Class 3
- Fits 1-1/4 and 2 Inch Hitch
- Fits 1-1/4 Inch Hitch
- Fits 2 Inch Hitch
- Thule
More Information >


by: Kris08/12/2016
Rack arrived fast, Was a simple install works like it should.
View More
View Less
by: Tom. R08/25/2016
I ordered three products from e-Trailer and was impressed with what arrived at my door, needing a bike rack that would hold four full size bikes I searched many different sites. E-trailer had the best reviews and descriptions of each which made my decision easy, the quality of each product showed as soon as I opened the boxes. The hitch was easy to install and looked good on the truck, the bike rack was just as easy to install and put four full size bike on. Being able to fit four bikes was a very big part of why I ordered it. We had recently upgraded all the kids to new bikes which the old rack would never have handled. As we prepared for vacation the four bikes fit nicely, it does take a little thinking of how to best lay them out but after figuring that out I was impressed with how well they fit and how sturdy the rack was. Thank you for your help in making this vacation a success.
View More
View Less
# 2
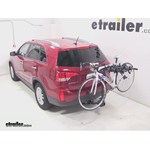
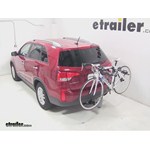
Thule Passage Trunk Bike Rack for 2 Bikes - Hanging Style

- view all Trunk Bike Racks
- Frame Mount - Anti-Sway
- 2 Bikes
- Non-Retractable
- Locks Not Included
- 6 Straps
- Adjustable Arms
- Hanging Rack
- Thule
More Information >
by: Steven M.05/16/20172015 Kia Sorento
I was extremely happy with the product. Set up was easy and quick and I was surprised how sturdy the product was, as well as the fact it stayed perfectly in place for several days of travel. Also, mounting/dismounting of the bikes on this carrier is easy and quick. Adjustment of the individual locking straps was somewhat difficult and the product's directions weren't extremely helpful. Enjoy.
View More
View Less
by: Constance J.Starck07/31/2016 Kia Sorento
Kia SorentoExcellent product! Fits our needs! Only problem. Is the bands are breaking. We use bungee cords.
View More
View Less
# 3
Swagman XTC2 Bike Rack for 2 Bikes - 1-1/4" and 2" Hitches - Frame Mount

- view all Hitch Bike Racks
- Platform Rack
- Folding Rack
- Frame Mount
- Locks Not Included
- 2 Bikes
- Class 2
- Fits 1-1/4 Inch Hitch
- Fits 2 Inch Hitch
- Fits 1-1/4 and 2 Inch Hitch
- Swagman
More Information >
by: BP05/26/2017
Sturdy, easy to use and gets my bikes where they need to go and at a great price
View More
View Less
by: Ken P.08/21/2012
I ordered the Swagman XTC-2 bike carrier along with Hidden Hitch class III hitch for my 2012 Kia Sorento. Both came in 5 business days and with no problems. I assembled the carrier on my garage floor in less than 15 minutes. It's well designed and fits good in my new hitch though it seems to wobble a bit - even with the 2" adaptor. Can't wait to try it out with our bikes!
View More
View Less
# 4
Swagman XTC4 Bike Rack for 4 Bikes - 2" Hitches - Frame Mount

- view all Hitch Bike Racks
- Platform Rack
- Folding Rack
- Frame Mount
- Bike and Hitch Lock
- 4 Bikes
- Class 3
- Fits 2 Inch Hitch
- Swagman
More Information >
by: William 02/26/2023
Well built product
View More
View Less
by: SLP08/21/2015
Stable and easy to use. Great price for the product.
View More
View Less
# 5
Thule Passage 3 Bike Carrier - Trunk Mount

- view all Trunk Bike Racks
- Frame Mount - Anti-Sway
- 3 Bikes
- Non-Retractable
- Locks Not Included
- Fits Most Factory Spoilers
- 6 Straps
- Adjustable Arms
- Hanging Rack
- Thule
More Information >
by: Steve B08/26/2015Kia Sorento
Excellent communication between buyer and seller. Item is exactly what was listed. I highly recommend using this company for all accessory needs!
View More
View Less
by: Steven M.05/16/20172015 Kia Sorento
I was extremely happy with the product. Set up was easy and quick and I was surprised how sturdy the product was, as well as the fact it stayed perfectly in place for several days of travel. Also, mounting/dismounting of the bikes on this carrier is easy and quick. Adjustment of the individual locking straps was somewhat difficult and the product's directions weren't extremely helpful. Enjoy.
View More
View Less
# 6
Swagman Trailhead Bike Rack for 2 Bikes - 1-1/4" and 2" Hitches - Tilting

- view all Hitch Bike Racks
- Hanging Rack
- Folding Rack
- Tilt-Away Rack
- Frame Mount
- Locks Not Included
- 2 Bikes
- Class 1
- Class 2
- Class 3
- Fits 1-1/4 and 2 Inch Hitch
- Fits 1-1/4 Inch Hitch
- Fits 2 Inch Hitch
- Swagman
More Information >
by: Michael07/23/2020
I bought a bike rack and this hitch receiver yesterday and installed them both. The hitch is definitely going to be easier to install with 2 people, as lifting it into place is awkward with this hefty thing. The install will also definitely be easier with a raised vehicle. Of course, I did this without raising the car, and I did it all on my own haha. Obviously, this took me longer as a result. I've very little experience working on cars, so I made a conscious effort not to be daunted by lowering the exhaust- I had never even lowered/removed the spare tire before this. Huge props to etrailer for the install video. It helped SO MUCH. The product's printed instructions for this install were so terrible I would have removed a star, but the vids answered all the questions I had. If you're concerned about tools: I removed the rubber hangers for the exhaust with my hands for the most part, though the one closest the rear of the vehicle, I employed a screwdriver then wrench to pry it off. I'm convinced I could have done this with my fingers as well. The WD-40 was a nice tip. I think it helped slip those off easier. I ended up having to jack up the car to re-hang the exhaust, as the newly installed tow rig reduced wiggle room under the car, but this wasn't a big deal. I'm going over all this stuff for those of you looking to do your own installation. To sum up: Love the hitch. Looks great, and is definitely sturdy. 5 stars for sure, because the cons are vastly outshone by the pros.


View More
View Less
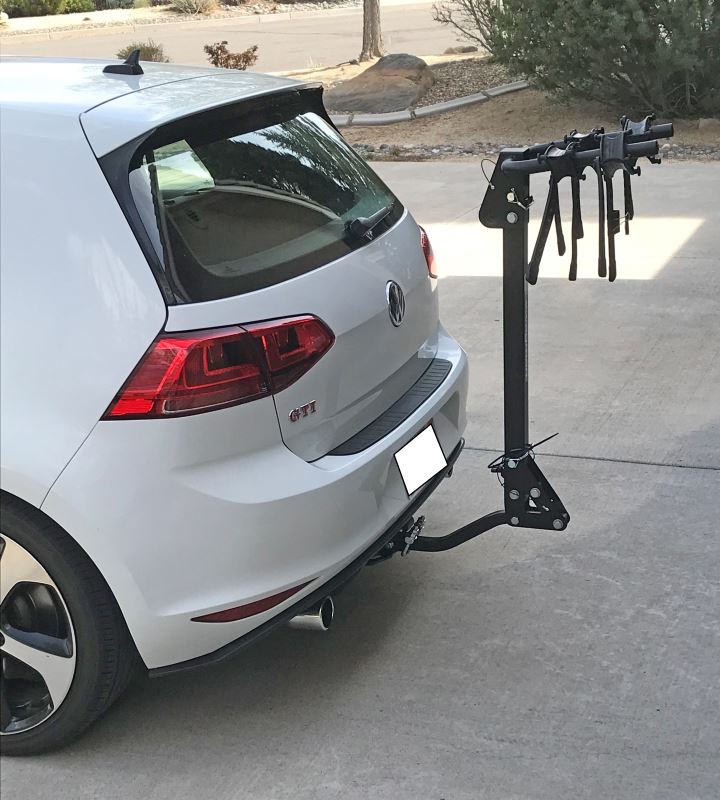
by: Mark04/23/2021
etrailer has the best pre- and post-sales customer service I've ever seen! I started out not knowing anything about hitch-mounted racks. So I wrote to etrailer telling them about my car and type of hitch I was about to have installed. Samuel wrote back with lots of great information tailored specifically to my car. He even included a photo that looked just like my 2017 white VW GTI with a hitch and rack installed. Okay something of a coincidence. But the rest of the assistance I got from the crew at etrailer was just as prophetic. I went into this a novice and came out knowing lots more about hitches and racks and finding the rack best suited to my situation. I have a small car, a class 1 hitch and a heavy mountain bike. I got exactly what I needed. As to the Swagman rack itself, it works fine. If I had a different situation I would probably buy a platform rack as they are easier to load. There's no reason to buy a bike rack anywhere else.

View More
View Less
# 7
Yakima HangOut 2 Bike Rack - Trunk Mount - Adjustable Arms

- view all Trunk Bike Racks
- Frame Mount - Anti-Sway
- 2 Bikes
- Non-Retractable
- Locks Not Included
- Fits Most Factory Spoilers
- 6 Straps
- Adjustable Arms
- Hanging Rack
- Yakima
More Information >
by: Saskia10/21/20222018 Kia Sorento
I ordered this bike rack, put it on my car, and transported my bike over 2000 miles. It holds the bike steady, the rack itself is sturdy. It would be good for the paper user manual to show mounting for SUVs as well.
View More
View Less
by: Timothy03/28/2023
Works great for my 2019 Jeep Renegade. I adjusted it to be open a little more, so I could use my rear wiper. It also keep pressure off the rear spoiler.
View More
View Less
# 8
Kuat NV 2.0 Base Bike Rack for 2 Bikes - 2" Hitches - Wheel Mount - Matte Black

- view all Hitch Bike Racks
- Platform Rack
- Folding Rack
- Tilt-Away Rack
- Wheel Mount
- Bike and Hitch Lock
- 2 Bikes
- Class 3
- Fits 2 Inch Hitch
- Carbon Fiber Bikes
Electric Bikes
Heavy Bikes - Kuat
More Information >
by: Matt04/26/2018
This attaches solidly to the receiver and holds my 27.5” x 2.3” trail bike and my 26” x 4.8” fat bike securely. I’m very pleased with the quality and the price. The shipping experience with etrailer was flawless.
View More
View Less
by: Michael08/17/2022
I've taken this rack all over New England on the front of my Dodge Ram 3500 pick up truck with a truck camper. I had no idea it was possible to love a bike rack so much. After one drive I didn't ever worry about it again. So nice that it locks up when I am camping or taking a quick stop for food on the road. So glad I bought it from etrailer. They totally help me pick the perfect rack for my challenging set up.


View More
View Less
# 9
Curt Bike Rack for 5 Bikes - 2" Hitches - Tilting

- view all Hitch Bike Racks
- Hanging Rack
- Folding Rack
- Tilt-Away Rack
- Frame Mount
- Locks Not Included
- 5 Bikes
- Class 3
- Fits 2 Inch Hitch
- CURT
More Information >
by: David06/13/2023
It was obvious that we received a product that was returned by someone else when the box was overly taped shut, a support collar was broken, and most of the pieces were out of their ripped plastic bags. However, it was a great price to hold 5, 26" and/or 27" Trek bikes. I used a piece of the broken collar and went ahead and assembled the rack. Due to the weight of the 5 bikes it did not wobble that much when driving, as one of the bike tires was up against my car. I can only imagine that if we received an untampered product that this review would have been 5 stars. The picture is a little hard to see, but there are 5 Trek bikes on the rack on my 2020 Toyota Seinna.


View More
View Less
by: Felicia07/10/2023
We received a damaged box, damaged items, no instructions, the nuts and bolts are completely stripped and not inside a bag. This was obviously used, returned, not checked for quality and sent out. We are extremely upset.


View More
View Less
# 10
Curt Bike Rack for 4 Bikes - 1-1/4" and 2" Hitches - Tilting

- view all Hitch Bike Racks
- Hanging Rack
- Folding Rack
- Tilt-Away Rack
- Frame Mount
- Locks Not Included
- 4 Bikes
- Class 2
- Fits 1-1/4 and 2 Inch Hitch
- Fits 1-1/4 Inch Hitch
- Fits 2 Inch Hitch
- CURT
More Information >
by: Gilbert03/29/2018
Works great so far. Easy install.
View More
View Less
by: Jackie 02/02/2023
The Curt Clamp-On rack was the only option that worked for me, the Aliner (A-frame pop-up) camper, and SUV. It fits on the hitch and not the trailer frame. It makes a very secure attachment and the additional tie down straps stop any movement. You only have to lift the bike up to waist height to get it on the rack! Other racks required lifting the bike up to shoulder height and then extending out. Not a good position for those of us that lack upper body strength. After using it for many camping trips last summer, I have to say that the website video was dead on. I have a very short ball mount on the SUV, not a long one like on the truck. The bike closest to the back hatch needs to have the handlebar padded or strapped so it won't hit the window. I have carried 2 bikes but that was a tight fit because I don't have much room between the back hatch and the propane tanks on the trailer. This part isn't about the rack itself but is something to be aware of. With the rack and bike on, they interfere with the backup camera. I mostly hitch up by myself, so I have to use the camera to see the hitch ball and the trailer. It makes it a little awkward, but the rack and bike are the last things to go on, after backing up to hitch the trailer. I'm glad the etrailer techs found a solution to my problem!
View More
View Less
# 11
Curt Bike Rack for 4 Bikes - 2" Hitches - Tilting

- view all Hitch Bike Racks
- Hanging Rack
- Folding Rack
- Tilt-Away Rack
- Frame Mount
- Locks Not Included
- 4 Bikes
- Class 3
- Fits 2 Inch Hitch
- CURT
More Information >
by: Jon03/21/2024
This rack has worked well for us. I fits the Curt hitch perfectly. It is easy to attach bicycles securely. We can get three adult bicycles on this hitch (see photo). There are sufficient means to protect against sway.

View More
View Less
by: Mitchell10/02/2020
After less than one year, and only 5 or 6 uses, the threaded stabilizer--the one just below the spring-loaded, T-shaped handle used for tilting the mast--stripped out the hole it passes through in the body of the rack. Now my rack wobbles like crazy. I'm still within the warranty period, but in order to get it fixed, I have to return the entire bike rack and cover the return shipping . I'll just keep the broken rack and find a way to deal with the issue. Hopefully you have a better experience than me.


View More
View Less
# 12
Swagman Chinook Bike Rack for 2 Bikes - 1-1/4" and 2" Hitches - Frame Mount

- view all Hitch Bike Racks
- Platform Rack
- Folding Rack
- Tilt-Away Rack
- Frame Mount
- Bike and Hitch Lock
- 2 Bikes
- Class 1
- Class 2
- Class 3
- Fits 1-1/4 and 2 Inch Hitch
- Fits 1-1/4 Inch Hitch
- Fits 2 Inch Hitch
- Swagman
More Information >
by: Steve H.05/08/2018
Truly grooving on my wife's new Swagman Chinook bike rack. She wanted to be able to transport her nice road bike easily without throwing it in the back of her car, and since a roof rack is out of the question, this Swagman model fit the bill perfectly. It arrived quickly on the anticipated date. Kudos to etrailer.com for the email updates to keep me informed of my purchase. Within one hour, it was installed on my wife's 2014 Mazda3 hatchback. The Swagman is heavy and solid, which is reassuring as it makes me feel confident that it will keep the bikes secure. It also makes me feel like I got my money's worth. A ratchet wrench and Phillip's head screwdriver were the only tools required for the easy install. I did my research before purchasing the Chinook model as I was also eyeballing a very similar Thule rack that was slightly more expensive. I spoke with an etrailer.com expert who gave me the lowdown on both models. Ultimately, the Swagman won out because it has a smaller 'footprint' while extended or folded up ... and also can tilt away from the car for easy access to the hatchback area. Very convenient! FYI: Mazda doesn't make a trailer hitch for the Mazda3 as it's a small car with a small engine and has no business towing anything. Thankfully, the Curt company makes an aftermarket frame and trailer hitch that fits the Mazda3 hatchback perfectly with no drilling. Stupidly, I purchased it from another online company thinking I was getting a good deal. Turns out etrailer.com had it for less with FREE shipping. Oh well ... live and learn. Now I know that etrailer.com is one-stop shopping for bike racks AND trailer hitches. (Full disclosure: I had the garage down the street install the frame as it's easier with a lift) Only snafu: the shipment contained an extra set of keys that I assumed was for the hitch bolt lock (there was also a set of keys on the bolt itself). I spent 15 minutes using those keys trying to figure out how to remove the lock from the bolt to install it on the hitch. The keys just wouldn't turn in the lock. I called etrailer.com and Kevin told me to try the other set of keys ... and they worked. So an extra set of keys came with it that did absolutely nothing ... weird! Obviously, I can't speak to the longevity and durability of the Swagman Chinook 2 Bike Platform Rack as I just installed it. What I can speak to is the sturdiness of it, the ease of the installation and my complete satisfaction with the good folks at etrailer.com.


View More
View Less
by: Capt Jim03/21/2017
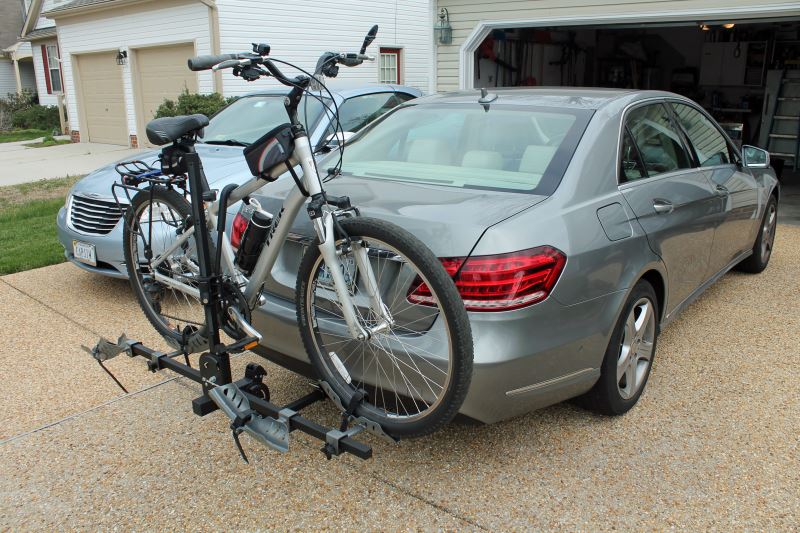
I ordered the Swagman Chinook 2 Bike Platform Rack on line from etrailer and so far have been very satisfied. The bike rack was delivered in less than a week. Unpacking the rack and assembly was fairly straightforward. I have read some reviews that complained the assembly instructions were a bit vague. I didn't have a problem but can see where others without a mechanical background get confused. The rack is very sturdy, but there is some side to side play in the tilt mechanism. I'm not sure this can be avoided with a rack that folds down. Installing the Curt trunk stabilizing strap takes most of the sway out of the rack. Installation is fairly easy and quick. It takes me 6 - 7 minutes to install the back on my hitch, and to install the bike and be ready to drive away. That seems reasonable to me. So far I've only loaded 1 bike. I've included pictures of my installation on a 2014 Mercedes Benz E350 sedan. Clearance between the bikes, the rack and the car are good. With the bike loaded in the inside, most forward position, I have 6" clearance between the pedal and the bumper. With the bike removed, the center support folded flat and the rack folded up in the storage position, I have 4" clearance between the closest part of the bike rack (the fold down hinge assembly) and the back bumper of the car. I am able to open the trunk of the car without removing the bikes or using the tilt feature, but I do have to remove the stabilizing strap first. Overall, I'm very pleased with the bike rack and think it will serve me much better than my old strap on rack. Since the weather has been cool since getting the bike carrier, I haven't taken any long trips to give it a real workout.


View More
View Less
# 13
Swagman Trailhead Bike Rack for 4 Bikes - 1-1/4" and 2" Hitches - Tilting

- view all Hitch Bike Racks
- Hanging Rack
- Folding Rack
- Tilt-Away Rack
- Frame Mount
- Locks Not Included
- 4 Bikes
- Class 1
- Class 2
- Class 3
- Fits 1-1/4 and 2 Inch Hitch
- Fits 1-1/4 Inch Hitch
- Fits 2 Inch Hitch
- Swagman
More Information >
by: Michael07/23/2020
I bought a bike rack and this hitch receiver yesterday and installed them both. The hitch is definitely going to be easier to install with 2 people, as lifting it into place is awkward with this hefty thing. The install will also definitely be easier with a raised vehicle. Of course, I did this without raising the car, and I did it all on my own haha. Obviously, this took me longer as a result. I've very little experience working on cars, so I made a conscious effort not to be daunted by lowering the exhaust- I had never even lowered/removed the spare tire before this. Huge props to etrailer for the install video. It helped SO MUCH. The product's printed instructions for this install were so terrible I would have removed a star, but the vids answered all the questions I had. If you're concerned about tools: I removed the rubber hangers for the exhaust with my hands for the most part, though the one closest the rear of the vehicle, I employed a screwdriver then wrench to pry it off. I'm convinced I could have done this with my fingers as well. The WD-40 was a nice tip. I think it helped slip those off easier. I ended up having to jack up the car to re-hang the exhaust, as the newly installed tow rig reduced wiggle room under the car, but this wasn't a big deal. I'm going over all this stuff for those of you looking to do your own installation. To sum up: Love the hitch. Looks great, and is definitely sturdy. 5 stars for sure, because the cons are vastly outshone by the pros.
View More
View Less
by: Daniel02/28/2024
Quick and reliable shipping and was able to take to my mechanic to get it installed and it works perfectly with my bike rack!
View More
View Less
# 14
Swagman XC-Extended Bike Rack for 2 Recumbent Bikes - 1-1/4" and 2" Hitches - Frame Mount

- view all Hitch Bike Racks
- Platform Rack
- Folding Rack
- Frame Mount
- Locks Not Included
- 2 Bikes
- Class 2
- Class 3
- Fits 1-1/4 Inch Hitch
- Fits 2 Inch Hitch
- Recumbent Bikes
- Swagman
More Information >
by: Jerald 04/11/2024
I have bad shoulders and could no longer lift my long wheelbase recumbent bike up to my Thule rack. The new rack solved the problem and made it much easier to load the bike. Very happy I got the new Swagman rack.
View More
View Less
by: Terrie B04/18/2014
Thank you again for such excellent customer service. I am including two pics from today showing the bikes mounted on my 2009 Honda Fit with the bike rack we purchased from you. Please feel free to use them in any of your publications, print or web.


View More
View Less
# 15
Thule EasyFold XT Bike Rack for 2 Electric Bikes - 1-1/4" and 2" Hitches - Frame Mount

- view all Hitch Bike Racks
- Platform Rack
- Folding Rack
- Tilt-Away Rack
- Frame Mount
- Bike and Hitch Lock
- 2 Bikes
- Class 1
- Class 2
- Class 3
- Fits 1-1/4 Inch Hitch
- Fits 2 Inch Hitch
- Fits 1-1/4 and 2 Inch Hitch
- Electric Bikes
Heavy Bikes - Thule
More Information >
by: Steve05/25/2018
The rack works great for our mountain bikes. Easy to load and unload. The arms to stablize the bikes can be awkward sometimes but nothing that would dissuade me if I had to purchase again. I'm glad I researched the distance between the rack and the hitch under the bumper. Worked out perfect.
View More
View Less
by: Milton 05/26/2023
Great product
View More
View Less
Bike Rack Videos
RockyMounts Hitch Bike Racks Review - 2014 Kia Sorento
Speaker 1: Today on our 2014 Kia Sorrento, we're going to be test fitting the RockyMounts SplitRail Four-Bike Platform Rack for 2" Hitches, part number RKY1140-4. We already have a bike installed on the rack, so let's take a closer look and show off some of the features.One of the best features about this bike rack is going to be the fact that it can tilt away from the vehicle with all four bikes still attached. To do that, we'll come to the front and come underneath to this lever here. I would like to point out that it can be a little awkward reaching all the way out here with all four bikes attached, so you may need an extra set of hands to help you do this. So, pull out on that lever, let the bike rack come down, and we'll have full hatch access now.I would like to point out that it's pretty close here when it comes to our handlebars. From the center out we're at about 9", so if you we're to have, say, a mountain bike that sticks out a little bit further, you may make contact with this rear hatch.
Saris Freedom SuperClamp Hitch Bike Racks Review - 2014 Kia Sorento

Today on our 2014 Kia Sorento, we're going to be test fitting the Saris Freedom SuperClamp 2-Bike Platform Style Rack 4-1/4" and 2" hitches part number Sa4025. We'll begin our test fit by inserting the shank of the rack into the hitch of our vehicle. With that inserted, we'll go ahead and line up the hitch pinhole. We'll then take the included anti rattle hitch lock and thread that into place. You may have to wiggle your rack around to get it in the right position so that the threads grab on. Once you have that hand tight, you can go ahead and tighten it down the rest of the way with your wrench. This helps to take any extra play out of the shank of the rack. With that tightened, we'll go ahead and snap the lock on to the other side. Now with the rack in this position, the closest point of the rack to the vehicle is going to be right here on the wheel cradle. That measures about 7-1/2" from the rear of the vehicle. The closest point of the ground, to the ground, excuse me, is going to be the shank which measures about 12-1/4". Overall, we've added about 24" to the rear of our vehicle. With the rack in this position, we can easily open our rear hatch to access our cargo area. We'll go ahead and prepare to load our bike.
Saris Bike Porter Hitch Bike Racks Review - 2014 Kia Sorento
Today, on our 2014 Kia Sorento, we're going to be test fitting the Saris Bike Porter 4 bike rack for 1 1/4 and 2 inch hitches, Part number SA404B. We'll begin our test fit by inserting the shank of the rack onto the receiver hitch of our vehicle. We'll then want to watch to line up the pin holes. With those in line, we can then take our threaded anti-rattle hitch bolt and thread that into place. Find our hitch mount hole here. Past them. There we go.
Hollywood Racks Traveler Hitch Bike Racks Review - 2014 Kia Sorento

Today on our 2014 Kia Sorento we're going to be test fitting the Hollywood Racks Traveler 5-bike rack, part number HR9200. We'll begin our test fit by inserting the shank of the rack into the hitch of our vehicle. With that inserted, you'll want to watch for the pin holes to line up. You can then take the included anti-rattle hitch bolt and throw that into place. Once you have this hand tight, you can go ahead and tighten it up the rest of the way with your wrench. This helps to take any extra movement out of the shank of our rack. As you can see, we're nice and tight.
Hollywood Racks Traveler Hitch Bike Racks Review - 2014 Kia Sorento

Today on our 2014 Kia Sorento were going to be test fitting the Hollywood racks traveler 4 bike rack per inch and 0.25 inch two hitch edges, part number HR8500. Well go ahead and begin our test fit by placing the shank of the rack into the hitch of our vehicle. With that inserted you want to watch for the hitch cam holes to line up. Once you have your hitch cam holes in line, well go ahead and take our anti-rattle hitch bolt and thread that into place. Once you have that hand tight you can go ahead and take you wrench and finish it off. This will also take any extra play out of the shank of the rack. Well then insert our clip on the other side.
Thule Big Mouth Roof Bike Rack Review - 2014 Kia Sorento

Today on our 2014 Kia Sorento we will be test fitting the Thule Big Mouth, a roof mounted bike rack, part number TH599XTR. With the Thule Crossroads Roof Rack system on our vehicle well being our test fit by placing the Big Mouth directly onto our load bars. Here at the front well bring our clamps around our front bar, fit the T-bolt through the slot and tighten it with the wing nut on top. Here at the rear well undo one of the wing nuts to bring our bolts around our rear bar, take our bolts fit it back through our clamp and secure it by tightening both wing nuts down. With our rack secured to our vehicle well go ahead loosen our wheel straps and make sure our frame jaws are open. Well grab our bike; place it onto our Big Mouth. Well secure it first by fitting the frame jaws around the lower part of our bikes frame. Then move to each wheel and tighten with the wheel straps. With our bike loaded up we are ready to go.That will complete todays test fit of the Thule Big Mouth; part number TH599XTR, on our 2014 Kia Sorento. .
Thule Apex 4 Swing Hitch Bike Rack Review - 2014 Kia Sorento

Today, on our 2014 Kia Sorento, we will be test fitting the Thule Apex Swing, a swinging 4-bike rack for 2-inch hitches, part number TH9027. To begin our test fit, we'll slide the shank of the bike rack into the receiver tube of our hitch, pulling out on the attached pin as we do. Once our pin holes are lined up, we'll want to be sure that our attached pin falls into place. We'll then use the black knob to engage our anti-rattle device and further secure our rack to our vehicle. With our rack in this position, we have about 11-1/2 inches of ground clearance. The closest point of the rack to the back of our vehicle is about an inch and a half, and overall, we've added about 11 inches to our Sorento. Pulling the gray handle at the top of our mast will allow us to swing out our dual cradle arms.
SportRack Roof Mounted Bike Rack Review - 2014 Kia Sorento

Today on our 2014 Kia Sorento, we will be test fitting the SportRack Roof Mounted Fork Mounted Bike Rack, part number SR4622. With the Thule rapid crossroads roof rack system assembled on to our vehicle, well begin our test fit by placing the bike rack on to the vehicles load bars. Well bring the rubber coated black brackets around the underside of the front bar up to the predrilled holes of the front platform. Then well take our black wing nuts and thread that on to the black brackets, securing the front part of our bike rack to our front bar.Next, well move to the rear, well slide the black bolts to the predrilled holes in the bike rack, taking our black plastic piece, placing it between our bike rack and our load bar, well then run the bolts through the black rubber coated metal bracket, and secure it with the wing nuts. Once everything is tighten down and secure, were ready to load up our bike. Well make sure our securer is loose in the front.
Saris Cycle-On 2 Bike Rack Review - 2014 Kia Sorento

Speaker: Today on our 2014 Kia Sorento, we will be test fitting the Saris Cycle On, a locking platform style 2 bike rack for 2 inch hitches, part number SA4024. To begin our test fit, well slide the shank of the bike rack into the receiver tube of our hitch, line up our pin holes, thread in our anti-rattle bolt, tighten it down with a wrench and secure it with the supplied lock. With our bike rack in this position, we have about 11 inches of ground clearance. The closest point of the rack to the vehicle is about 6-1/2 inches and overall, weve added about 14-1/2 inches to the length of our Sorento. In the stored position, as you can see here, we do have full access to our rear hatch. Pulling the pin at the base of the rack will allow us to unfold it into the loading position. With our rack in this position, we do have 18 inches of ground clearance here at the rear. The closest point of the rack to the back of our Sorento is about 8-1/2 inches and overall, weve added about 28 inches to the length of the vehicle.To ready our rack to load our bike, well first want to extend the front wheel hook all the way up and out and undo the rear wheel clamp.
Hollywood Racks Traveler Tow n Go Bike Rack Review - 2014 Kia Sorento

Today on our 2014 Kia Sorento, well be test fitting the Hollywood Racks Traveler Tow N Go Hitch Mounted 3 Bike Rack, part number HR135. Well be using the hidden hitch ball mount with the super extra-long shank, part number 80232. This is sold separately, along with the hitch pin and clip. Well begin our test fit by sliding the shank of the ball mount into the receiver tube of our hitch. Well line up our pin holes and secure it with the pin and clip. You will notice that the fit is a little loose. We do have available for purchase an anti-rattle device, which will prevent any wobble within the hitch.
Thule Vertex 4 Hitch Bike Rack Review - 2014 Kia Sorento

Today on our 2014 Kia Sorento, we will be test fitting the Thule Vertex, a Tilting 4 Bike Rack for 1-1/4" and 2" Hitches. Part number is TH9029. To begin our test fit, we'll slide the shank of the bike rack into the receiver tube of our hitch, line up our pin holes. We're going to thread in our anti-rattle bolt, then tighten it with a wrench. In this position, you have about 11-1/2" of ground clearance. The closest point of the rack to the back of our Sorento is about 3", and overall we've added about 11" to the vehicle. By pulling the gray lever at the base of the center mast, we can tilt the bike rack away from our vehicle. As you can see, we have full access to our rear hatch in this position.
Thule Helium Aero Hitch Bike Rack Review - 2014 Kia Sorento

Today on our 2014 Kia Sorento, we'll be test fitting the Thule Helium Arrow, a tilting 2-bike rack for 1 1/4" and 2" hitches, part number TH9042. We'll begin our test fit by sliding the shank of the bike rack into the receiver tube of the hitch. When doing this, we'll want to pull out on the attached pins, line up our pin holes and make sure it drops into place. We can then turn the black knob on the rear of the rack. This will engage our anti-rattle device and further secure our rack to our vehicle. In this position, we'll have about 11 3/4" of ground clearance.
Thule Doubletrack Hitch Bike Rack Review - 2014 Kia Sorento

Today on our 2014 Kia Sorrento we will be test-fitting the Thule Doubletrack. A platform-style two-bike rack for inch-and-a-quarter and two-inch hitches. Part number TH990XT. To begin our test fit, we'll slide the shank of the bike rack into the receiver tube of our hitch, line up our pinholes, thread in our anti-rattle bolt and tighten it down with a wrench. In this position, we have about 10-1/4 inches worth of ground clearance. The closest point of the rack to the back of our Sorrento is about two-and-a-half inches, and overall we've added about 10 inches to the length of our vehicle. Pulling the gray handle at the base of the bike rack will allow us to unfold it into the loading position.
Thule Apex 4 Hitch Bike Rack Review - 2014 Kia Sorento

Today in our 2014 Kia Sorento, we will be test fitting the Thule Apex. A tilting 4 bike rack, 4 inch and a quarter and 2 inch hitches. Part number Th9025. To begin our test fit, we'll slide the shank of the bike rack into the receiver tube of our hitch. While doing this, we want to pull out on the attached pin, move entering the black knob on the rear. The rack engaging our anti rattle device and further securing the rack to our vehicle.
Swagman Upright Roof Mounted Bike Rack Review - 2014 Kia Sorento
Today on our 2014 Kia Sorento, we will be test fitting the Swagman Upright Roof Bike Rack, part number S64720. With our Thule Rapid Crossroads Roof Rack System already installed on the vehicle, we'll begin our test fit by placing our bike rack directly onto our load bars. Here at the front, we'll bring our U bolt around the underside of our load bars, putting it back up through the front platform. We'll secure it by tightening down two wing nuts. We can move to the other side and repeat this process here on the front platform. Here at the rear, we'll drop the U bolt through the top of the bike rack, being sure that it comes out on both sides of our load bar. We'll then install our plate, making sure that the bolts go through our plate, and secure it by tightening down the two wing nuts. With both the front and the rear secure, we'll go ahead and undo our wheel straps, and open up our frame jaw. We'll now grab our bike and place it onto our bike rack.
Swagman Titan Hitch Bike Rack Review - 2014 Kia Sorento - Video
Today on our 2014 Kia Sorrento, we will be test fitting the Swagman Titan, a tilting 4-bike rack for 1-1/4 and 2 inch hitches, part number S63410. To begin our test fit, well slide the shank of the bike rack into the receiver tube of our hitch. Were going to line up our pin holes, thread in our anti-rattle bolt, and tighten it down with our wrench. With our rack in this position, we have about 14 inches of ground clearance. The closest point of the rack to the back of the Sorrento is about 7-1/2 inches. Overall, weve added about 18-1/2 inches to the vehicle.
SportRack Super EZ Hitch Bike Rack Review - 2014 Kia Sorento

Today in our 2014 Kia Sorento, we will be test the sport rack super ez. A platform style two bike rack, 4 inch and a quarter and 2 inch hitches. Part number SR2901LR. To begin our test fit, we'll slide the shank of the bike rack into the receiver tube of the hitch, line up our pinholes, thread in our anti-rattle bolt and tighten it with a wrench. We can then secure it with the provided lock. With our bike rack in this position, you're going to see we have about 13 and a half inches of ground clearance.
SportRack 3 Bike Rack Review - 2014 Kia Sorento
Today on our 2014 Kia Sorento, we will be test fitting the Sportrack tilting 3-bike rack for 1 1/4" and 2" hitches, part number SR2403. To begin our test fit, we'll slide the shank of the bike rack into the receiver tube of our hitch. We'll want to line up our pin holes, thread in our anti-rattle bolt and go ahead tighten it down with a wrench. There is a cotter pin to secure it further. In this application, it will not go in. With our bike rack in this position, we'll have about 11" worth of ground clearance. The closest point of the rack to the back of our Sorento is about 6".
Softride Element Hitch Mounted Bike Rack Review - 2014 Kia Sorento
Today on our 2014 Kia Sorento, we will test fitting the Softride Element Parallelogram tilting four-bike rack for inch and a quarter and two-inch hitches, part number SR26248. To begin our test fit, we'll side the shank of our bike rack into the receiver tube of our hitch. We'll line up our pin holes, trend in our anti-rattle bolt, and tighten it with a wrench. With everything secure, we'll have about 11 inches of ground clearance. The closest point of the rack to the back of the vehicle is about two and a half inches. Overall, we've added about 11 and a quarter inches to the length of our Sorento. By pulling the black handle on the right side of the rack, we can tilt it away from our vehicle.
Softride Dura Hitch Bike Rack Review - 2014 Kia Sorento

Today on our 2014 Kia Sorento, we'll be test fitting the Softride Dura Parallelogram, a tilting 4-bike rack for 1-1/4- and 2-inch hitches, part number SR26247. To begin our test fit, we'll slide the shank of the bike rack into the receiver tube of our hitch, line up our pin holes, thread in our anti-rattle bolt, tighten it with our wrench, and then secure it with the provided lock. In this position, we'll have about 10-3/4 inches worth of ground clearance. The closest point of the rack to the back of our Sorento is about 5 inches, and overall, we've added about 35 inches to the length of the vehicle. For ease of storage, the arms in the parallelogram are removable. With these arms removed, you will be adding about 14-1/2 inches to the length of your vehicle. With our cradle arms reinserted, we'll undo our cradle straps, grab our bike, place our bike into our cradles, and secure it with the straps. One of the great features of the Dura Parallelogram is its ability to tilt away from your vehicles, even with your bikes loaded. To do this, you pull the black T handle on the right side of the rack, tilt it away from our vehicle. As you can see in this position, we have great access to our rear hatch, and it also lowers our loading height when we want to load our bike. With our mast back in its upright position, that will complete today's test fit of the Softride Dura Parallelogram, part number SR26247, on our 2014 Kia Sorento.
Saris Thelma 3 Bike Rack Review - 2014 Kia Sorento

Today on our 2014 Kia Sorento, we'll be test fitting the Saris Thelma platform style 3-bike rack for 1-1/4-inch and 2-inch hitches, part number SA4239B. To begin our test fit, we'll slide the shank of the bike rack into the receiver tube of the hitch. We'll line up our pin holes, thread in our anti-rattle bolt, and tighten it with a wrench. We'll then secure it with a clip. With our bike rack in this position, we have about 11-1/2 inches of ground clearance. The closest point of the rack to the back of the vehicle is about 2-1/4 inches, and overall, we've added about 10 inches to the length of the Sorento. By pulling the gold pin at the base of the rack, we can unfold it into its loading position. We'll want to reinsert that pin to secure it. With our bike rack in this position, we have about 18-1/2 inches of ground clearance here at the rear of the rack.
Saris Axis 3 Bike Rack Review - 2014 Kia Sorento

Today on our 2014 Kia Sorento, we will be test fitting the Saris Axis, a tilting 3-bike rack for 1-1/4- and 2-inch hitches, part number SA843B. To begin our test fit, we'll slide the shank of the bike rack into the receiver tube of our hitch. We'll line up our pin holes, thread in our anti-rattle bolt, and secure it with the provided lock. With our bike rack in this position, we have about 11-1/4 inches worth of ground clearance. The closest point of the rack to the back of our Sorento is about 5 inches, and we've added about 14 inches to the overall length of the car. By pulling the yellow T handle at the base of the rack, we can tilt it away from our vehicle. This will give us full access to our rear hatch. By lifting the two yellow levers and moving our cradle arms toward our center mast, we can move them up into the loading position. We want to be sure our bars are either even or slightly inclined. We'll now undo our cradle straps, grab our bike, place our bike into our cradles, and secure it with the three straps. With our bike secure, that will complete today's test fit of the Saris Axis, part number SA843B, on our 2014 Kia Sorento.
Saris Axis Tilting 2 Bike Rack Review - 2014 Kia Sorento
Today on our 2014 Kia Sorento, we will be test fitting the Saris Axis, a tilting 2-bike rack for 1 1/4" and 2" hitches, part number SA832. To begin our test fit, we'll slide the shank of the bike rack into the receiver tube of our hitch, line up our pin holes, thread in our anti-rattle bolt, tighten it with a wrench, then secure it with a clip. With our rack secure, we'll have about 11 1/4" of ground clearance. The closest point of the rack to the back of our Sorento will be about 5". Overall, we've added about 12 1/2" to the length of the car. Pulling the yellow T-handle at the base of the rack will allow you to tilt it away from your vehicle.
RockyMounts TieRod Roof Bike Rack Review - 2014 Kia Sorento

Today on our 2014 Kia Sorrento, we will be test fitting the RockyMounts TieRod Roof Mounted Bike Rack, part number RKY1014. With our Thule Rapid Crossroads Roof Rack System installed on our vehicle, well begin our test fit by placing the bike rack directly on top of the load bars. We will bring our steel, rubber-coated straps around our front load bar, placing them back into the head of the rack. We will then move to the rear mounting point of our bike rack, where well use a clamp to go underneath the crossbar, and well secure it by tightening down both Allen-bolts. We will then move to the front of the bike rack and further secure our straps with the included Allen tool. With our bike rack secured to the vehicle, we will reinstall our head-cover, then well make sure the skewer is open, and ready for the front fork of our bike. We will also undo our rear wheel strap. We will now place our bike directly onto our rack, placing our front fork into our front skewer first. We will secure our front skewer, then move to the rear wheel and tighten it with the strap. With our bike secure, that will complete our test fit of the RockyMounts TieRod, part number RKY1014.
Pro Series Q-Slot 2 and 4 Bike Hitch Bike Rack Review - 2014 Kia Sorento

Today on our 2014 Kia Sorento, we will be test fitting the pro series q-slot, a platform style 2 or 4 bike rack for 2 inch hitches. Part number PS63138. Today we will be test fitting the 2 bike configuration. To begin our test fit, we'll slide the shank of the bike rack into the receiver tube of our hitch, line up our pin holes; we'll then thread in our anti-rattle bolt and tighten it with a wrench. With our bike rack secure, we'll have about 11 inches of ground clearance. The closest point of our rack to the back of our Sorento's about 8 inches and overall we've added about 23 1/2 inches to the vehicle. Pulling the 2 outside silver pins on the back of the rack will allow us to tilt out our cradle arms .. and pulling the pin in the center mast will allow us to swing it away from our vehicle, giving us full access to our rear hatch.
2014 Kia Sorento Bike Rack Questions
- The Thule Passage Trunk Rack part # TH910XT that you referenced has been confirmed as a fit for your 2014 Kia Sorento so it would work well for you. Trunk racks can have the straps touch the spoiler of a car as long as the spoiler is supported. Thule tested your vehicle and determined that it would be strong enough. Also, most of the weight of a trunk rack and bikes is placed on the bumper and not the top straps.
I attached a review video that shows this rack being used on...
view full answer... - The anti-rattle hitch pin on the Yakima OnRamp Bike Rack for 2 Electric Bikes - 2" Hitches - Frame Mount # Y36FR is not standard as they all are hitch specific but the lock you're looking for is the Yakima HitchLock for Yakima Hitch Mounted Bike Racks - Same Key System (SKS) # Y07235.
view full answer...


What our customers are saying:
"Sent out an e-mail to you earlier this week asking which hitch woudld be the best choice for installing on a 2000 Venture van for hauling a bike rack with two bikes. You suggested the one that would be easiest to install..received in a matter of days..installation went great ..very well thought out instructions. Everything went smooothly and the hitch is up nice and snug..doesn't stick out..looks great."