
To see if this custom-fit item will work for you please tell us what vehicle you'll use it with.
Thank you! Your comment has been submitted successfully. You should be able to view your question/comment here within a few days.
Error submitting comment. Please try again momentarily.


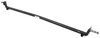
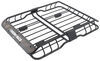
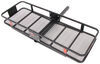
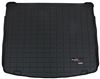
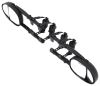
Perfect for light-duty towing, this custom, Dodge Journey trailer hitch receiver features fully welded, gloss powder coated steel construction. Drawbar sold separately.
Features:
Specs:
At etrailer.com we're committed to the products we sell, and to our customers. Our experienced and knowledgeable staff are available via both phone and email to address your questions and concerns for the lifetime of your hitch. The technicians at etrailer perform hitch installations on a daily basis, making them a valuable resource for do-it-yourselfers. The one-on-one, personal service you'll receive comes straight from an expert in the towing and automotive field. We've installed it, we've wired it and we've towed with it, so whatever your question, we can answer it.


Tech Tip
No drilling required for installation
Videos are provided as a guide only. Refer to manufacturer installation instructions and specs for complete information.
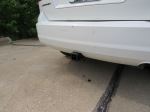
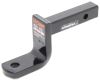
Today on our 2012 Dodge Journey we're going to review and install the CURT class two 1-1/4" receiver tube hitch, part number C12134. Here's what our hitch is going to look like once installed. As you can see, hangs down below the rear fascia. It's got a nice round crosstube design and a fully welded steel construction, which chain hold downs on either side of our receiver tube. Going all the way through our receiver tube is also a pre-drilled 1/2" hole for your hitch pin. Then we've got a 1-1/4" by 1-1/4" receiver tube for this class two hitch.
The hitch is capable of up to 350 tons of tongue weight and a 3,500 pound tow capacity. Next we'll give you a couple measurements to assist you with selecting accessories for your new hitch. From the center of the hitch pinhole to the outermost edge of the bumper is 2-3/4". From the top of the receiver tube opening down to the ground is 12-3/4". This will assist you with selecting accessories such as a ball mount, bike rack, or cargo carrier. We'll now go ahead and show you the minimum tools required for installing the hitch. We're going to have our safety strap for tightening them down, our 3/4" socket, our torque wrench, pry bar, and our spray lubricant.
To begin our install we first need to lower the exhaust. To safely lower the weight of the exhaust we're going to put a safety strap underneath. This will help support the weight. Next we're going to remove the ground strap that runs from the frame to the exhaust hanger. Now to remove the ground strap we'll just push the clip off of the metal hanger. Now to lower the exhaust we need to remove the rubber isolators from the metal hanger.
We have two here above the muffler and one just behind the rear axle in front of the muffler. Note, on vehicles equipped with dual muffler systems you'll need to do this on both sides. Now to remove the rubber isolators from the metal hangers we're going to spray each one with a spray lubricant and then use our pry bar or pliers to remove it. Now with the hangers remembered we can use the safety strap to safely lower the weight of the exhaust. Now that we have both frame rails exposed, let's go ahead and point out the attachment points. Our hitch is going to have a total of six attachment points, three on each side.
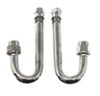
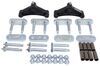
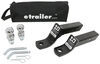
Our hardware and attachment points are identical so each process we do here on one side we'll repeat identically on the opposite side. Starting here at the frame, there's two pre-drilled holes towards the end of the frame. These pre-drilled holes will be our forward and center attachment points. Then inside the bumper structure will be our rear attachment point. Starting with the forward two fasteners, we'll secure the hitch with a 1/2" carriage bolt and spacer block. The carriage bolt and spacer block will get fed into the frame and down through the pre-drilled hole, and then we'll secure the hitch with a 1/2" flange nut. To get our hardware into the frame we'll use the 1/2" bolt leader supplied with the install kit. Starting with my forward attachment point, I'll take the bolt leader, feed it in and out through the end of the frame. Then I can slide on the block and thread on the carriage bolt. We'll feed them into the frame separately and pull them into position. Go ahead and remove the bolt leader and repeat the same process with the center attachment point. Now I'll go ahead and leave the bolt leader attached as it will assist with getting our hitch into position without pushing the hardware back into the frame. Now for our rear attachment hardware it will be the same 1/2" bolt, but a larger spacer block. We can go ahead and engage the two and then feed them into the end of the frame and into place. Now with all our hardware in place here on the driver side, we'll repeat the same process on the passenger side. Now before we install the hitch we're going to add a wedge block. The wedge block's going to have a thick and a thin side. The thicker side will face the rear of the vehicle. Now to help hold it in place so we don't have to worry about trying to get it in there while we're installing the hitch, we're just going to tape the wedge block over the attachment point and then our carriage bolt will drop down through it. Using some black electrical tape holds our wedge block in place. We're now ready to put our hitch in place. It's a good idea to get an extra set of hands to help you hold the hitch while you install your fasteners. We'll bring the hitch up to the frame and feed our pull wire through the center attachment point. Then we can install our flange nuts. Be careful as you put your hitch in place not to push the hardware into the frame. Now with our flange nut in place holding the hitch, we'll go ahead and remove our pull wire and install the center and rear fasteners. Keep in mind as we install our fasteners we'll install each one finger tight until we have them all in place. Now we can go ahead and tighten it down. Next we'll torque to specifications as indicated in the instructions. Now with our hitch tightened down and torqued to specifications, we'll go ahead and reinstall the exhaust. As we reinstall the exhaust hangers, we'll also make sure we put our ground strap back onto the metal hanger of the muffler. Once we have the exhaust back in position, we'll go ahead and remove our safety strap. Just like that, our hitch is installed and we're ready to hit the road. There you have it for the review and install of the CURT class two 1-1/4" receiver tube hitch, part number C12134, on our 2012 Dodge Journey. .
Average Customer Rating: 4.8 out of 5 stars (23 Customer Reviews)
Perfect for light-duty towing, this custom, vehicle trailer hitch receiver features fully welded, gloss powder coated steel construction. Drawbar sold separately.
Easy install it took less than 30 minutes. This hitch is built to last. Very impressed with the quality of the product.
Two day shipping - no complaint there. I had a minor fit issue on this hitch. The transverse structural member at the rear of the car did not have a semi-rounded profile like the instructions indicated. That member on my car was flat/square. To get the hitch to bolt up flush to the car's underside mounting points it was necessary to eliminate the wedge shaped spacers that were included in the hardware kit. No other problems were encountered. Unit is well constructed, finish is flawless. Unit looks like it belongs.

Brian G.

4/3/2020
Perfect fit and easy to install. All necessary was included. Good instructions. Great product.
I received my Hitch very pleased with it, installed my self and instructions were there I never fished the bolts before but i did it came with all hardware and it looks good and pulls my small trailer just right Thanks again etrailer very satisfied with my new hitch.

Charlie S.
3/16/2020
Works greatThank you nice to have small hitches
First, thank you for providing a suitable answer for a trailer hitch for Dodge Journey Crossroads that Chrysler cannot. But there are comments I’d like to make.
1. This is not a DYI project unless your desperate to save the $200 to $300 a dealer would charge for installation. Your project estimates assume the vehicle is up on a lift and not in someone’s garage supported by car jacks with minimum clearance to work.
2. The lowering of the mufflers is a difficult task. I was forced to make a specialized pry bar and make wedges of 1/8, ¼, 3/8 and ½ inch. The wedges were required because the pry bar would only move the hanger so far and then a bigger wedge inserted to increase the distance the hanger was moved. Frustrating when the hanger would return to it’s initial position if you were clumsy getting the wedges in place.
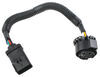
3. The video’s were good but the wiring video lacks a lot of detail. I had to totally “wing it” on how the wire was run from battery to the hitch wiring. I only hope…
4. The green wire to the right tail light was 18 inches short.
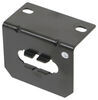
5. The description of where the converter box was to be secured was not correct. It says secure the box in the light well, but your support people confirmed my thought that it must in the open space below the light well.
6. The actual trailer four pin wire should have a more professional connection to the hitch. It’s just held there by ties
I bought a new car during the pandemic and had to have a trailer hitch to tow my jet ski. I found the etrailer website and ordered my hitch. I couldn't find the wiring on the website and when I called, he asked me what kind of lights I had on my new car - had never heard of that before, but come to find out they were LED lights, so I was able to order the right part. I paid a little more for faster shipping and it arrived 2 days later. Had it installed and all seems fine. I haven't had a chance to use it yet, but everything looks great. Excellent website, customer service and shipping. Thanks.
these guys are great, very customer oriented. products are quality built, they fit as they are supposed to. I watched their installation video for my trailer hitch and followed the instructions---- no problems. this was my second purchase for trailer hitches, i won't go no where else.
For the second occasion in 2-3 years I ordered a hitch receiver and light wiring kit. As in the first time this order arrived before anticipated and complete.
Customer service is flawless . . . .
I ordered the hitch and wiring harness for my Journey. It was shipped and showed up very quickly. It came with straightforward instructions and the install went very smoothly. I would buy through etrailer again.
Mounting was easy and works great. So easy to hitch the trailer up and take off. I would recommend this hitch to anyone in need and priced right.
Purchased tow hardware and electrical light package for my 2016 Journey. Installed the light package yesterday - Very satisfied with the product and the customer service was great.
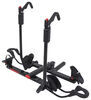
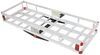
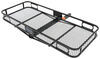
This hitch works great with my bike rac k.
No damage to package. All hardware and equipment in package as detailed. Very easy to install with car lifted. Took me less than 30 minutes to install.
Everything went as advertised. Instructions were great. Perfect fit! :-)
Works great,easy installation.
I couldn't get one bolt to line up, My frame may be shifted from a prior vehicle owner accident. The install was smooth.
Products are excellent as always. A little slow on delivery this time because of waiting for a back-ordered part.
Came quickly and was fairly easy to install. Once I figured out what I was doing.
great product at a great price. Thank you!
Exactly what I ordered in just a few da ys.
Easy to install shipped fast.

Do you have a question about this Trailer Hitch?
Info for this part was:
At etrailer.com we provide the best information available about the products we sell. We take the quality of our information seriously so that you can get the right part the first time. Let us know if anything is missing or if you have any questions.


Ken J.
2/13/2021
I use this hitch with great confidence, it’s solid and no problem with pulling either of my trailers. Number one in my book.