
Custom RCP Fit Kit for 4 Rhino-Rack RC and RV Series Roof Rack Legs - Fixed Mounting Points
(34 reviews)
Price: $114.16
In Stock
Custom RCP Fit Kit for 4 Rhino-Rack RC and RV Series Roof Rack Legs - Fixed Mounting Points
Item # RR42SV
Retail:$125.37
Our Price: $114.16
You Save: $11.21
Will this fit?
To see if this custom-fit item will work for you please tell us what vehicle you'll use it with.
In Stock
Thank you! Your comment has been submitted successfully. You should be able to view your question/comment here within a few days.
Error submitting comment. Please try again momentarily.


- All Info
- Reviews (34)
- Q & A (0)
- Videos (2)
- Photos
Rhino Rack Roof Rack - RR42SV
- Fit Kits
- 4 Pack
- Rhino Rack
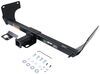
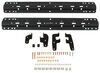
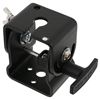
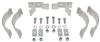
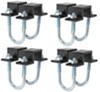
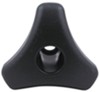
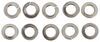
Custom fit kit lets you mount Rhino-Rack RC or RV series legs to a vehicle with fixed mounting points. Legs mount to vehicle with attachment studs. Molded inserts cover bases when the legs are removed. Includes 4 pads, covers, and mounting hardware.
Features:
- Custom fit kit allows you to mount 4 Rhino-Rack RC or RV series legs (sold separately) on your vehicle with fixed mounting points
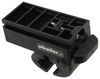
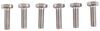
- Threaded studs screw into fixed mounting points to provide attachment point for legs
- Legs slide onto studs and secure with hex bolts
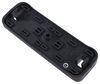
- Molded-rubber pads are designed to fit the contours of your roof
- Protect your roof from scratches and abrasions
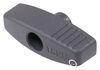
- Precision-molded inserts cover bases when the legs are removed
Specs:
- Application: Rhino-Rack RCH, RCL, RVH, and RVL roof rack legs
- Quantity: 4 pads, 4 covers, and mounting hardware
- 5-Year limited warranty
RCP69-BK Custom RCP Fit Kit for Rhino Rack RCH, RCL, RVH, and RVL Series Roof Rack Legs - FMP
Installation Details


Video of Custom RCP Fit Kit for 4 Rhino-Rack RC and RV Series Roof Rack Legs - Fixed Mounting Points


Videos are provided as a guide only. Refer to manufacturer installation instructions and specs for complete information.


Video Transcript for Rhino-Rack Vortex Aero Crossbars Roof Rack Installation - 2024 Toyota RAV4
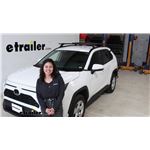
Hey everyone, it's Evangeline right here at Etrailer. Today we have the Rhino-Rack Roof Rack and we're gonna take a look at how it fits and I'll also show you how to get installed on your 2024 Toyota RAV4. If you need to get some fun roof rack accessories mounted to your vehicle, in fact, this vehicle is getting a rooftop tent mounted to the top of it, what you first need is a roof rack, so this is gonna be a three part kit. We have the 49 inch long vortex bars. These are gonna be aerodynamic and very versatile for different accessories. You also have the RCH legs, which are gonna give you a little bit of height so that you can clamp things around it.
And finally, we have a custom fit kit for your Toyota RAV4. It's very important to use our fit guide here at Etrailer because we have all of this kitted together as one thing, and that's gonna be something that is custom but also a confirmed fit for your vehicle. For the RAV4, there's a bunch of roof rack options and the main thing is bouncing price as well as what type of style you're looking for. I like the Rhino-Rack because it's a solid midpoint roof rack system where you get a lot of versatility and I think it looks good on the RAV4. It's very easy to install, although you do have to keep a 10 millimeter wrench handy in order to keep those towers tightened down.
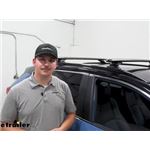
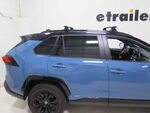
It's very similar to Yakima's flush rail roof rack where you have the same design. The main difference though to Yakima, is that the Yakima towers you can remove and they have little caps that go onto the brackets that stay on your roof. For this one, you're gonna have to leave the whole system on or take the whole system off. I've seen a bunch of different RAV4s and I know they all have different types of roofs, so double check yours to make sure this is gonna be a fit for you. We have a flush roof here, meaning we have a rail that goes up, but you cannot fit your hand underneath.
If you can't fit your hand underneath, you're gonna have a raised rail, and if you have no rail whatsoever, that's what we call a naked roof. So again, the fit guide will help guide you through those three different options. This is gonna be the one for the flush rail. This gives us a good amount of overhang, three inches up front, four inches in the back. Overhang is measured from the end cap to right to the tower, and that is a spot where you can still clamp accessories down, or if you want to utilize the T track, you can put your accessories anywhere on the crossbar.
This is all secured with an end cap and you also have weather strips on top. So the weather strips are great because it will help cushion your accessory that's loaded onto the rack. However, if you wanted to use the channel in between your crossbar, you are gonna have to take these strips off. For height, when I took my measurement, I measure at the top part of the roof. So here we have three and a quarter inches of clearance underneath the crossbar. In the back we have about three and a half inches of clearance underneath the crossbar. That is a good amount of clearance for clamps that go around. You'll see some clamps that have wing nuts and U bolts, and those require a lot of space. We also see super low profile clamps too. With this type of height, you're gonna get a lot of versatility. The next measurement is gonna be how high does this roof rack sit on the roof From the top of the roof to top of the crossbar, I have it just at about three and a half inches here in the back. That's where your cargo sits. If you have skis with extra tall bindings, you wanna have enough clearance so those bindings don't scratch up your roof. And again, that's where having that extra height comes in handy. Because they fit to very specific points on your roof rack, You don't get to choose where they go though. So for your crossbar spread, these are gonna sit pretty far apart. That's measured from center to center, and here we have it at 34 and a half inches of distance. So if you are carrying a roof box, the ski and snowboard here, or a roof basket, those very commonly require a very specific crossbar spread, so just double check that to see if it'll work with the roof. The next thing is if you are carrying extra long items, that crossbar spread is great, but you then have to factor in if you're gonna have hatch clearance. Measuring from our rear crossbar to the opened up hatch, we have 26 inches of distance. So honestly, that's gonna be great for the rooftop tent we're putting on top of this car. But if you have a ladder or a kayak, that's another measurement to think about. The install process might look a little daunting at first because you have different boxes and different pieces and nuts and bolts, but the process is pretty straightforward, especially if you follow along with this video. I already installed the rear crossbar and we're gonna install the front crossbar together. Most of what you need to install will be included with your kit, but you do need to bring a couple tools to the table. So what I brought is a 10 millimeter ratchet wrench, especially an open socket one. That one's super helpful and then I also have a pie tool. You can also use a flat head screwdriver and then I have some scissors. So with these, you should be good to go. When you open up the boxes for your crossbars, you're gonna have your bars with these rubber strips and a tool stored inside. The rubber strips push into the top T track of your bar. They're not gonna all fit perfectly, so you are gonna have to snip off a little piece and make sure everything is flush. Once you've done that for both crossbars, you then get your tower set up. Each tower will utilize this bolt that has a spot on top for an Allen key. You are then gonna put a split washer and then a flat washer. You're also gonna grab your metal plate, so this metal plate goes on top of your tower, flip the tower over and then put your bolts and the washers in through from the bottom. You're going to loosely thread that metal plate to that bolt. Do not tighten that down. With both towers set up like that, you're then going to slide it through the bottom track of your crossbar. This is why that plate had to be loosely installed so it could still slide. (tool sliding) You are gonna want to slide your towers around to the perfect spot before tightening it down. There's two ways to do this. You could tighten it down while it's on the roof, and that's going to take a little bit of time to use the tool, or you could follow the measurement that I figured out. So for the front crossbar, what I did is I found that if I put our measuring strip to the end and I put it at 80 on both sides, then I tightened it down, that fit perfectly fine on our roof. And then for the rear crossbar, I went all the way up to 120 for that measurement. Try that for yourself, and if it doesn't line up, just loosen the tower and adjust until you have the same length on both sides. Gonna have some excess strip and you're going to use that to fill in the gaps between your tower and the back of your crossbar. Be really mindful to do this up to spec because this will prevent whistling of your crossbar once it's on your roof. For setting up your roof, you're then going to need your flathead screwdriver or your little pry panel tool. See this cutout on your flush reel, there's also a little spot there to use your screwdriver, we'll just gently lift the top panel out. Then you're going to grab your spacer brackets. On the bracket, it says front left, front right, rear left, rear right. Front left is gonna be your front driver's side. This fits perfectly into the flush rail. You'll also be able to see how it evens out here on the top. To secure those blocks, you have a bolt and then you have a larger Allen key included with your kit. The bolt just drops down and if you have it lined up, it's gonna line up in the nut in that front rail. You then use your Allen key to secure it. Do this for all four corners. What I like to do is I just like to get the Rhino-Rack logo facing out or towards the front. This is gonna fit onto your roof. There's little tabs on the towers that will fit into those blocks. (piece snapping) To secure it, you are gonna have your hex head bolts, and these will also have a split washer and a flat washer. Put them together and then fit them through your tower so it goes in from the top and just drops into that block below. You're gonna want to hand tighten them down first on both sides, and then you're going to use your 10 millimeter wrench and that will further tighten it down. Once you've tightened down both towers to the point where that split washer flattens out, you then secure them with end caps. You get two end caps here, one is for the tower. It is gonna have this metal lock core. So turn the key and make sure it's locked and just give it a good little shake test. The next end cap is gonna be for your crossbars, and this does not have a metal lock core, but it has a pretty good security plastic core. You're just gonna turn that with your security tool. These two keys are important. Go ahead and put them on a key chain and put them in your glove box or on your keyring. Everything is tightened down, but I like to give all the craft bars and towers a good shake test and make sure it's all secure. And that's it for your install. It is very straightforward, especially with everything labeled, pretty easy to do, and hopefully this video helped you out with that process. This right here was a look at the Rhino-Rack Roof Rack with a 49 inch long vortex, Aero crossbars, BRCH legs, as well as the custom fit kit for your 2024 Toyota RAV4.
Customer Satisfaction Score:
94% were satisfied with this product
6% of customers were not satisfied
- Wrong item was ordered
- Product did not meet expectations
- Manufacturer issue
Customer Reviews
Custom RCP Fit Kit for 4 Rhino-Rack RC and RV Series Roof Rack Legs - Fixed Mounting Points - RR42SV
Average Customer Rating: 4.4 out of 5 stars (34 Customer Reviews)
Custom fit kit lets you mount Rhino-Rack RC or RV series legs to a vehicle with fixed mounting points. Legs mount to vehicle with attachment studs. Molded inserts cover bases when the legs are removed. Includes 4 pads, covers, and mounting hardware.by: Andy M04/16/2024
Purchased 3/2021 for a 2021 RAV4 hybrid. Front mounts didn't fit right because the casting in the mount interfered with a bolt on the RAV roof rail. Cleared the mod with Rhino Rack and modified the mount. Fit didn't seem perfect but looked and felt solid. Now in 3/2024 the mount gaskets are coming out since the fitment probably never really held them in very well. I contacted Rhino rack and their suggestion was to buy new mounts because they can't sell gaskets separately. Lol, WTF! Otherwise, the rack looks good!
by: Chris03/28/2024
Toyota RAV4
The Rhino rack for my Rav4 hybrid fit perfectly and has been used extensively for carrying whitewater and touring kayaks since installing it one year ago.
etrailer videos were helpful while I shopped for alternatives to Thule and Yakima which did not offer the specific feet I needed to install their racks.
by: John07/16/2022
Well made parts, shipped quickly. I was able to install the rack with no problems by following the instructions. Good choice if you want a quality roof rack for $xxx less than a comparable Thule or Yakima.


by: Doug 11/09/2021
2021 Toyota RAV4
Product arrived earlier than expected with all parts. A little work to install but everything fits perfectly. After I dry fit the parts and then tightened the sliders to the cross bars I attached the rack to the mounting brackets on the roof using a 10mm wrench. It was easier access than trying to use the allen head wrench. It's on with a solid fit and I love it.
by: Jonathon08/05/2023
I'm disappointed in this mounting system. I took it out of the box and went to install and the first 3 went on perfectly but the last one wouldn't tighten down out of the box. I followed the instruction manual for torque specs but the front right just spun and spun never getting tight. Tried the bolt in one of the other ones and it tightened down just fine. I'm reaching out to customer support for help with this and I will update if things change, but I can not in good conscience recommend a $XXX component that is unusable.
by: Tom04/04/2024
2020 Toyota RAV4
I appreciate your help with my order. I mistakenly ordered the wrong leg kits for my vehicle, which required a return. Your staff helped me make the return, and get the correct kits for my vehicle.
by: Tony 07/28/2022
Toyota RAV4
This rack was easy to install and looks great on our RAV4 Prime; much better than the Toyota brand roof rack, IMHO. I’ve used the racks primarily with a Yakima Rocketbox and have had no problems. The racks are solid, sturdy and show no signs of wear after a year of use.
by: Josh08/18/2023
Great roof rack! Easy ordering, fast delivery. Thanks!!
by: John 07/05/2023
Very happy with my order. Delivery was quick, customer service was very responsive to a few questions that I emailed to them (on a holiday!). The assembly instructions were well written. Thanks.
by: Jody 08/24/2023
fits like a glove or how its suppose to without any modification so thats a bonus. Says for the specific vehicle and it actually is for that vehicle


by: Scott 08/31/2023
Holding up well after a year. Would buy again.
by: Bart 08/07/2022
I looked at a lot of roof racks, and knew I had to be careful to get the right one. I asked a question about a specific Rhino rack fitting my car, and the question was answered overnight! I ordered the rack, and it was delivered two days earlier than the original estimated date! I just installed it, and it seems bomber! And it was a simple installation! I am very pleased with the rack and service!
by: Bill06/30/2023
Nicely made, attractive, easy install
by: Rowena05/29/2022
This kayak rack is perfect for my 2021 RAV4 utilizing a Thule Hullivator attachment. etrailer customer service is amazing, and I highly recommend them for all of the kind help they have provided as I purchased this rack for my SUV. Justin went above and beyond to help me with my purchase, and I am extremely grateful!!
by: Jose04/20/2022
2020 Toyota RAV4
I am very very very disappointed my package came in missing. And won’t be able to use the crossbars on my weekend trip. I ask them if they can expedite the shipment because I really need to use the crossbars on my weekend trip. Called them on Monday and said that they are processing and they received the request. Called them today coz I didn’t received any tracking number. No one answered on my calls I just left a voicemail. Check my email today and they said they are now processing my order. I am really dissapointed. I used the one in the website that says fit my car and they gave me all that I need hoping that I will received everything and saved me the hassle in looking for the parts, turns out what they sent to me has missing some
Parts.
by: Chris07/06/2023
Great experience
by: Gary 05/10/2021
2021 Toyota RAV4
I ordered the Rhino cross bars and cargo basket together for my 2021 RAv4 Hybrid simply because I wanted a sure combo that would work together, and they did and fit the car perfectly. This was an easy and quick job!
by: Nicole 07/28/2022
Looks like a great rack. Very sturdy. Only complaint is that the directions are not as complete as I would have liked and they have you tighten bolt underneath which is pretty much impossible to do. We ended up marking where the cross beams should go, turn it over to tighten the underneath bolts and then attaching to roof. It worked!
by: Arthur01/25/2021
Toyota RAV4
Placed it on a 2021 Toyota Rav4 and it fit perfectly. Follow the directions and it will be very easy to install. All hardware and tool was provided. I added Items #RRRCH4 and #RRVA126B-2.
by: Richard 04/16/2024
by: Joe08/11/2021
The racks whistle too much to leave on the vehicle (RAV4).
by: Joanna10/01/2022
Noisy
by: Clark08/24/2022
by: Matt 11/23/2022
25
34
Show More Reviews
See what our Experts say about this Rhino Rack Roof Rack
- Rhino-Rack Pioneer Platform Set-Up For a 2022 Toyota RAV4 with Flush RailsThe RCH Legs # RRRCH4 (RCH4) are the correct legs for your 2022 Toyota RAV4 with flush rails, you will also need the Custom RCP Fit Kit # RR42SV to mount them to the fixed mounting points. The Rhino-Rack Pioneer Platform Roof Tray # RR35TB (60" Long x 49" Wide) is not the correct size for your RAV4. I verified with the manufacturer that the correct tray option for your RAV4 is the Rhino-Rack Pioneer Platform Roof Tray # RR32TB (52" Long x 49" Wide). You can piece it all together individually...
view full answer... - Rhino Rack Cross Bars That Fit A 2021 Toyota Rav4 With Flush Mounted RailsThe Rhino-Rack Vortex Aero Crossbars # RRVA126B-2 will work with your 2021 Toyota Rav4, however, you're also going to need: - Custom RCP Fit Kit for 4 Rhino-Rack RC and RV Series Roof Rack Legs # RR42SV. And - RCH Legs for Rhino-Rack Crossbars and Pioneer Platforms # RRRCH4. These bars measure 49" long, 3-1/8" wide, 1-3/16" tall, and have a maximum weight capacity of 165-lbs.
view full answer... - Can Rhino-Rack Vortex Aero Crossbars Carry a Roofnest Sparrow Adventure XL TentThe Rhino-Rack Vortex Aero Crossbars - Aluminum - Black - 49" Long # RRVA126B-2 have a capacity of 165-lbs, which is the highest available for your 2021 Toyota RAV4, so you will be limited to that weight when loading items on the roof rack. Since your Sparrow Adventure XL tent weighs 150-lbs alone, you'll eat up most of the capacity with that. You will always be limited to the lowest rated component in your setup and in this case it appears that the roof of the RAV4 is only rated for...
view full answer... - Recommended Roof Rack for a 2022 Toyota RAV4The best roof rack for your 2022 Toyota RAV4 with flush mounted rails is going to be made by Rhino Rack. This roof rack has integrated locks to secure it from theft. The crossbars are 49" aero bars that fit almost all accessories. This Roof Rack Includes: Rhino-Rack Vortex Aero Crossbars - Aluminum - Black - 49" Long - Qty 2 item # RRVA126B-2 Custom RCP Fit Kit for 4 Rhino-Rack RC and RV Series Roof Rack Legs - Fixed Mounting Points item # RR42SV RCH Legs for Rhino-Rack Crossbars and...
view full answer... - Recommended Roof Rack and Capacity for a 2022 Toyota RAV-4The Rhino-Rack roof rack for your 2022 Toyota RAV-4 has a 165 lbs capacity. You will want to confirm your RAV-4's actual roof capacity and go off of that if it is lower. I have listed the individual weights next to the parts below: 8 lbs - Rhino-Rack Vortex Aero Crossbars - Aluminum - Black - 49" Long - Qty 2 item # RRVA126B-2 2 lbs - Custom RCP Fit Kit for 4 Rhino-Rack RC - Fixed Mounting Points item # RR42SV 2 lbs - RCH Legs for Rhino-Rack Crossbars - Fixed Mounting Points - Qty 4...
view full answer... - Is There a Roof Rack For 2019 Toyota RAV4 With Flush Side RailsHi Ben, Since your 2019 Toyota RAV4 doesn't have the raised side rails, it should have flush-mounted rails, and I have added a photo below that a customer was nice enough to send in which shows a flush side rail and what your RAV4 should have. If it does, there is indeed a roof rack you can use, from Rhino-Rack, that consists of the following parts: - Rhino-Rack Vortex Aero Crossbars # RRVA126B-2 - RCH Legs # RRRCH4 - Custom RCP Fit Kit # RR42SV Not only does this fit your RAV4 with...
view full answer... - Recommended Roof Rack w/ Silver Crossbars for a 2023 Toyota RAV4 w/ Flush Rails To add a roof rack to your 2023 Toyota RAV-4 with silver crossbars, I recommend the roof rack by Rhino-Rack and it includes the following parts: Rhino-Rack Vortex Aero Crossbars - Aluminum - Silver - 49" Long - Qty 2 item # RRVA126S-2 Custom RCP Fit Kit for 4 Rhino-Rack RC and RV Series Roof Rack Legs - Fixed Mounting Points item # RR42SV RCH Legs for Rhino-Rack Crossbars - Fixed Mounting Points - Qty 4 item # RRRCH4 This aero bar roof rack system has a 165 lbs capacity. The included...
view full answer... - Recommended Roof Rack for a 2022 Toyota RAV4 w/ Flush Mounted RailsYes, the 2022 Toyota RAV4 Roof Rack by Rhino Rack does fit your 2022 Toyota RAV4 with flush mounted rails that run front to back. You will need the following parts: Rhino-Rack Vortex Aero Crossbars - Aluminum - Black - 49" Long - Qty 2 item # RRVA126B-2 Custom RCP Fit Kit for 4 Rhino-Rack RC and RV Series Roof Rack Legs - Fixed Mounting Points item # RR42SV RCH Legs for Rhino-Rack Crossbars and Pioneer Platforms - Fixed Mounting Points - Qty 4 item # RRRCH4
view full answer... - Rhino Rack Vortex Aero Bar Roof Rack for a 2022 Toyota RAV4Yes, we do have a Vortex Aero Roof Rack for your 2022 Toyota RAV4. It is the Roof Rack by Rhino Rack and it includes: Rhino-Rack Vortex Aero Crossbars - Aluminum - Black - 49" Long - Qty 2 item # RRVA126B-2. These slim, elliptical crossbar shape helps to create an extremely aerodynamic system. Custom RCP Fit Kit for 4 Rhino-Rack RC and RV Series Roof Rack Legs - Fixed Mounting Points item # RR42SV. This custom fit kit lets you mount Rhino-Rack RC or RV series legs to your RAV-4 with fixed...
view full answer... - Is Rhino-Rack Vortex Aero Crossbar System for 2021 Toyota RAV4 Hybrid XLE QuietThe Rhino-Rack Vortex Aero Crossbar System part # RRVA126B-2, part # RR42SV, and part # RRRCH4 is a confirmed fit for a 2021 Toyota RAV4 Hybrid XLE. The system uses aero shaped crossbars which do a great job of reducing wind noise during travel. It will be on par with options from Thule and Yakima.
view full answer... - Recommended Roof Rack for a 2023 Toyota RAV-4 w/ Side RailsYes, there is a set of crossbars that will fit the factory side rails of your 2023 Toyota RAV-4. This system mounts directly to the side rails and has more than enough capacity for a cargo box. You will want the roof rack by Rhino Rack and it includes the following parts: Rhino-Rack Vortex Aero Crossbars - Aluminum - Black - 49" Long - Qty 2 item # RRVA126B-2 Custom RCP Fit Kit for 4 Rhino-Rack RC and RV Series Roof Rack Legs - Fixed Mounting Points item # RR42SV RCH Legs for Rhino-Rack...
view full answer...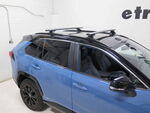
- Rhino Rack Vortex Aero Roof Rack for 2020 Toyota RAV4 With Flush Mounted Roof RailsThe Rhino Rack # RRVA126B-2 50 inch Vortex Aero Crossbars and the # RR42SV fit kit are indeed compatible with a 2020 Toyota RAV4 with fixed mounting points located in the flush mounted roof rails. You'll also need the # RRRCH4 Roof Rack Feet to join the crossbar to the fit kit. Those 3 items combined would make up the correct Rhino Rack Vortex Aero roof rack for your wife's RAV4.
view full answer... - What is the Best Roof Rack for a 2024 Toyota RAV4 w/ Flush Rails?The best roof rack for a 2024 Toyota RAV4 with flush rails is the roof rack by Rhino-Rack which includes the following parts: Rhino-Rack Vortex Aero Crossbars - Aluminum - Black - 49" Long - Qty 2 item # RRVA126B-2 Custom RCP Fit Kit for 4 Rhino-Rack RC Roof Rack Legs - Fixed Mounting Points item # RR42SV RCH Legs for Rhino-Rack Crossbars and Pioneer Platforms - Fixed Mounting Points - Qty 4 item # RRRCH4 This aero bar roof rack system has a 165 lbs capacity. The included locks will...
view full answer...

- 2020 Toyota Rav4 hybrid XLE with Flush Rails Rhino Rack Roof Rack System RecommendationThe 49" Rhino-Rack Vortex Aero Crossbars part # RRVA126B-2 do include 4 end caps. One for each end of the two bars. These are secured using a turn latch to hold them in place. These bars with the Custom RCP Fit Kit for 4 Rhino-Rack RC and RV Series Roof Rack Legs part # RR42SV will be the complete kit you need to install the system on your 2020 Toyota Rav4 with the flush factory side rails. Locking caps are available to provide increased security for the system with Rhino-Rack Locking...
view full answer... - Will Rhino Rack Vortex Aero Roof Rack Fit 2023 Toyota RAV4 With Flush Mounted Roof Rails Yes, the Rhino Rack Vortex Aero Cross bars # RRVA126B-2 is confirmed to fit your 2023 Toyota RAV4. For these crossbars to work you will also need the roof rack feet # RRRCH4 and the fit kit # RR42SV.These three items will give you the complete roof rack system for your 2023 Toyota RAV4. You can upgrade to all metal locks with part # RRVA-LEC4. The roof rack has a weight capacity up to 160 pounds. If you ever plan on hauling skis or a snowboard I recommend the Rhino-Rack Ski and Snowboard...
view full answer... - Is There a Front Hitch for Rod Holders on a 2019 Toyota RAV4 XLEI might have an option for you but there aren't any front mount trailer hitch options for a 2019 Toyota RAV4. If you are already using the rear hitch for something else like towing then your only other option is the roof. I recommend the Rhino-Rack Vortex Aero Crossbar System composed of part # RRVA126B-2, part # RR42SV, and part # RRRCH4. This would then allow you to carry your fishing poles on a carrier like the Thule Rod Vault part # TH27YV.
view full answer... - What Rhino-Rack Roof Rack Will Fit My 2024 Toyota RAV4? We have a few different Rhino-Rack roof racks which will fit your 2024 Toyota RAV. You will need to select the correct roof rack depending on what style roof rails you have if any. Raised Roof Rails Rhino-Rack Vortex Aero Crossbars # RRVA126B-2 Rhino-Rack SX Series Legs # RRSX100 Flush Mounted Roof Rails Rhino-Rack Vortex Aero Crossbars # RRVA126B-2 RCH Legs # RRRCH4 Fit Kit # RR42SV No Roof Rails Rhino-Rack Vortex Aero Crossbars # RRVA126B-2 Rhino-Rack 2500 Series Legs # RRRLKVA Fit...
view full answer... - Will 54 Rhino-Rack Vortex Aero Crossbars Work on a 2021 Toyota RAV4 with Flush Side RailsThe Rhino-Rack Vortex Aero Crossbar that Rhino-Rack recommends for a 2021 Toyota RAV4 with flush side rails is 49" part # RRVA126B-2. That said, you can go up one size to 54" with part # RRVA137B-2. In addition to the crossbars you'll also need the Custom RCP Fit Ki part # RR42SV and RCH Legs part # RRRCH4.
view full answer... - Will The Thule Tepui Rooftop Tent Be Compatible With 160lb Capacity Factory Crossbars Both the roof and crossbars have to have a minimum weight capacity of 165lbs to be compatible with the Thule Tepui Explorer Autana 3 Rooftop Tent with Annex # TH8001ASK05 so your 160lb capacity factory crossbars would not be enough. Instead you'll need an aftermarket roof rack with a higher capacity. If you have flush mounted rails then you'll need the following components: Rhino-Rack Vortex Aero Crossbars - Aluminum - Black - 49" Long - Qty 2 # RRVA126B-2 Custom RCP Fit Kit for 4 Rhino-Rack...
view full answer... - Best Roof Rack for a 2022 Toyota RAV4 w/ Side Rails Using a Thule HullavatorI have a great roof rack system for your 2022 Toyota RAV4 that will work with your Thule Hullavator Pro Kayak Carrier item # TH898. The crossbars will be longer than the standard 49" item # RRVA126B-2 so the Hullavator can function. It is the 2022 Toyota RAV4 Roof Rack by Rhino Rack and it Includes the following parts: Rhino-Rack Vortex Aero Crossbars - Black - 59" Long - Qty 2 item # RRVA150B-2 - ONLY FOR HULLAVATOR Custom RCP Fit Kit for 4 Rhino-Rack RC and RV Series Roof Rack Legs...
view full answer... - Will the Seasucker Monkey Bars # 298-SX6000B Fit on My Ridged Roof on My 2021 Toyota RAV 4?Without knowing the exact measurements of the gaps between the ridges on your vehicle, there is no way to confirm for sure whether the SeaSucker Monkey Bars # 298-SX6000B will be able to fit between the spaces. SeaSucker recommends smooth, flat surfaces in order to mount the vacuum cups, so it is not recommended to have part of the cup attached to a flat surface and part attached to the raised ridge. However, the diameter of the cups is 6 inches, so as long as you have 6 inches between...
view full answer...

- Recommended Roof Rack for All Models of the 2020 Toyota RAV4 It sounds like you need a roof rack for your 2020 Toyota RAV4. We have a couple of options and the one you will want depends on what is currently on your roof. There are three options that your RAV4 could've come from the dealership with and I have listed them all below along with the necessary parts: Factory installed raised rails that run front to back Rhino-Rack Vortex Aero Crossbars - Aluminum - Black - 49" Long - Qty 2 item # RRVA126B-2 Rhino-Rack SX Series Legs for Vortex Aero...
view full answer... - Would The Thule Tepui Explorer Kukenam 3 Rooftop Tent Fit On A 2022 Toyota RAV4To use a rooftop tent like the Thule Tepui Explorer Kukenam 3 Rooftop Tent # TH8001KSK05 on your 2022 Toyota RAV4 you'll first need a roof rack. RAV4's come with a few different rail styles for their roofs but if you have a naked roof with no rails that run front-to-back then you will not be able to use a roof top tent on the roof and would instead need to use a rooftop tent trailer like the Yakima EasyRider Double Decker Trailer # Y08129. If you have rails that are flush with the roof...
view full answer... - Will the Rhino-Rack Zenith MasterFit Rooftop Cargo Box Fit on My 2019 Toyota RAV-4?As far as the compatibility of the Rhino-Rack Zenith MasterFit Rooftop Cargo Box - 14 cu ft - High Gloss Black # RRRMFZ66, it will allow you to fully open your rear hatch on your 2019 Toyota RAV-4 when mounted. The Rhino-Rack Zenith is compatible with crossbars that are between 1-1/8 - 3-9/16 inches wide between 11/16 - 1-3/8 inches tall. If you need a crossbar system, the recommendations I have depend on whether your 2019 Toyota RAV-4 has a bare roof, flush rails, or raised rails. For...
view full answer...
Do you have a question about this Roof Rack?
Info for this part was:

Video Edited:
Jacob T

Video Edited:
Chris R

Updated by:
Wilson B

Updated by:
Noah M

Edited by:
Daron K

Written by:
Alex H

Test Fit:
Aidan B

Test Fit:
Evangeline M

Video by:
John S

Video by:
Schuyler H

Video by:
Ethan H
At etrailer.com we provide the best information available about the products we sell. We take the quality of our information seriously so that you can get the right part the first time. Let us know if anything is missing or if you have any questions.
Product Experts Available Now!
Call 1-800-940-8924
Doug
11/10/2022
Very well but takes a 15 minutes to take on and off.