
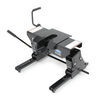
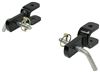
Demco Classic Base Plate Kit - Fixed Arms
(204 reviews)
Price: $753.95
Demco Classic Base Plate Kit - Fixed Arms
Item # DM9518218
Retail:$788.68
Our Price: $753.95
You Save: $34.73
Will this fit?
To see if this custom-fit item will work for you please tell us what vehicle you'll use it with.


Need help with installation?
Locate installers near me- All Info
- Reviews (204)
- Q & A (0)
- Videos (1)
- Photos
Demco Base Plates - DM9518218
- Fixed Drawbars
- Demco
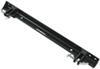
This custom-fit base plate kit lets you hook up your tow bar to your vehicle. No external crossbar means that only the base plate tabs are visible. Simple bolt-on installation with included hardware.
Features:
- Custom-fit base plates provide attachment points for your tow bar
- Hidden reinforcement means that less of the bracket shows
- No crossbar support beam or large, protruding brackets
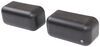
- Tab covers provide a clean look for your car
- Sturdy, dependable design
- Spreads towing force evenly to minimize weight placed on suspension
- Constructed of durable steel
- Simple installation - no welding required
- Bolts securely to your vehicle's chassis
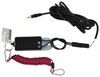
- Electrical bracket lets you easily mount a round electrical connector plug
- Instructions and necessary hardware included
- Compatible with all Demco tow bars
- Adaptable for use with tow bars from other manufacturers (adapters sold separately)
- Made in the USA
Specs:
- Distance between brackets: 24"
- Bracket height: 22-1/2"
- 1-Year limited warranty
Tab Covers

When you're not towing, the included tab covers provide a clean look for your car by covering the protruding brackets. They also keep dirt and debris out of the base plate tabs, and even act as a shin guard to help cusion the blow if you walk into the base plate tabs. These high-density polyethylene covers easily snap into place over each pull point when your tow bar is not attached.
Tow Bar Adapters
If you have a tow bar from a different manufacturer, an adapter may be available. Demco makes adapters for use with other manufacturer's tow bars so that you don't have to go through the added hassle and expense of replacing your tow bar when outfitting your new towed car with base plates.

| Type of Tow Bar | Use Adapter |
|---|---|
| Roadmaster Eagle and Eagle 8000 | DM9523014 |
| Reese Tow Champ and Valley Industries | DM9523015 |
| Roadmaster Falcon 5250 | DM9523023 |
| Roadmaster Tracker, Falcon 2, Falcon All-Terrain, Blackhawk, Blackhawk All-Terrain, and Sterling tow bars with serial numbers up to 14,500 | DM9523036 |
| Roadmaster Nighthawk All-Terrain, Sterling All-Terrain, and Sterling tow bars with serial numbers 14,501 and above | DM9523062 |
9518218 Demco RV Classic Baseplates
Installation Details
This Product Fits The Following Vehicles
- 2012 - 2015 Chevrolet Captiva Sport with brush guard
- 2012 - 2015 Chevrolet Captiva Sport without brush guard
- 2008 - 2010 Saturn Vue Hybrid
- 2008 - 2009 Saturn Vue Red Line
- 2008 - 2010 Saturn Vue XE and XR


Video of Demco Classic Base Plate Kit - Fixed Arms


Videos are provided as a guide only. Refer to manufacturer installation instructions and specs for complete information.

Video Transcript for Demco Classic Base Plate Kit Installation - 2014 Chevrolet Captiva Sport
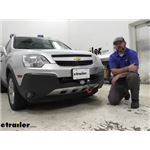
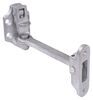
Shane: Hi. I'm Shane with etrailer.com. Today, I'm going to walk through how to install Demco Baseplate with Fixed Arms on our 2014 Chevy Captiva Sport. The baseplate is going to attach to the chassis of the vehicle and what it's designed to do, is it allows you, or gives you, a solid attachment point for your tow bar on the back of your motor home. It's going to allow you to flat tow the vehicle behind the motor home while you're traveling.It's going to be a steel construction, very durable, very thick welds. Nice black-powder coat finish on it.
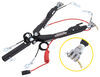
Really going to stay looking nice for a long time.One of the downfalls to the Demco Baseplate is the installation side. The installation side for this baseplate is not the easiest. There are other baseplate available that are a little bit easier to install. That being said, if you like the looks of this one, it's going to work with a lot of different tow bars out there, so, it's not going to limit you to just one tow bar. You can find any of those products, the baseplate and the different tow bars, here are etrailer.com.Here is going to be our connection point for our tow bar.
This spot here, this is going to be for your safety cables. If we come over here to this center, this bracket here, you see the wiring mounted to, or this wiring bracket mounted to . this bracket is going to come with your baseplate. Typically, this .. this is going to have two holes in it and typically it would mount on either side of your baseplate.
However, you can see with this vehicle, the license plate would cover it so we actually moved it out here. So, that being said, I would recommend getting two long brackets, they're no-drill mounting brackets, and you can find those here at etrailer.com. This allows you to extend the bracket . or extend your connection point out from your baseplate so you can attach your wiring.Now let's go ahead and take our vehicle out, get it hooked up to our RV, and show you what it looks like when it's being used. As you can see here, this is what it's going to look like when we're connected.
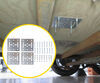
We have our tow wire connected to our baseplate. You can see, as I mentioned, this is going to be your connection point for your baseplate. Safety cables, they're going to hook here and it's going to give us that solid attachment point or solid connection point between our vehicle and our motor home.Another nice thing about this baseplate is, when you're not flat towing your vehicle, because these do stick out a little bit, they're going to have nice caps that you can put on to give it a little bit of added look to kind of blend in with the vehicle a little bit more. Now that we've gone through some of the features, let's walk you through how to get it installed.To start our installation, we're going to remove 12 fasteners from this plastic panel underneath our hood. We're going to use a Philips head screwdriver. You don't need to push on it. All you need to do is just make sure it grips and you're going to pry out the center. If you push on it too much, you're going to push it back down in there. Just like that.I have one here, here. Across the top, we're going to have four here. This one, this one, and this one down here in the very center. We'll pull this panel off, and as I mentioned, we're going to have one right down here in the center that's holding the fascia down on the bumper beam.Take a seven millimeter socket and in each wheel well, we're going to have a bolt here and one right up top here. On the bottom side of the vehicle, on both sides of the fascia, we're going to have two seven millimeter bolts and one 10-millimeter bolt we need to remove. We're going to have one 10-millimeter bolt right here in the center and two plastic push in fasteners right here.Flat head screwdriver, turn panel tool throughout the center just like that. We'll pull this panel off and set it aside.Now, we can start pulling our fascia off. It's a good idea . it's better if you have an extra set of hands so you can go from either side. If you don't, take your box that your baseplate comes in, set your, the box underneath the fascia so you can start on one side and set your fascia on it so you don't damage it. We're going to start on the outside and start working out way to the center. Keep in mind, if you have any lights or anything like that, don't just pull the fascia off. You want to make sure you unplugged those as you're taking it off so you don't damage the wiring.Just going to pull out from the fender and we'll just pop it off like this. Again, we'll just work our way to the center. We're going to have a wire connection here. Push that gray tab down on both sides and then you're going to have a black tab right there in the center. Push that and you're going to pull up on the plug. We'll just work our way over to the other side. Once you have all your plugs removed, you can set your fascia aside somewhere safe so it doesn't get damaged.We're going to take a 10-millimeter socket and remove our radiator coil. We're going to have a 10-millimeter bolt here. This top one here, or our center one and then over here, on the passenger side frame rail where your two hoses come in, there's a push in fastener right back here. We need to pop that off. Just like that.The next thing we need to do is we're going to start the process of removing our bumper beam. We're going to have two bolts up here that attach our headlights to the beam. We need to remove all the fasteners that are holding the wiring onto the beam. We're going to have four bolts here that hold the beam onto the frame rail. We're going to have a fastener right here on the bottom where the wiring comes down. We'll start with the top two, here. This is going to be a 10-millimeter socket.Your fasteners, you can remove the same way you did the other ones. Just a drum panel tool or a flat head screwdriver. This bottom one, you want to be careful with this. This is your air temperature sensor so you want to make sure you don't break that clip. We're just going to kind of pull it to the side and push these little tabs in. Just like that.Take a 12-millimeter socket and we're going to remove the four bolts on each side . and then we'll have one more 10-millimeter head bolt right here. I'll go ahead and start removing out bumper beam. We're going to kind of pull up on our lights. They have a little tab there that holds it into place. Again, make sure you don't just pull this off in case you miss any wiring or anything like that that's still connected to it. We're just going to slide it back slowly and slide our radiator hoses out just like that and then we'll set this aside.On our passenger side, take a 10-millimeter socket, we're going to have two bolts. We're going to be removing our air baffle. One here and one here and then we'll set that aside.On our driver's side, we need to remove our windshield washer reservoir. These hoses that are coming up, they're going to connect right here at the top. Mark one of them where you're disconnecting it so you know which one is going to which hose because these are little pumps and you want to make sure they're going to the correct one. What we're going to do is, we're going to pull that apart and you can take a little screw or bolt, put it inside the hose so it doesn't leak when you take if off. Then we're going to have a couple of bolts to remove from here. We'll have one right here. And we'll have one right down on the bottom. And then we'll have one right back here. Need to pull your plugs off the top of the vacuums. If it's taped, right here, there's a little tab inside there and it's going to face in. Push that tab and pull these off and we'll slide this off. You're going to have to watch the neck because it goes up into the engine compartment and we'll have a fastener right here on the backside. Move. It's just a push in fastener. And then we'll set our tank aside.Then we'll take a turn panel tool, we're going to remove the fastener that's holding the wiring onto this frame extension. This is going to be on the drivers side and then over on our passengers side, we're going to remove this fastener here. So, you're going to use a Philips head screwdriver and it's going to come out the same way that you're top ones did.Next, we'll take a 12-millimeter socket. We're going to remove the frame extension from each side. We're going to have four bolts. Two at the top, and two along the bottom. Remove both of them, and set them aside.Driver side, I've found, had a little tack weld right here. I'm not sure why they did that. The other side wasn't like that. If it does, just pop it off. Pop the extension off.Next, what we're going to do, is you're going to take your frame bracket. It's going to be marked rear with a sticker. One sides going to have two holes and the short flap is going to be shorter, it's not going to have holes in it. You're going to put it up against the backside of your frame rail. Two holes are going to be on the side and you want to measure, on this side, three quarters of an inch down, passenger side's going to be an inch and a half. You just want to make sure you're following your directions on all your measurements.You can see, I got a little black mark there. I clamped it, like this. What I'm going to do, is I'm going to use a drill bit and I'm going to drill the center out of each one of those and then take it up to three eighths.Before I start drilling holes on the other side, I want to show you what the end results going to look like. This is our rear bracket. You can see how I have this one marked. Drilled through both my frame extension here. We have a front bracket that's going to go on and also going to have holes drilled in it. I just wanted to show you what it's going to look like even though we're going to take you step by step and show you how to get it installed.The best way to do this is to start with a pilot bit, do a small hole, and then step it up every couple bits up to a three eighths. One, it's going to save your arms. Two, it's going to save your drill bits.We'll take a three eighths bolt. You want to make sure you're using the blue Loc-Tite that comes in your kit. We're going to run it through each of the holes in the bracket that we just drilled and then we're going to put on a lock washer and a nut.Then, with a 14-millimeter socket, we're going to tighten and and torque the hardware to the specifications on the instructions. We're going to make sure, if at all possible, you torque it from the nut side, not the bolt head side so that it's inaudible 00:13:17. Should have enough room in here with the small torque wrench to get it inside there and a short bit.You're going to measure from this top hole down two and three quarter inches. You're going to go in seven eighths of an inch, and mark it. From there, you're going to go down to five and three quarters from this top hole down, to five and three quarters. Again, in seven eighths and mark it. We're going to drill out two holes, only we're going to go through this plate and then the plate we just installed, or the bracket we just installed. We're going to take it from our pilot hole all the way up to three eighths.Next, we're going to temporarily reinstall our extension, our frame extension and then right back here, they're not going to tell you this in the instructions, but this fastener right down here Go ahead and remove it. What we're going to do is we're actually going to drill from back here through instead of tapping it and then pulling this off and re drilling it. This is going to make it a little bit easier to get our holes to line up better because I had a little bit of a problem on the other side. Their measurements are a little bit off and we're going to see if we can't get this one to line up any better. Now, all's I'm doing is I'm using my drill bit to mark the holes on the extension and then I'll pull it back off and drill them out of the way.Once you get holes opened up enough to get these bolts through, then what you're going to do is install the plate. Don't tighten it down and we're going to mark these holes and drill them out. Now we're going to take the whole thing off, including this front bracket, and we're going to mount the front bracket onto our extension.You'll notice, there's an overlap here. We're going to take a flat washer that comes in the kit, and we're going to slide it in the bottom hole only and run our three eighths bolt through. On the inside, we're going to put a lock washer and a nut. Now, before putting the nut on, you want to make sure you're using the Loc-Tite. Again, you want to use this in all the hardware that we're installing for the baseplate. Then, we're going to tighten and torque the hardware to the specification in the instructions.For bolts that are going through, through this bracket, through this plate, and then through this bracket, they're going to be three eighths bolts but they're going to have the collar on them. Again, make sure you're installing Loc-Tite and then we can reinstall our frame extension. Once you have these tightened and torqued down, you can repeat the process for the other side of the vehicle.Next, we're going to lift our baseplate up into place. We're going to temporarily install it using the existing weld nuts. What I did, was I put two on each end just to hold my baseplate up and then what we're going to do is this very bottom hole, we're going to drill it out to the same size we did the rest of our hardware. Before we take these off, we're going to install the hardware here. Then we'll remove these and put our bumper beam back in place. We're going to tighten our bolts down and then we're going to torque them to the specifications in the instructions. These are actually going to be a 13-millimeter socket for the nut side.Next, we can reinstall our air box and our windshield washer reservoir. Once you have your bumper beam put back in place, you're hardware that you're going to be putting in, you're going to have eight bolts. They're going to be the same length, same size. You're going to put on a lock washer and then a flat washer. Install them again into the existing weld nuts that are already going through the baseplate into the frame, and then you're going to tighten and torque them to the specification in the instructions.Once you get your bumper beam put back in place, you're going to have to trim your fascia. Just follow the instructions for the trimming. It's very simple. You'll notice a couple of extra brackets here. These do not come in the kit. These are long brackets and what I did with these, is this is a bracket that comes with the baseplate. This is for mounting your wiring and typically, it's going to mount on one side or the other. With this vehicle, the license plate sits right here on the bumper fascia and it actually covers this, so, mounting it here would not work. So what I did is use two brackets, drilled a hole in the back, just ran a bolt through it, through the slip in the bumper beam. Drilled a couple extra holes here. Once I get the fascia put back in place, that's going to sit just like that and then with out braking system, we can mount our break away switch right here on this side, that way everything is together.Once you get your fascia cut out, it's a good idea before you put your fascia back in, to add any additional items you may be needing like your wiring and your braking system. It's a lot easier to run all of your wires where they need to go while your fascia's off.Well guys, I hope you enjoyed this video. That's going to do it for our look at installation on the Demco Baseplate on your 2014 Chevrolet Captiva Sport.
Customer Reviews
Demco Classic Base Plate Kit - Fixed Arms - DM9518218
Average Customer Rating: 4.8 out of 5 stars (204 Customer Reviews)
This custom-fit base plate kit lets you hook up your tow bar to your vehicle. No external crossbar means that only the base plate tabs are visible. Simple bolt-on installation with included hardware.by: Smitty12/19/2020
Received on time and installed as directed. I'm 78 and only had one problem, that of having to bend down a tab on the vehicle frame. Had to go buy a punch. However, the left base plate front holes for the tow bar attaching pin was not in alignment. The pin would not go through. Contacted etrailer and received a replacement in no time. Removed the bad one and reinstalled the new one. Then took the vehicle to my hitch guy for brake wiring. He double checked my work and said everything was in great order and a good fit. With the virus lockdown, I have not towed other than home from getting the brakes set up. But that worked ok.


by: Virgil 12/20/2022
Etrailer has proven to be the best place to purchase all my towing needs! They sent my first order very quickly. I decided to do a second order for another vehicle and again perfect service and top quality parts! The communication is A++++ and I highly recommend Etrailer.
by: Doug 04/18/2024
It took closer to 5 hours by myself!! Actually fairly simple install. If I had another one to do now it would probably take 3 hours. Some of the bolts were a pain with my large hands. It only pokes out a little. Very happy with this hitch!!
by: Michael W01/27/2023
Very high quality.
Very quick delivery.
Very good customer service.
I will order from etrailer again, I'm sure
by: Howard 12/27/2023
easy to install on the truck frame and the removable arms help hide the base plate.
by: Scott 09/02/2022
Towed our jeep 3,000 miles and this baseplate fit and worked very well.
by: Vincent 07/18/2023
These base plates are AWESOME! They were very easy to install on my 2013 Ram 2500. I just removed the shackles that were there, and the base plates aligned to the existing holes perfectly. Connecting to the tow bar behind my RV was a simple and easy task. Make sure you use the Loc-tite that comes with the base plates on the new bolts. This will ensure you have a good strong tight bond. The plastic covers that come with the base plates are a good fit too. The only come off if you pull them off, plus they protect your knees if you happen to bump into the base plates by accident. This is an awesome product, I highly recommend.
by: Marcus08/28/2019
Great service - ordered Sunday night, delivered Wednesday lunch time, installed Wednesday afternoon. Excellent information, instructions - took about 4 hours, had to file 2 bolt holes a slight bit, but the fit was very good.
I am very happy with the baseplate and would recommend it to anyone.
Before and after pictures attached.


by: TL07/02/2022
Demco is a great product. This is the third baseplate we have purchased for different vehicles. All have fit perfectly. It took me 1.5 hours to install this one on our Fiat 500.
by: Jim 03/18/2024
Super Service and parts fit perfectly.
Very good quality.
by: Don, Ellendale ND07/26/2023
Received my H3 Hummer baseplates and towing lights diode kit. Haven't installed yet but when it's done I hope to submit pics.
Dealing with etrailer has always been nothing short of outstanding. Always rapid delivery of great parts and excellent prices. Thanks once again etrailer.
by: Reto05/19/2019
After reviewing the top name brands for tow bars I was really exited first with Roadmaster's pin style base plate connectors, but when I realized that it would require cutting and possibly drilling I took a second look and decided to install the Demco base plates and get the tow bar from them as well.
These plates can be installed in a mere 2 hours if you have all the tools ready to go. I have the fortunate luck that my truck is equipped with the air suspension and so lifting it to the highest setting and driving up on 12in ramps gave me ample amount of room to work under the front bumper area.
The installation is seriously easy and requires no special tools, other than a set of metric sockets and a torque wrench. The factory tow hooks are removed and these base plates fit in the exact same space without any cutting, not even the plastic cover behind the pumper needed to be removed (though for some odd reason the instructions did and I followed them on the driver side but when I realized that I could install the plate without this step, I omitted it on the passenger side). Despite my initial worry of wanting a nearly invisible look, these bars are remarkably clean looking.


by: Ace03/27/2024
Received shipment fast. I ordered the wrong adapters and call customer service right after delivery. Got excellent service from Brittany ordered the right adapter, got a return label while on the phone to my email. Installed the demco base plates with a few problems. Fit was tight but nothing a small mallet couldn't handle. They do mention in instructions that you may need to elongate one of the holes. Mine was for a 2016 GMC 2500. Definitely need to make hole bigger on the truck frame. I would do it before inserting the baseplate. Otherwise great product good tight fit.
by: Stephen10/05/2021
Fast delivery and great price. Replaced an old Roadmaster baseplate (which was a shin-getter) for my Saturn Vue, with a Demco baseplate. Fits perfect! New baseplate is barely exposed to my shins. Directions were very clear, and I installed it in about 2 hours. It even came with the thread lock required. etrailer communicated every step of my shipment, even following up after delivery.


by: Kevin 07/12/2023
I installed this base plate on my 2006 z71 crew cab 1500. It works perfectly to flat tow our truck anywhere we want to go.
by: Doug11/03/2022
One year follow up....
The Demco unit is a solid base plate overall. Basemount mounting holes are slightly off compared to the frame which made installation slightly difficult, however, not too difficult to rectify. Unit works well with just over 3000 miles in the past year.


by: Dale02/13/2022
I am very pleased with this base plate , it installed with very little effort . The only issue I had was that it was delivered to the wrong address . The shipping label was for another address and with much effort we found it .
But with that I will still purchase from etrailer in the future .
by: Doug03/26/2024
I can only comment on how fast the shipping to Canada!! It was awesome!!! Tks
by: John 04/04/2024
it bolted right on . works great
by: Dave B.07/13/2023
Played "It is in stock but backordered" inventory games with my local RV shop till I finally gave up and ordered from etrailer. Got my shipping information immediately, no games. Love etrailer.


by: Reto05/19/2019
First, etrailer has come through again. I've been purchasing various components and towing related parts from them for years and never once had an issue. Great work guys.
Now on to the product review of the Demco Excali-Bar II tow bar. Right away I liked the fact that it had the breakaway cables pre-mounted and attached to the underside of each tow bar. It makes it very easy to keep it all neat this way. The cables are also polyurethane covered, so fraying shouldn't be an issue from rubbing. The next cool thing is that the tow bar has a built in 3in raise or drop to make the installation parallel to the towed vehicle, plus there is two hitch pin locations for further lateral adjustment. The driver side tow bar also comes with an umbilical cord rod that allows you to keep the electrical umbilical cord attached to the bar without the risk of it dropping down on the pavement during travel and getting chewed up or ripped off - also keeps it clean and eliminates one less thing to consider each time when connecting and disconnecting. Stowing away also gives multiple options as the two bars can either be both on the same side (driver or passenger) or they can be split (one on each side).
I purchased the Demco base plates, so no special adapters needed for my vehicle. Tow bar hook up and disconnect takes no more than 5 min. The release levers work as advertised and allowed to disconnect the tow bar even when the towed vehicle wasn't perfectly aligned. These base plates were the only ones that didn't require any drilling or cutting of the trucks frame or other cladding.
In all, the Excali-Bar II tow bar is worth every penny.


by: Jim07/19/2023
Easy to install. Very heavy duty. Performs as expected. I’ve pulled my GMC Canyon THOUSANDS of miles and this have never failed.
by: Jordan 01/05/2024
Easy to install. 2009 dodge 2500. Very solid.
by: Robert 02/26/2023
Haven't been able to install due to the weather. However it appears to be as described and I expect that like all Demco baseplates it will be a perfect fit.
25
204
Show More Reviews
See what our Experts say about this Demco Base Plates
- Flat Towing a 2012 Chevrolet CaptivaYes, your 2012 Chevrolet Captiva Sport can be towed with all 4 wheels on the ground. You do have to pull the 2 amp PWR/MODING fuse from the instrument panel fuse block. You can use fuse bypass part # RM76511 so you do not have to pull the fuse every time you want to tow the vehicle. For a baseplate, I recommend Demco classic base plate kit part # DM9518218. You need a tow bar that is compatible with the Demco baseplate. I recommend the Demco Commander tow bar part # DM9511012 because...
view full answer... - Parts Needed to Flat Tow a 2013 Chevy Captiva Sport Behind a Motor HomeThere are parts available that will allow you to flat tow a 2013 Chevy Captiva Sport. But to determine if it can be flat towed you will need to check the owners manual in the towing or recreational towing sections to see if it can be flat towed and if there are any special procedures or requirements. If you can flat tow it then you would start with base plates. You can use the Demco kit, # DM9518218. Next you will need a tow bar. I recommend the Commander II, # DM9511012. This is a motor...
view full answer... - Recommended Flat Tow Setup for a 2014 Chevy Captiva SportI can definitely help you out with parts to flat tow your 2014 Chevy Captiva Sport. I really like the Demco setup you were looking at because Demco offers a few kits that include just about everything that you need, plus they have very nice tow bars that will last you a long time which you can use on future vehicles you choose to flat tow. For a base plate kit use part # DM9518218 and the the Demco tow bar I recommend is the Dominator # DM9511008 because it has a 7,500 lb weight capacity...
view full answer... - Parts Needed to Flat Tow a 2013 Chevy Captiva Sport Behind a Motor HomeI found an online copy of the owners manual for the 2013 Chevy Captiva and in section 10-70 it does indicate that you can flat tow the vehicle (front wheel drive and all wheel drive). Consult your owners manual for additional flat towing information. You will need base plates, tow bar, safety cables, lighting, and supplemental braking to flat tow a vehicle. For base plates you can use Demco base plates # DM9518218 that you referenced. For a compatible tow bar I reocmmend the Commander,...
view full answer...
Do you have a question about this Base Plate?
Info for this part was:

Edited by:
Lindsey S

Video Edited:
Jacob T

Test Fit:
Shane H

Written by:
Kristina F

Video by:
Jacob H

Updated by:
Manda E
At etrailer.com we provide the best information available about the products we sell. We take the quality of our information seriously so that you can get the right part the first time. Let us know if anything is missing or if you have any questions.
Product Experts Available Now!
Call 1-800-940-8924
Thank you! Your comment has been submitted successfully. You should be able to view your question/comment here within a few days.
Error submitting comment. Please try again momentarily.