
Rear View Safety Backup Camera System - 2 Cameras
(22 reviews)
Price: $329.59
Need help with installation?
Locate installers near me- All Info
- Reviews (22)
- Q & A (0)
- Videos (1)
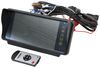
Rear View Safety RV Camera System - RVS-7706135
- Backup Camera
- 7 Inch Display
- Rear View Safety
- Mirrored Image
- Night Vision
- Removable Sunshade
- 2 Cameras
- Dashboard Pedestal Mount
- Below Rear Clearance
- Rear View Safety backup camera system
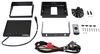
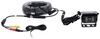
- 7" Digital LED color monitor
- Removable sunshade
- Mirror image capability
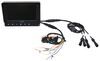
- Power harness for connecting DVD player or other cameras
- Automatic system switch
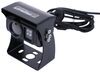
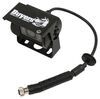
- 2 CCD cameras
- 1 Backup camera with 130-degree viewing angle
- 1 Side camera with 120-degree viewing angle
- 50' Infrared night vision
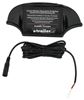
- IP69K Rated - keeps out dirt and moisture
- 20G Vibration and 100G impact rating
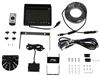
- Includes all wires, connectors, and mounts
- 1-Year warranty
RVS-7706135-NM-01 Rear View Safety Backup Camera System - Side Camera
Replaces Rear View Safety RVS-7706135
Installation Details


Video of Rear View Safety Backup Camera System - 2 Cameras


Videos are provided as a guide only. Refer to manufacturer installation instructions and specs for complete information.

Video Transcript for RVS Rear View Safety Backup Camera System Review
Hi there, RVers. Today we're going to be taking a look at RVS' rear view safety backup system. These are available in different configurations up to four cameras. We've currently got the four camera system installed on our RV. The four camera system comes with a front, a rear, and two side cameras. Here at the back we've got our two rear cameras.
Now, the system is designed for one of these to go on the front, but you can mount the front camera wherever you really like. My friend Tom's dad mounts his over the door of his RV so he can watch his camp site and use it as a security camera.Right now you're looking at the one we've set up low at the back of our vehicle to make it easy when backing up for hooking up this flat tow setup. When we toggle to the next camera, we've now got our high mounted rear camera that'll allow you to see your entire flat tow setup pulling behind you. This is also nice for pulling a trailer and you want to monitor your cargo in the back. We also have a left and right side camera system, which makes it easy when parking and backing up where you need to see down the side of your RV.If we continue to toggle through, we'll have multiple display modes up.
Here, we have both of the cameras we have installed in the rear. Here, we have both of our side cameras. You've got a three camera set up here with the rear and both the sides, and a four channel setup, where you have both the sides. And we have two rears here, but it could be your front and rear.It's just another layout with all four cameras, and we've circled back around to our first camera, which is our low rear camera. These display options will vary depending on how many cameras you have.
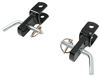
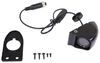
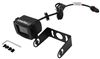
The monitor system will accept up to four.This is our side camera on our driver's side. All of the cameras feature infrared lights to assist its vision in low light settings. The nice thing about the front rear cameras is they come with a sun shade to assist its vision in high light settings, and the brackets that come included with those will allow the camera to swivel both up and down. The screws on the side can be loosened and tightened to allow you to make that adjustment.Here's our passenger side camera. All the cameras that come included with the kit are going to be vibration and impact resistant.
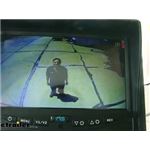
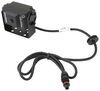
Your side cameras will have two mounting options. You'll have the adhesive backing that we chose to install on ours, which gives it a nice flush mount, which gives it a real good factory look. There are also a bracket set up that you can install on these. It will have it stick out about an inch when the brackets installed, but what's nice about the brackets is that the cameras will be adjustable so you can tweak those to the best vision option that works for your RV.Three out of the four cameras that you can hook up to the monitor system will have trigger wires available. These trigger wires, when 12 volts as applied to them, will turn on that specific camera. So on our system here, we hooked our side cameras up to our front blinkers, so that way whenever I turn the blinker on, that 12 volt signal from the blinker is sent to our system and it turns those on. We also have one hooked up to our reverse lights for the rear camera. Here, you can see it activating as I turn my blinkers on.There's a slight delay when you turn the blinker off before it returns to the normal position, which is usually your front camera or camera one. And here's our left. As long as the blinker remains active, this camera will stay on. Same goes for reverse.Now, when you put your vehicle in reverse, it automatically switches to your reverse camera. Here, you would see it on. When it gets this trigger signal, that will inaudible 00:03:33 switch to that camera. inaudible 00:03:34 grid lines up, making it easy to back into a parking space. And it also turns on the audio circuit. You're hearing me through the camera system right now. This is nice if you've got anybody in the back guiding you into your spot. You'll be able to hear the directions.This camera system's not only great for increasing your confidence and safety as you're driving down the road by providing you with vision all around your RV. It also is great for a security system, so when you get to your destination, you can monitor your camp site and your belongings, in the event that any animals may come along to try and get some food, or you have any unwanted guests that want to troll into your camp site.The menu button next to the power button will pull up the menu where you can adjust all the display output options on your camera here. This is going to vary between picture quality, brightness, as well as which cameras are currently being displayed. In the bottom right, you can also reverse the camera. This gives you a few more mounting options. If the location that you want to mount it works best with the camera upside down, go ahead and place it upside down and then press the reverse button. Through the menu on the turn option, you can adjust it so that specific camera displays upside down all the time, which would be right side up for you.The unit also comes with a remote. This is nice if you're using it as a security system. I can be sitting here at the table, just inaudible 00:04:54 look around outside. We can cycle through all of our cameras and see that everything here at the site is a-okay.When comparing this other camera systems on our website such as the ones from Voyager, I found that the RVS system has a better audio quality coming out of it in comparison. However, I found that the Voyager has a little bit crisper picture. So if picture quality is better for you, then the Voyager might be a better option, but if you really are having trouble hearing the people behind you and you want those directions, the RVS system that we have here is probably a better option.Another difference between them is that the RVS cameras use a five wire connector, where the Voyager systems use a four pin connector. The four pin connector, I've found, is a little more common and is often pre-installed on many RVs, even if they don't have a camera system. So installing a Voyager system is often a little bit easier if the wiring is already run to the back, because routing the wiring can be some of the most time consuming parts. So if you can use the wire that already exists in the RV, it greatly decreases the amount of time for the installation.You'll want to begin your installation by determining what you already have on your RV. Some systems already have cameras mounted in the back, and may already have cameras mounted at the side, and they may already have camera wiring run through them.Once you determine what you have, then you'll want to determine where you want to put the cameras that come in your kit. We're going to be placing two cameras at the back. This kit's typically designed for one of those to go on the front, but our customer requested the other to be in the rear. And we're going to be mounting both the side cameras. There was already wiring ran for our camera through the back. There is wiring that comes in your kit if you don't have a wire that's already run.If you need to route your wiring, you're going to run that from your monitor to wherever you've mounted your camera. When routing your wiring, it's best to avoid any moving objects, such as your steering and suspension, and anything excessively hot, such as your exhaust. In a lot of cases, running it down and then underneath the vehicle back up and then inside is the easiest way to do it.For your front and rear cameras, you'll have a bracket that you'll need to mount. We're going to be mounting the rear. We're going to use the hardware that already existed on our RV. There is some hardware that comes with it, but depending on where you want to mount your camera, you may need to pick a more appropriate hardware for that application, whether that be wood screws or nut and bolts that are different sizes than what comes in your kit.We're going to mount the bracket by sliding our screws through the slotted holes on each side here in the back. And using a Phillips screwdriver for this hardware to tighten it down.Next, we're going to mount our camera into our mount there. It's not a bad idea, if you're mounting it up high on the back of the RV like we are here, to go ahead and, connect the electrical wire now. This way, just in case you drop it, it's not going to go all the way to the ground. So just line up. There's a couple little slots on each end. Line those up, so it only goes together one way. Go ahead and screw the locking nut together and then you can take the rubber protective covering and slide it over both.Now, it's optional, but there is a sun shield that comes with it. If you decide to use it, you simply just slide this over your bracket. I like to slide it on first. It's going to be held on by the same hardware that holds on the camera. I just find it a little easier to put that in place because it does a pretty good job of staying there. We'll now take our camera. We're going to line up the holes in the side, you have three holes on each side, with the hole in the center of our bracket, and the slots. We're going to start by doing the center hole to the center hole on the camera.Once you've got the bolt the center ones on on each side, and you can angle the camera to your desired position and then use the remaining hardware to put one on each side of that center one, locking it in place. You'll do that on each side of the camera. We can now push our wiring back up inside the motor home to hide it. We mounted our camera where cameras are typically mounted in the back, and a lot of RVs already have a location here to put one if they don't already have a camera, just like this vehicle did. But if you we're installing it in a place where there was no spot for it, you can drill a hole for your wiring, and I would recommend using an 11 16ths drill bit to make it large enough to fit your wiring and connector ends through there. That also happens to be a good size for the grommet that comes in the kit to poke up in there and seal up the hole you just drilled.To help get your grommet in place, you might need a small screwdriver to just poke the lip edge up in the hole as it is kind of a tight fit, but this is what we want, so that way it's a water-tight seal. We mounted our front camera here at the rear. Our customer wanted to use this as a closer camera towards this hitch. Hooking up this hitch mounted accessories and also backing up, hook this vehicle up for his flat tow setup.Your side cameras, so they're going to mount in a similar way. You do have brackets that will allow adjustment just like your rear and front cameras, but it also comes with a double sided adhesive pad that you can use. That's what we chose to use here, as it gives it a nice flush mount and it's just a little bit more appealing to the eyes using the flush mount.Once you've got all your cameras mounted and you've routed all your wiring up to the front of the vehicle, we now need to get our monitoring system hooked up. There's a harness that comes with your monitor and we're going to start hooking that up. The end with all the wires poking out of it that you see here, it's going to have all of your camera connections here, so if you routed your wiring inside, you can go ahead and connect all of your cameras to it. Those connect just like the ones in the back. And after you've connected them, you can cover them up with the rubber sleeve.You'll have a brown, a blue and a yellow wire that comes off of your harness. These are your trigger wires for your cameras. Your trigger wires will look for a 12 volt input, and when it sees one, it will automatically turn on the camera for that specific trigger wire. So you can see here this one's labeled channel four, channel three, and channel two.Channel one is supposed to be for your front camera. Channel two is designed to be your rear camera. Channel three is designed to be your left side camera, and channel four is designed to be your right side camera. So we've hooked channels three and four to our blinkers, channel three to the left front turn signal, and channel four to the right front turn signal. We just spliced right off of the bulbs for the turn signals, in order to get that 12 volt. So whenever we turn our blinker on, that blinker signal that's going to the bulb, making the bulb light up, is going here in flashing. Our system will detect that flashing and know, oh, that's your left turn, and it will automatically turn on the camera when it sees that left turn signal input.Same thing with our channel two. We hooked this to the reverse light circuit and brought it up here. So whenever we pull our vehicle in reverse, the 12 volts that was going to our reverse light is also going to our camera system. Once it sees the signal, it turns on the backup camera. You'll also then have a black and red wire that comes off this harness. Your black wire is ground, and you could hook this to any ground point. We went ahead and just used a ground stud located back behind our brake pedal. This will vary depending on your motor home, where you decide to mount it.And lastly, we have power. There's a couple of different ways you hook up power. You could hook it directly to the battery and that would power your camera system all the time. If you do have it hooked up to your battery all the time, you can turn the monitor off to save battery life, but there is still LEDs on it that will be lit up for the buttons, and over a long period of time, those could drain the battery.So what I've opted to do, instead of hooking it directly to the battery, we used a fuse tap to tap into a fuse that's only powered when the ignition's in the run position. This way the camera system turns on when you turn the key on. So if you are not planning to use it as a security system and you want to make sure that it's not going to drain your battery so you don't have to worry about it ever, this is a good option. You can pick up fuse taps here at etrailer.com.For the front camera, there is no trigger wire. If you want to select the front camera, you do so using the buttons on the monitor. Now, you can see here we've got a lot of extra wire. Depending on the length of your motor home, you may have a lot of wire like this too. This is a shorter motor home, so the excessive length that you get here, we can just bundle up and zip tie out of the way. I do however really like that you get so much cable length. This camera system will work with just about all RVs out there without needing additional extensions. Some of your longest ones may require them, but for your average and slightly larger sized ones, there'll be plenty here. So we're just going to take this and we're going to shove it under the dash and zip tie it up out of the way.Then pick out a location to mount your monitor. We've decided to put ours on the dash, a little bit on the passenger side, but close to center. And we've angled it towards the driver. It's a pretty large monitor, so placing it in the center and on the driver's side will likely obstruct the driver's view, so I do highly recommend putting it off towards the passenger side of it.There's a couple of different mounting brackets that you'll receive, to choose some different locations to mount ours. We used the dash mount, which has a double sided adhesive underneath, and there are a couple of holes in it where you can run some self-tapping screws down to further secure it to your dash.The other option you'll get is a wall or ceiling mount that you can put and be able to pivot and rotate it. This is nice if you've got the extra room so you don't have to worry about obstructing your windshield. However, on our particular RV here, there really just wasn't a good location. This kind of puts it a little too far back, makes it hard to see for the driver. You can't really go off to one side because it will interfere with our visors. But it is a good option if you do have the space.The only thing left to do is test it out. We've gone ahead and turned our key on. The system automatically powered up due to how we have it run. You can see here, we're currently looking at, this would be our front camera, but this, on our vehicle, is our lower rear mounted camera. You can cycle through the cameras with the button here, so you just want to make sure they all work. This is our backup camera, the high mounted one. We have our left and right side mount cameras as well.You can also watch multiple monitors at the same time when cycling through. Next, we'll test out our trigger wires. You'll want to try both your blinkers in reverse and make sure you've got those signals. As you can see here, whenever I flick the blinker switch, it switches to each side. And when we put it in reverse, we'll get our backup camera.And that completes our look at RVS' rear view safety backup system.
Customer Reviews
Rear View Safety Backup Camera System - 2 Cameras - RVS-7706135
Average Customer Rating: 4.4 out of 5 stars (22 Customer Reviews)
by: Greg E08/03/2017
I bought a two camera setup, works great! One camera on the 5th wheel hitch, and one on the rear of the trailer. The camera on the trailer is setup to be on all the time I am driving. It really helps for backing up, but it is even better on the road. You can see cars coming up on the trailer and see if they are going to pass.
by: Roger10/20/2022
This system failed after a few months and then neither the manufacturer or etrailer would stand behind the product. This is not a quality product.
by: Andrew11/06/2018
This is an awesome camera setup. I installed this on a 2012 Chevy Express cargo van. I mounted the camera to the top of the 3rd brake light cover and drilled a 3/4" hole to hold the included rubber grommet for the camera wiring. The wiring was simple, I found a fuse that is tied into the ignition switch and used a fuse tap to supply the minimal amps needed. I wired it so the camera is on whenever the vehicle is running, to act as the rear view mirror since the van has no rear windows. This is a high-quality kit and I am very happy with it.
by: Robin10/27/2018
This 2 camera system gives me a full view of the road behind me as well as providing a closeup look at my toad. The backup guide-lines let me drive my 33' Southwind backwards with a trailer without any problem whatsoever.....and I can easily switch between the full-road or close-up modes to check on my trailer/toad when going through dicey road conditions.
Very easy to hook up.....wire your power supply line and plug in the rest.
by: Chad09/11/2018
Still going strong. Great picture quality. I would recommend this if you are looking for and backup camera. Etrailer is a good company to buy from with excellent customer followup on you satisfaction.
by: David12/18/2018
Everything we have purchased has been great!We are very happy with everything.The Sterling towbar,the rear camera are all working great as we start a new adventure.Thank you!
by: Ron L03/21/2017
Recieved my etrailer order yesterday. Received it very quickly, I ordered two items,
a back-up camera system and sensor set-up. Very pleases with what I have seen of it. Will install it this weekend, can't wait.
by: Judy08/02/2018
Haven’t used the camera system yet but it was fast on delivery. The cameras and components look like they are made very well. Customer service dept. works well for the consumer. Thanks and I will give a review when installed.
by: JPIII10/18/2018
I have done business with etrailer for over 5 years. In every case I have found their pricing to be fair and their customer service to be excellent.
by: Shawn 11/14/2019
The camera systems we purchase have been easy to install and use.
by: Marv06/02/2017
Product as advertised. Service excelled fantastic!
by: Rex D07/15/2020
Works very well day or night
by: STEPHEN HOBBS12/19/2016
WHAT A JOY DOING BUSINESS WITH THIS COMPANY, EASY ORDERING, RECEIVED EVERYTHING I ORDERED IN A VERY TIMELY MATTER.
by: Patrick 02/01/2023
by: Shawn10/24/2019
Lots of product options excellent website and fast parts delivery.
by: Mark 02/05/2020
marty is awesome. thanks
by: Steve03/25/2022
by: Joseph06/19/2022
by: Kevin08/09/2021
by: Christopher 06/23/2023
by: Shane 01/14/2022
GREAT JOB
by: Joey 03/09/2023
22
22
See what our Experts say about this Rear View Safety RV Camera System
Info for this part was:

Edited by:
Tyler C

Video Edited:
Jacob T

Updated by:
Mary K

Updated by:
Wilson B

Written by:
Daron K
At etrailer.com we provide the best information available about the products we sell. We take the quality of our information seriously so that you can get the right part the first time. Let us know if anything is missing or if you have any questions.
Product Experts Available Now!
Call 1-800-940-8924
Thank you! Your comment has been submitted successfully. You should be able to view your question/comment here within a few days.
Error submitting comment. Please try again momentarily.