
# 1
Swagman Upright Bike Rack for 1 Bike - Roof Rack Crossbars - Frame Mount
Planning on bringing bikes while camping. I mounted 2 of the Swagman bike racks to my new Sportrack on my pop-up camper. The bikes fit perfectly. The racks seem sturdy enough. Not heavy duty, but for my needs they should be fine. Assembly was relatively fast and easy.

We have used the Swagman Roof Rack a number of times when we have needed the additional bike carrying capacity. It took a couple attempts to get the initial spacing of the bike rack properly balanced on the van’s roof rack as recommended by the instructions. But it was easy to do and once set was very easy and quick to put on and take off. The rack works great, the bike is easy to put into place and secure. The bike and rack are very stable and quiet and haven’t required any mid-trip adjustments. We always put the cheapest bike on the roof (lol) but do use a bit of duct tape to protect the finish just Incase. We are very satisfied with the rack and consider it quite a deal for the money.
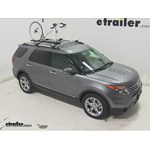
Rhino Rack Road Warrior Roof Bike Racks Review - 2015 Ford Explorer

Today on our 2015 Ford Explorer we are doing a test fit of the Rhino Rack Road Warrior Rooftop Bike Carrier. Part number is RBC036. Now, we already have a bike on our rack, so I am just going to show you a few features on it. This is a fort mounted bike rack, you can see our skewers here. It has a lock for anti-theft. To the back all we have is strap over our back wheel, sitting in our wheel cradle.
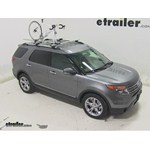
Rhino Rack MountainTrail Roof Bike Racks Review - 2015 Ford Explorer

Today on our 2015 Ford Explorer, we're doing a test bit of the Rhino-Rack MountainTrail Bike Carrier. Part number is RBC035. Now, we have the bike on our rack already. Show you a few things here. This is a fork mounted bike. See there, we have our skewer here, and it has a lock on here for you. Anti-theft.
Thule Sprint Fork Mount Bike Rack Review - 2014 Ford Explorer

Today on our 2014 Ford Explorer we're going to be test fitting the Thule Sprint, a fork mount roof bike rack with part number TH528. With our Thule Rapid Crossroads Roof Rack System already installed on the Explorer, we'll begin our test fit by placing our bike rack directly onto our load bars. As we do this we'll want to bring our black rubber coated metal straps around the underside of our load bars. This will position our foot packs directly on top of them. Here at the front we're going to fit the strap into the foot of the carrier and tighten it using the black lever. With the front secure we'll move to the rear and we can repeat that same tightening process. With our rack secure we're ready to load up our bike.
Thule Big Mouth Roof Bike Rack Review - 2014 Ford Explorer

Today on our 2014 Ford Explorer we're going to be test fitting the Thule Big Mouth, a frame clamp roof Bike Rack with Part number TH599XTR with our Thule Roof Rack System already installed on the Explorer. We'll begin our test fit by placing our bike rack directly on to our load bars. Here at the front we'll remove both of the T-bolts from the lower portion of our clamp, bring both clamps under the underside of our bar, then we'll reinsert the T-bolts and tighten both wing nuts to secure both clamps around our load bar. With the front secure we'll move to the rear. Here we will loosen both wing nuts and remove one completely. We'll then position the clamp so that one bolt will come down on both sides of our load bar, replace the metal flat portion, put the bolt back through the metal flat portion and secure it by tightening down both wing nuts. With our rack secure we're ready to load up our bike. We'll first want to undo our wheel straps and make sure that our center frame clamp is open.
Swagman Upright Roof Mounted Bike Rack Review - 2014 Ford Explorer

Today on our 2014 Ford Explorer, were going to be test fitting the Swagman Upright Roof Bike Rack, part number S64720. With our Thule rapid crossroad roof rack system already installed on the Explorer, well begin our test fit by placing our bike rack directly onto the load bars. Here at the front, were going to bring two of the silver U-bolts around the underside of our load bar, fit it up to the head of our carrier, and thread two wing nuts onto each one.After tightening down all four wing nuts, well have the front of our rack secure. We can now move to the rear load bar. Here were going to bring one of the U-bolts down through the rack, being sure the threaded portion comes out on both sides. Well then place on our black metal plate and thread two wing nuts onto our U-bolt to hold the plate in place.
Swagman Fork Down Roof Bike Rack Review - 2014 Ford Explorer
Today on our 2014 Ford Explorer, we're going to be test fitting the Swagman Fork Down Fork Mount Roof Bike Rack, part # S64710. With our Thule Rapid Crossroads Roof Rack System already installed on the Explorer, we'll begin our test fit by placing our bike rack directly onto our load bars. Here at the front, we're going to bring 2 of the silver U-bolts around the underside of our load bar, fit them up through the head of our carrier, and thread 2 wing nuts onto each one. With all 4 of our wing nuts started, we'll go ahead and tighten them all down. This will secure the front of our bike rack to our roof rack. We'll now move to the rear. Here, we're going to place 1 U-bolt down through the rack, being sure that the threaded portion comes out on both sides of the load bar. We'll then place on the flat black metal plate and thread 2 wing nuts on to hold this place.
RockyMounts TieRod Stretch Roof Bike Rack Review - 2014 Ford Explorer
Speaker: Today on our 2014 Ford Explorer, were going to be test fitting the RockyMounts TieRod Stretch, a fork mount roof bike rack with part number RKY1011. With our Thule Rapid Crossroads Roof Rack System already installed on the Explorer, were going to begin our test fit by placing our bike rack directly onto our load bars. Here at the front, well bring the two black rubber coated metal straps around the underside of our load bar as we do so. Well then remove the black plastic cover, fit those straps back into the head of our carrier and tighten down the Allen bolt located on the front with an Allen key to secure it. With our straps tight, well now replace our black plastic cover and move to the rear clamp. Here, well remove one of the Allen bolts completely and loosen the other. Well bring the black plastic portion of the clamp around the underside of our load bar, reinsert the Allen bolt and thread it in. Well then take an Allen key and tighten both of our bolts down. With our front and rear secure, lets take a look at the rear hatch to see what kind of access we have.
Kuat TRIO Roof Bike Rack Review - 2014 Ford Explorer

Today on our 2014 Ford Explorer, we're going to be test fitting the Kuat Trio, the fork-mount roof bike rack with part number RU01. With our Thule Rapid Crossroads roof rack system already installed on the Explorer, we'll begin our test fit by placing our bike rack directly onto our load bars. Here at the front, we'll bring the two black rubber-coated metal U-bolts around the underside of our load bar, fit them up near the head of our carrier, and thread two cylinder nuts onto each one. We'll then take the provided awling tool and tighten all four of these cylinder nuts down, securing the front of our rack to our vehicle. We'll now move to the rear. Here, we're going to loosen both wing nuts and remove one completely. We'll then position the clamp so we have one bolt in front of our load bar and one bolt behind it.
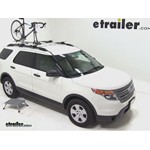
Rhino Rack MountainTrail Roof Bike Racks Review - 2013 Ford Explorer

Today on our 2013 Ford Explorer we're gonna be test fitting the Rhino Rack MountainTrail rooftop bike rack, part number RBC035. We already have a bike installed on the rack, let's take a closer look and show off some of the features. How the bike attaches to the rack, we're not gonna have any frame contact at all, instead we're going to have this wheel strap at the rear, which is adjustable the length of the bike rack to accommodate bikes of different sizes. Closer to the front, we have this skewer that will grip your bike by the fork mounts and hold it in place and this has a lock on it already so you can actually secure your bike to the bike rack once everything's installed properly. With everything installed as it is, we're not gonna have any issues of clearance between our rear hatch and the bike rack as you can see here, there's plenty of space. So, let's go ahead and take the bike off and set it aside. To do that, we'll first release the rear strap by pushing in the top portion of the tab and pushing up. Then going up towards the front, while holding onto the bike so it doesn't fall into the vehicle, we'll release front skewer mount, like so, and grab our bike. How this actually attaches to the roof rack, we're going to have this padded bracket here with the two turn knobs to tighten up against our rear crossbar.
Swagman Fork Down Roof Bike Rack Review - 2013 Ford Explorer

Today we have a 2013 Ford Explorer and we're going to be test fitting the Swagman Fork Style Roof Mounted Bike Carrier, part number s64710. To install the bike rack to the carrier place the bike rack up on top of our load bars. At the front we'll fit the two U-bolts around our load bars and use the wing nuts to secure the front of the bike rack.Next we'll move to the back of the bike carrier fitting the U-bolt through the carrier from the top. We'll take the clamp and two wing nuts to clamp around the bar from the bottom. With that done our bike rack is secure and we're ready to load up our bike. We'll make sure that the wheel strap at the rear of the bike carrier is undone and also make sure that the skewer at the front of the bike is open.We'll pick up our bike, place the wheel into the wheel tray and fit the front fork down into our skewer.
Thule Domestique Roof Bike Rack Review - 2011 Ford Explorer

Today on our 2011 Ford Explorer we'll be test fitting the Thule Domestique Roof Top Bike Carrier, part number TH513. With our vehicle equipped with the Thule AeroBlade crossbars and our Domestique preassembled, we're ready to fit it to the vehicle. We'll simply set the Domestique on top of the crossbars. We'll line up the head of the bike carrier with the front crossbar and adjust the rear mounting point to the rear crossbar of our vehicle. We can then take the front head cover, bring it underneath the front crossbar and tighten it down using the Allen wrench included with the bike rack. After the front head is tight, we can move to the rear attachment point and bring the clamp underneath the rear load bar and tighten it down using the included hardware.
RockyMounts TieRod Roof Bike Rack Review - 2011 Ford Explorer
Today on our 2011 Ford Explorer well be test fitting the RockyMounts TieRod Roof Mounted Bike Rack, part number RKY1014. Now our vehicle is equipped with the Thule AeroBlade roof rack system and our roof rack is preassembled so we are ready to go ahead and fit it to the vehicle. Well take the head of the bike rack and put it directly over the top of the front cross bar, we can then bring the rubber coated steel straps around and secure them back to the head of the bike rack. Well then come to the rear mounting point and line it directly over the top of the rear crossbar where we can secure it using the included wing nuts provided with the bike rack. With our rear mount secured we can move on to the head, tightening down the Allen bolt, which will secure it to the front cross bar. And with the head of the bike rack secured well install the head cover, which will complete the bike rack and make it ready to load a bike.


What our customers are saying:
"I purchased a hitch, wiring harness, bike carrier and bike adapter for a newly redesigned 2007 Hyundai Santa Fe. Everything arrived in a matter of days and either fit or worked perfectly. Great prices, quality and service support. Rest assured, I'll be recommending you to anyone who asks. Thanks again."