
Most Popular Roof Bike Racks for 2013 Toyota Highlander
change vehicle# 1
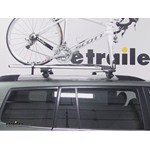
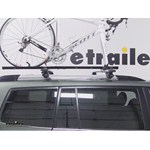
Swagman Upright Bike Rack for 1 Bike - Roof Rack Crossbars - Frame Mount

- view all Roof Bike Racks
- Frame Mount
- 15mm Fork
- 15mm Thru-Axle
- 20mm Thru-Axle
- 5mm Fork
- 9mm Fork
- 9mm Thru-Axle
- Bike Lock
- Factory Bars
- Round Bars
- Square Bars
- Disc Brake Compatible
- Clamp On - Standard
- Black
- Swagman
More Information >
by: Don S.05/18/2011
Great "universal" rack for a lot less $ than other brands. With just minimal knowledge of nuts, bolts and spacers this rack can easily be attached to a slightly curved roof rack, like my toyta highlander.
View More
View Less
by: Andres 10/22/2016
Work as advertised. Easy to fit to a caf roof rack. I work buy again.
View More
View Less
Bike Rack Videos
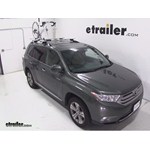
Thule Domestique Roof Bike Rack Review - 2013 Toyota Highlander
Today on our 2013 Toyota Highlander well be test fitting the Thule Domestique Fork-Mount Bike Carrier part number th513. For easier installation, I already removed the skewer at the front and removed the bracket at the front. With the Thule Aeroblade Roof-Racking System assembled onto our vehicle. Well begin out test fit by placing the Domestique directly on top of our load bars. Ill fit our front bracket around our front load bar making sure that the bolts goes through the brackets and tightened with an Allen Key. Once I have the bracket tight Ill go ahead and reinstall the skewer.Here at the rear well bring our clamp around our rear load bar, run the bolt through and tighten with a Allen key.
RockyMounts TieRod Stretch Roof Bike Rack Review - 2013 Toyota Highlander
Today on our 2013 Toyota Highlander well be test fitting the RockyMounts Tierod Stretch Roof Mounted Bike Carrier, part number rky1011. With a Thule Aeroblade roof rack system assembled on to our vehicle, well being our test fit by placing our carrier directly on to our load bars. Well remove the black plastic cover at the front and bring our rubber-coated straps around our front load bar fitting them back into the head of the carrier. Well go ahead and move to the rear and fit our rear bracket around our rear load bar. Well use an Allen key at the front of the carrier to tighten the Allen bolt which will tighten down our straps. We can replace our black plastic cover and then move to the rear and tighten down the bolts to tighten down our rear clamp.
Swagman Fork Down Roof Bike Rack Review - 2013 Toyota Highlander
Today on our 2013 Toyota Highlander, well be test-fitting the Fork Style Roof Mounted Bike Rack from Swagman, part number S64710. With the Thule Aeroblade Roof Rack system assembled on to our vehicle, well begin the test-fit by placing our carrier directly on to our load bars. Once we have it situated well begin at the front by bringing our U-bolts up under our load bar through our bracket and tighten with wing nuts on top of our platform at the front. Well repeat the same process for the other side of our front bracket platform. Once we have those wing nuts tightened we can then move on to the rear where well drop the U-bolt through the top of our carrier around our load bar and well make sure the U-bolt is through the black bracket with the flat side against the carrier. Then well use the wing nuts to tighten it and secure the rear part of our carrier.
2013 Toyota Highlander Bike Rack Questions
- Rola T-Slot equipped crossbars are intended for Rola accessories but will also work with other brands of similar roof-rack-mount accessories. Since the different brands do not test with each others products there may be instances where a particular T-slot accessory from one maker may not work ideally with the Rola crossbars, but usually we find that these similar systems are compatible. I have included a photo of a Rola T-Slot crossbar showing the dimensions of the slot, which...
view full answer...


What our customers are saying:
"I ordered a trailer hitch and a bike rack carrier the order was shipped with in three days. To put the hitch on only took about 30 mins. only had to drill two 1/2 holes. fit like a glove."